8 Turning On the TV/VCR

Before you turn on the TV/VCR, make sure batteries are in the remote control and the TV/VCR is hooked up correctly.

The instructions on this page work only when you turn on the TV/VCR for the first time.

1

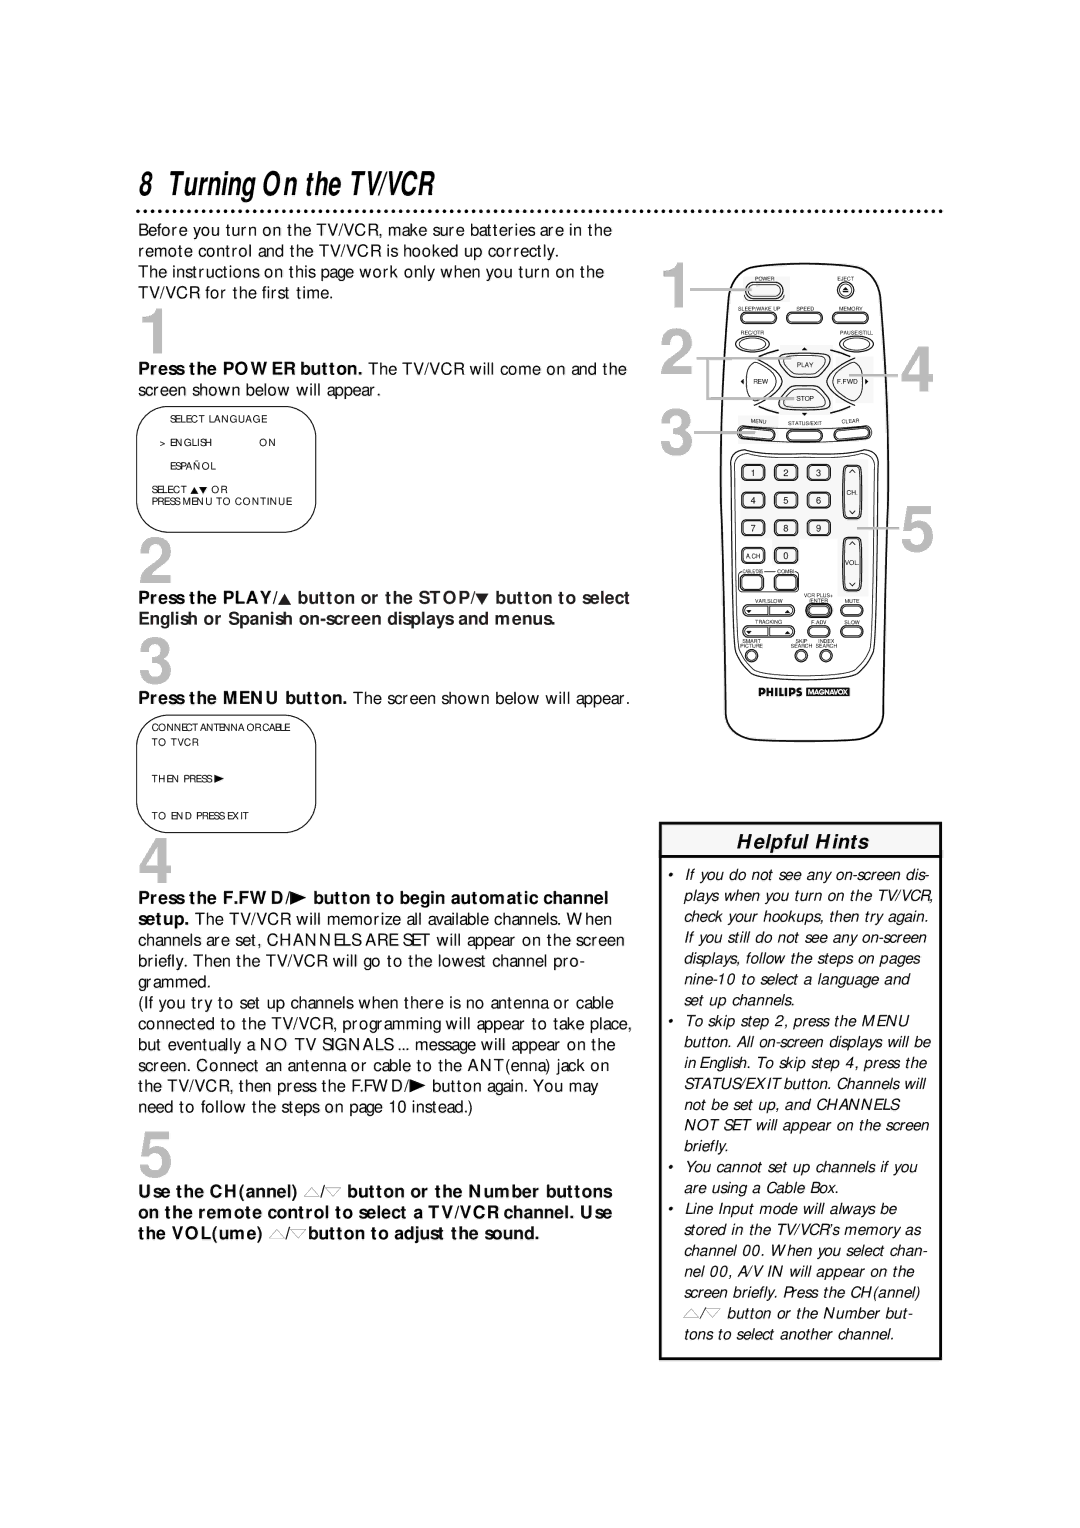
Press the POWER button. The TV/VCR will come on and the screen shown below will appear.

SELECT LANGUAGE

> ENGLISH

ON

1

2

3

POWER


SLEEP/WAKE UP

SPEED

REC/OTR


PLAY

REW


STOP

MENU

STATUS/EXIT

EJECT


MEMORY


PAUSE/STILL

4

F.FWD

CLEAR


ESPAÑOL

SELECT KL OR

PRESS MENU TO CONTINUE

2

Press the PLAY/K button or the STOP/L button to select

English or Spanish on-screen displays and menus.

3

Press the MENU button. The screen shown below will appear.

CONNECT ANTENNA OR CABLE

TO TVCR

THEN PRESS B

TO END PRESS EXIT

4

Press the F.FWD/B button to begin automatic channel setup. The TV/VCR will memorize all available channels. When channels are set, CHANNELS ARE SET will appear on the screen briefly. Then the TV/VCR will go to the lowest channel pro- grammed.

(If you try to set up channels when there is no antenna or cable connected to the TV/VCR, programming will appear to take place, but eventually a NO TV SIGNALS ... message will appear on the screen. Connect an antenna or cable to the ANT(enna) jack on the TV/VCR, then press the F.FWD/B button again. You may need to follow the steps on page 10 instead.)

5

Use the CH(annel) m/n button or the Number buttons on the remote control to select a TV/VCR channel. Use the VOL(ume) m/nbutton to adjust the sound.

1

2

3


4

5

6

CH.

5


7

8

9


A.CH

0


VOL.

CABLE/DBS

COMBI


VCR PLUS+


VAR.SLOW

/ENTER

MUTE


TRACKING

F.ADV

SLOW


SMART


SKIP INDEX


PICTURE


SEARCH SEARCH


Helpful Hints

If you do not see any on-screen dis- plays when you turn on the TV/VCR, check your hookups, then try again. If you still do not see any on-screen displays, follow the steps on pages nine-10 to select a language and set up channels.

To skip step 2, press the MENU button. All on-screen displays will be in English. To skip step 4, press the STATUS/EXIT button. Channels will not be set up, and CHANNELS NOT SET will appear on the screen briefly.

You cannot set up channels if you are using a Cable Box.

Line Input mode will always be stored in the TV/VCR’s memory as channel 00. When you select chan- nel 00, A/V IN will appear on the screen briefly. Press the CH(annel) m/n button or the Number but- tons to select another channel.

Page 8
Image 8
Philips CCA194AT Turning On the TV/VCR, Press the Menu button. The screen shown below will appear, Select Language English

CCA194AT specifications

The Philips CCA194AT is a compelling accessory in the realm of consumer electronics, specifically designed to enhance the audio experience for users with various devices. Known for its blend of functionality and advanced technology, the CCA194AT is an adapter that bridges the gap between traditional wired connections and modern digital devices.

One of the main features of the Philips CCA194AT is its versatility. This adapter is equipped with a 3.5mm audio jack, which can be utilized with a range of devices including smartphones, tablets, laptops, and even older audio systems. This compatibility makes it an ideal choice for users who seek to integrate their devices without the hassle of dealing with multiple connectors.

The adapter also incorporates advanced digital-to-analog conversion technology, ensuring that the audio quality is preserved during the transition from digital signals to analog. With a high-resolution processing capability, users can expect clear and robust sound output, minimizing distortion and enhancing overall listening pleasure. This feature is particularly appealing for audiophiles who value sound fidelity in their music playback.

Another standout characteristic of the Philips CCA194AT is its compact and portable design. Lightweight and easy to carry, it fits effortlessly into bags or pockets, making it perfect for users on the go. Whether commuting, traveling, or simply enjoying time outdoors, the convenience of this adapter cannot be overstated.

Durability is also an essential aspect of the CCA194AT. Built with quality materials, the adapter is designed to withstand everyday use while maintaining its performance. The robust construction helps ensure that it can endure the rigors of frequent connectivity while providing reliable service over time.

Additionally, the Philips CCA194AT features a user-friendly plug-and-play design, eliminating the need for complex setups or installation processes. Users can connect the adapter and start enjoying their audio content immediately, which is especially appealing for those who prefer quick and efficient solutions.

In conclusion, the Philips CCA194AT represents a thoughtful blend of technology, functionality, and durability. With its versatility, superior audio quality, portability, and ease of use, it is an essential accessory for anyone looking to enhance their audio experience across various devices. The Philips CCA194AT is a testament to the brand's commitment to delivering innovative solutions to meet the evolving needs of consumers.