1 Connections
Start with the “Basic Connection”.
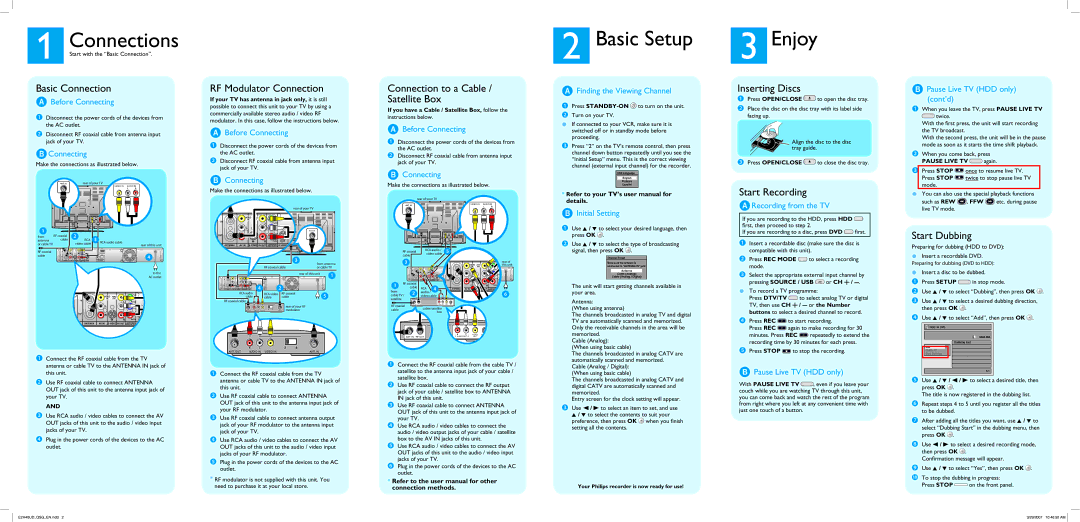
Basic Connection
ABefore Connecting
❶Disconnect the power cords of the devices from the AC outlet.
❷Disconnect RF coaxial cable from antenna input jack of your TV.
BConnecting
Make the connections as illustrated below.
VIDEO IN AUDIO IN
L R
1 | | | | 2 | | | | | | | | | | |
from | RF coaxial | | | | | | 3 | | | | | | |
antenna | cable | | | | | | RCA | RCA audio cable | | | |
| | | | | | | | |
or cable TV | | | | video cable | | | | | | | rear of this unit |
| | | | | | | | | | | | | |
| | VIDEO VIDEO | | Y | | | | | | | | |
RF coaxial | IN | | IN | OUT | | | | HDMI OUT | | | | | |
| | | L | PB/CB | | | | | | | |
| | | | | | | | | | | | |
cable | | L | | | | | | | | | | | | 4 |
OUT | R | | IN | R | PR/CR OUT | COAXIAL OPTICAL | | | | |
| ANTENNA | AV IN | S-VIDEO AV OUT | COMPONENT | S-VIDEO | | DIGITAL AUDIO OUTPUT | | | | | |
| VIDEO OUTPUT | | PCM / BITSTREAM | | | | | |
| | | | | | | | | | | | | | to the |
| | | | | | | | | | | | | | AC outlet |
| | | | | | | | | VIDEO | VIDEO | | | |
| | | | | | IN | | | | IN | OUT | | | |
| | | | | | | | | | | L | PB/CB | |
| | | | | | | | | | | | |
| | | | | | | | | | L | | | | |
| | | | | OUT | | | | R | | | | |
| | | | | | | | | | | | | |
| | | | | | | | | | | IN | R | PR/CR OUT |
| | | | | | ANTENNA | AV IN | S-VIDEO AV OUT | VIDEOCOMPONENTOUTPUT | S-VIDEO |
❶Connect the RF coaxial cable from the TV antenna or cable TV to the ANTENNA IN jack of this unit.
❷Use RF coaxial cable to connect ANTENNA OUT jack of this unit to the antenna input jack of your TV.
AND
❸Use RCA audio / video cables to connect the AV OUT jacks of this unit to the audio / video input jacks of your TV.
❹Plug in the power cords of the devices to the AC outlet.
RF Modulator Connection
If your TV has antenna in jack only, it is still possible to connect this unit to your TV by using a commercially available stereo audio / video RF modulator. In this case, follow the instructions below.
ABefore Connecting
❶Disconnect the power cords of the devices from the AC outlet.
❷Disconnect RF coaxial cable from antenna input jack of your TV.
BConnecting
Make the connections as illustrated below.
| | | | | | | | | | rear of your TV | |
| | | | VIDEO | VIDEO | | | | | |
IN | | | | | IN | OUT | | | | | |
| | | | | | L | PB/CB | | | |
| | | | | | | | | |
| | | | L | | | | | | |
| | | | | | | | | | ANT. IN | |
OUT | | | | R | | | | | | |
| | | | | | | | | |
| | | | | | IN | R | PR/CR | OUT | | |
ANTENNA | | AV IN | S-VIDEO AV OUT VIDEOCOMPONENTOUTPUT | S-VIDEO | | |
| | | | | | | | | | 3 | |
| | | | | | | | | | from antenna |
| | | | | | | RF coaxial cable | or cable TV |
| | | | | | | | | | rear of this unit | 1 |
| VIDEO VIDEO | | Y | | | | | | |
IN | | IN OUT | | | | | | | | |
| | L | PB/CB | | | | | | | |
| | | | | HDMI OUT | | | | |
| L | | | | | | | | | | |
OUT | R | | | | | | | | 2 | | |
| | | | | | | | | |
| | IN | R | PR/CR OUT | | COAXIAL OPTICAL | | | |
ANTENNA | AV IN | S-VIDEO AV OUT | COMPONENT | S-VIDEO | | DIGITAL AUDIO OUTPUT | | | |
VIDEO OUTPUT | | 4PCM / BITSTREAM | | | |
RCA audio | RCA video | RF coaxial | 5 |
cable | cable | cable |
RF coaxial cable | | | |
| | rear of your RF | |
ANT. OUT AUDIO IN | VIDEO IN | ANT. IN modulator | |
R L | 3 4 | | |
| R | L | 3 | 4 |
ANT. OUT | AUDIO IN VIDEO IN | | ANT. IN |
❶Connect the RF coaxial cable from the TV antenna or cable TV to the ANTENNA IN jack of this unit.
❷Use RF coaxial cable to connect ANTENNA OUT jack of this unit to the antenna input jack of your RF modulator.
❸Use RF coaxial cable to connect antenna output jack of your RF modulator to the antenna input jack of your TV.
❹Use RCA audio / video cables to connect the AV OUT jacks of this unit to the audio / video input jacks of your RF modulator.
❺Plug in the power cords of the devices to the AC outlet.
*RF modulator is not supplied with this unit. You need to purchase it at your local store.
Connection to a Cable / Satellite Box
If you have a Cable / Satellite Box, follow the
instructions below.
ABefore Connecting
❶Disconnect the power cords of the devices from the AC outlet.
❷Disconnect RF coaxial cable from antenna input jack of your TV.
BConnecting
Make the connections as illustrated below.
rear of your TV
| ANT. IN | VIDEO IN AUDIO IN |
| L | R |
| |
| RF coaxial | RCA audio / | 5 | | | | | | |
| video cable | | | | | | |
| cable | | | | | | |
| | | | | | | | | | |
| | 3 | | | | | | | | | | rear of |
| | | | | | | VIDEO | VIDEO | | Y | this unit |
| | | | | | IN | | IN | OUT | | | |
| | | VIDEO VIDEO | | Y | | | | L | PB/CB | |
| | IN | IN OUT | L | PB/CB | | | | | |
| | | HDMI OUT | | | | | |
| | | L | | | | | L | | | | |
| | | | | | | | | | | |
| | OUT | R | | | | | | | | | |
| | | | | | | | | | | |
| | | IN | R | PR/CR OUT | COAXIAL OPTICAL | | | | | | |
| | | | | COMPONENT | DIGITAL AUDIO OUTPUT | | | | | | |
| | ANTENNA | AV IN S-VIDEO AV OUT | VIDEO OUTPUT S-VIDEO | OUT | | | | | | |
| | PCM / BITSTREAM | | R | | | | |
1 | RF coaxial | | | | | | | | | |
| | | | | | IN | R | PR/CR OU |
| cable | RCA | | 4 | | | |
from | | | ANTENNA | AV IN | S-VIDEO AV OUT | VIDEOCOMPONENTOUTPUT | S-VID |
| 2 | audio / | | | | | | | | 6 |
cable TV / | video cable | | | | | | |
satellite | | | | | | | | | | | | |
RF coaxial | ANT. IN RF OUT | R L | VIDEO | S-VIDEO | | | |
AUDIO OUT | OUT | OUT | | | |
| cable/satellite | | | | | |
cable | | | | | | |
| box | | | | | |
| | | | | | |
| | | N | R | L | VIDEO | S-VIDE |
| ANT. IN RF OUT | AUDIO OUT | OUT | OUT |
❶Connect the RF coaxial cable from the cable TV / satellite to the antenna input jack of your cable / satellite box.
❷Use RF coaxial cable to connect the RF output jack of your cable / satellite box to ANTENNA IN jack of this unit.
❸Use RF coaxial cable to connect ANTENNA OUT jack of this unit to the antenna input jack of your TV.
❹Use RCA audio / video cables to connect the audio / video output jacks of your cable / satellite box to the AV IN jacks of this unit.
❺Use RCA audio / video cables to connect the AV OUT jacks of this unit to the audio / video input jacks of your TV.
❻Plug in the power cords of the devices to the AC outlet.
*Refer to the user manual for other connection methods.
2 Basic Setup
AFinding the Viewing Channel
❶Press STANDBY-ON to turn on the unit.
❷Turn on your TV.
If connected to your VCR, make sure it is switched off or in standby mode before proceeding.
❸Press “2” on the TV’s remote control, then press channel down button repeatedly until you see the “Initial Setup” menu. This is the correct viewing
channel (external input channel) for the recorder.
OSD Language
English
Français
Español
*Refer to your TV’s user manual for details.
BInitial Setting
❶Use K / L to select your desired language, then press OK  .
.
❷Use K / L to select the type of broadcasting signal, then press OK  .
.
Channel Preset
Make sure the antenna is connected to “ANTENNA IN” jack.
Antenna
Cable (Analog)
Cable (Analog / Digital)
The unit will start getting channels available in your area.
Antenna:
(When using antenna)
The channels broadcasted in analog TV and digital TV are automatically scanned and memorized. Only the receivable channels in the area will be memorized.
Cable (Analog):
(When using basic cable)
The channels broadcasted in analog CATV are automatically scanned and memorized.
Cable (Analog / Digital): (When using basic cable)
The channels broadcasted in analog CATV and digital CATV are automatically scanned and memorized.
Entry screen for the clock setting will appear.
❸Use { / B to select an item to set, and use
K / L to select the contents to suit your preference, then press OK  when you finish setting all the contents.
Your Philips recorder is now ready for use!
3 Enjoy
Inserting Discs
❶Press OPEN/CLOSE  to open the disc tray.
❷Place the disc on the disc tray with its label side facing up.
 Align the disc to the disc tray guide.
❸Press OPEN/CLOSE  to close the disc tray.
Start Recording
ARecording from the TV
If you are recording to the HDD, press HDD  first, then proceed to step 2.
If you are recording to a disc, press DVD  first.
❶Insert a recordable disc (make sure the disc is compatible with this unit).
❷Press REC MODE to select a recording mode.
❸Select the appropriate external input channel by pressing SOURCE / USB or CH
or CH  /
/  .
.
To record a TV programme:
Press DTV/TV to select analog TV or digital TV, then use CH
  /
/  or the Number buttons to select a desired channel to record.
❹Press REC to start recording.
Press REC again to make recording for 30 minutes. Press REC
  repeatedly to extend the recording time by 30 minutes for each press.
❺Press STOP to stop the recording.
BPause Live TV (HDD only)
With PAUSE LIVE TV  , even if you leave your couch while you are watching TV through this unit, you can come back and watch the rest of the program from right where you left at any convenient time with just one touch of a button.
BPause Live TV (HDD only)
(cont’d)
❶When you leave the TV, press PAUSE LIVE TV  twice.
With the first press, the unit will start recording the TV broadcast.
With the second press, the unit will be in the pause mode as soon as it starts the time shift playback.
❷When you come back, press
PAUSE LIVE TV  again.
❸Press STOP  once to resume live TV. Press STOP
  twice to stop pause live TV mode.
You can also use the special playback functions
such as REW  , FFW
, FFW  etc. during pause live TV mode.
Start Dubbing
Preparing for dubbing (HDD to DVD):
Insert a recordable DVD.
Preparing for dubbing (DVD to HDD):
Insert a disc to be dubbed.
❶Press SETUP  in stop mode.
❷Use K / L to select “Dubbing”, then press OK  .
.
❸Use K / L to select a desired dubbing direction, then press OK  .
.
❹Use K / L to select “Add”, then press OK  .
.

 HDD
HDD  DVD
DVD
3000 MB
Dubbing List
Add
Delete All
Start Dubbing
1/1
❺Use K / L / s / B to select a desired title, then press OK  .
.
The title is now registered in the dubbing list.
❻Repeat steps 4 to 5 until you register all the titles to be dubbed.
❼After adding all the titles you want, use K / L to select “Dubbing Start” in the dubbing menu, then press OK  .
.
❽Use s / B to select a desired recording mode, then press OK  .
.
Confirmation message will appear.
❾Use K / L to select “Yes”, then press OK  .
.
0To stop the dubbing in progress:
Press STOP  on the front panel.