1Connect
Before connecting
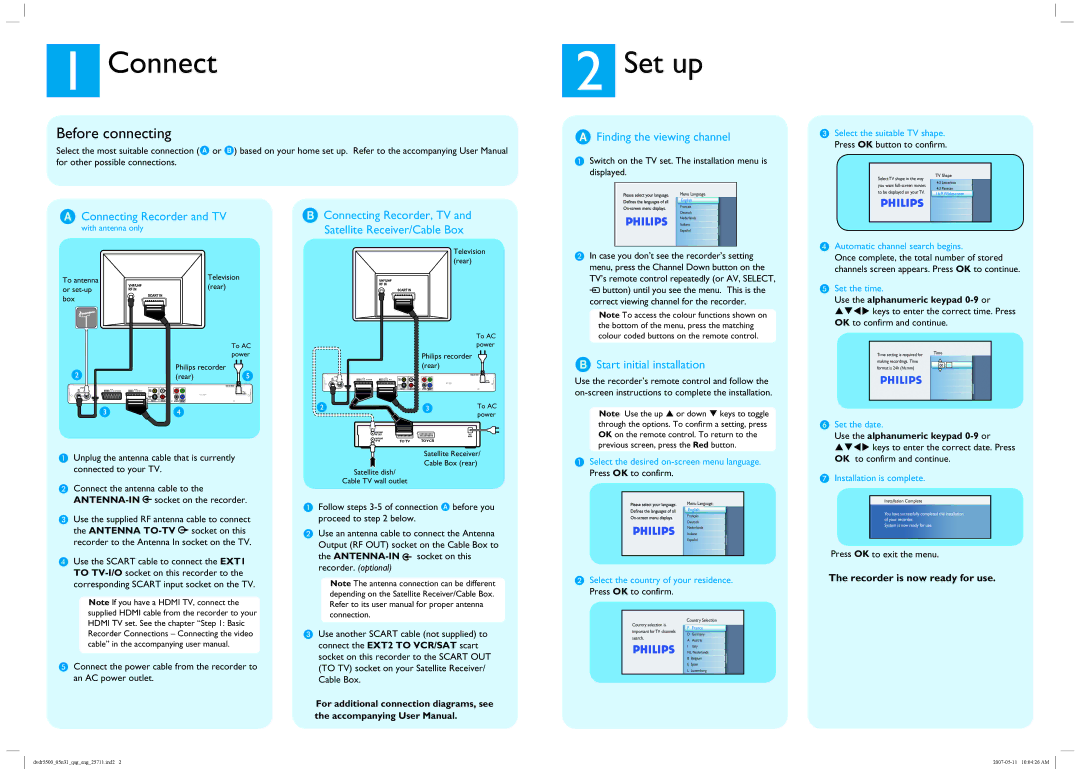
Select the most suitable connection (A or B) based on your home set up. Refer to the accompanying User Manual for other possible connections.
A Connecting Recorder and TV | B Connecting Recorder, TV and | |
with antenna only |
| Satellite Receiver/Cable Box |
|
| Television |
|
| (rear) |
To antenna | Television |
|
(rear) |
| |
or |
| |
|
| |
box |
|
|
2Set up
AFinding the viewing channel
ASwitch on the TV set. The installation menu is displayed.
Menu Language
English
Français
Deutsch
Nederlands
Italiano
Español
BIn case you don’t see the recorder’s setting menu, press the Channel Down button on the TV’s remote control repeatedly (or AV, SELECT, ° button) until you see the menu. This is the correct viewing channel for the recorder.
Note To access the colour functions shown on the bottom of the menu, press the matching
CSelect the suitable TV shape. Press OK button to confirm.
Select TV shape in the way | TV Shape | |
4:3 Letterbox | ||
you want | ||
4:3 Panscan | ||
to be displayed on your TV. | ||
16:9 Widescreen |
DAutomatic channel search begins.
Once complete, the total number of stored channels screen appears. Press OK to continue.
ESet the time.
Use the alphanumeric keypad 0-9 or
STWX keys to enter the correct time. Press OK to confirm and continue.
To AC power
Philips recorder (rear)
|
|
|
|
|
|
|
| 3139 241 25451 |
| ANTENNA |
|
|
|
| P | Y |
|
TO TV | IN | EXT2 | TO VCR/SAT | EXT1 | TO TV | VIDEO |
|
|
(CVBS) |
|
| ||||||
|
|
|
|
|
|
| P | MAINS |
|
|
|
|
|
|
|
| |
|
|
|
|
|
| (Y/C) |
|
|
HDMI OUT | VIDEO OUT | AUDIO OUT | COAXIAL | COMPONENT |
| (DIGITAL OUT) | VIDEO OUT |
| ANTENNA |
TO TV | IN |
HDMI OUT
To AC power
Philips recorder (rear)
3139 241 25451
EXT2 | TO VCR/SAT | EXT1 | TO TV | VIDEO |
(CVBS) |
![]()
![]() MAINS
MAINS
(Y/C)
VIDEO OUT | AUDIO OUT | COAXIAL | COMPONENT |
| VIDEO OUT |
To AC power
colour coded buttons on the remote control.
BStart initial installation
Use the recorder’s remote control and follow the
Note Use the up S or down T keys to toggle through the options. To confirm a setting, press OK on the remote control. To return to the
Time setting is required for | Time | |||
|
|
|
| |
making recordings. Time |
|
|
|
|
format is 24h (hh:mm) |
| 00 | : | 00 |
|
|
|
| |
F Set the date. |
Use the alphanumeric keypad |
AUnplug the antenna cable that is currently connected to your TV.
BConnect the antenna cable to the ![]() socket on the recorder.
socket on the recorder.
CUse the supplied RF antenna cable to connect the ANTENNA ![]() socket on this recorder to the Antenna In socket on the TV.
socket on this recorder to the Antenna In socket on the TV.
DUse the SCART cable to connect the EXT1 TO
Note If you have a HDMI TV, connect the supplied HDMI cable from the recorder to your HDMI TV set. See the chapter “Step 1: Basic Recorder Connections – Connecting the video cable” in the accompanying user manual.
EConnect the power cable from the recorder to an AC power outlet.
TOTV TOVCR
Satellite Receiver/
Cable Box (rear)
Satellite dish/
Cable TV wall outlet
AFollow steps
BUse an antenna cable to connect the Antenna Output (RF OUT) socket on the Cable Box to
the ![]() socket on this recorder. (optional)
socket on this recorder. (optional)
Note The antenna connection can be different depending on the Satellite Receiver/Cable Box. Refer to its user manual for proper antenna connection.
CUse another SCART cable (not supplied) to connect the EXT2 TO VCR/SAT scart socket on this recorder to the SCART OUT (TO TV) socket on your Satellite Receiver/ Cable Box.
For additional connection diagrams, see the accompanying User Manual.
previous screen, press the Red button.
ASelect the desired
Menu Language
English
Français
Deutsch
Nederlands
Italiano
Español
BSelect the country of your residence. Press OK to confirm.
Country selection is | Country Selection | ||
F | France | ||
important for TV channels | |||
D Germany | |||
search. | |||
A | Austria | ||
| |||
| I | Italy | |
| NL Nederlands | ||
| B | Belgium | |
| E | Spainr | |
| L Luxemborg | ||
STWX keys to enter the correct date. Press |
OK to confirm and continue. |
G Installation is complete. |
Installation Complete
You have successfully completed the installation of your recorder.
System is now ready for use.
Press OK to exit the menu.
The recorder is now ready for use.
dvdr5500_05n31_qsg_eng_25711.ind2 2 |