Connecting the DVD recorder

Connecting to the TV

Choose from the following connections:

Connection with Component (Y Pb Pr) cable

Connection with S

Connection with Video (CVBS) cable

Connection with the antenna cable only

Connection with Component (Y Pb Pr)

cable

Component Video is the highest quality system for transmitting video by splitting the video signal into the Y (brightness), U and V (red minus brightness, blue minus brightness) components. The signals are sent over separate lines. The plugs for these cables and the corresponding jacks are usually red, green, and blue.

In addition, the signal can be 'interlaced' or use 'progressive scan.'

Interlaced

The regular video/TV signal is interlaced, i.e. the even and odd lines are formed as half pictures in an alternate fashion.

Progressive scan

With progressive scan, each picture is structured (approx. 50/60 times per second depending on the TV system) as a complete picture, i.e. the even and odd lines are formed together. Disruptive picture flickering is avoided as is the case with 100 Hz TV devices.

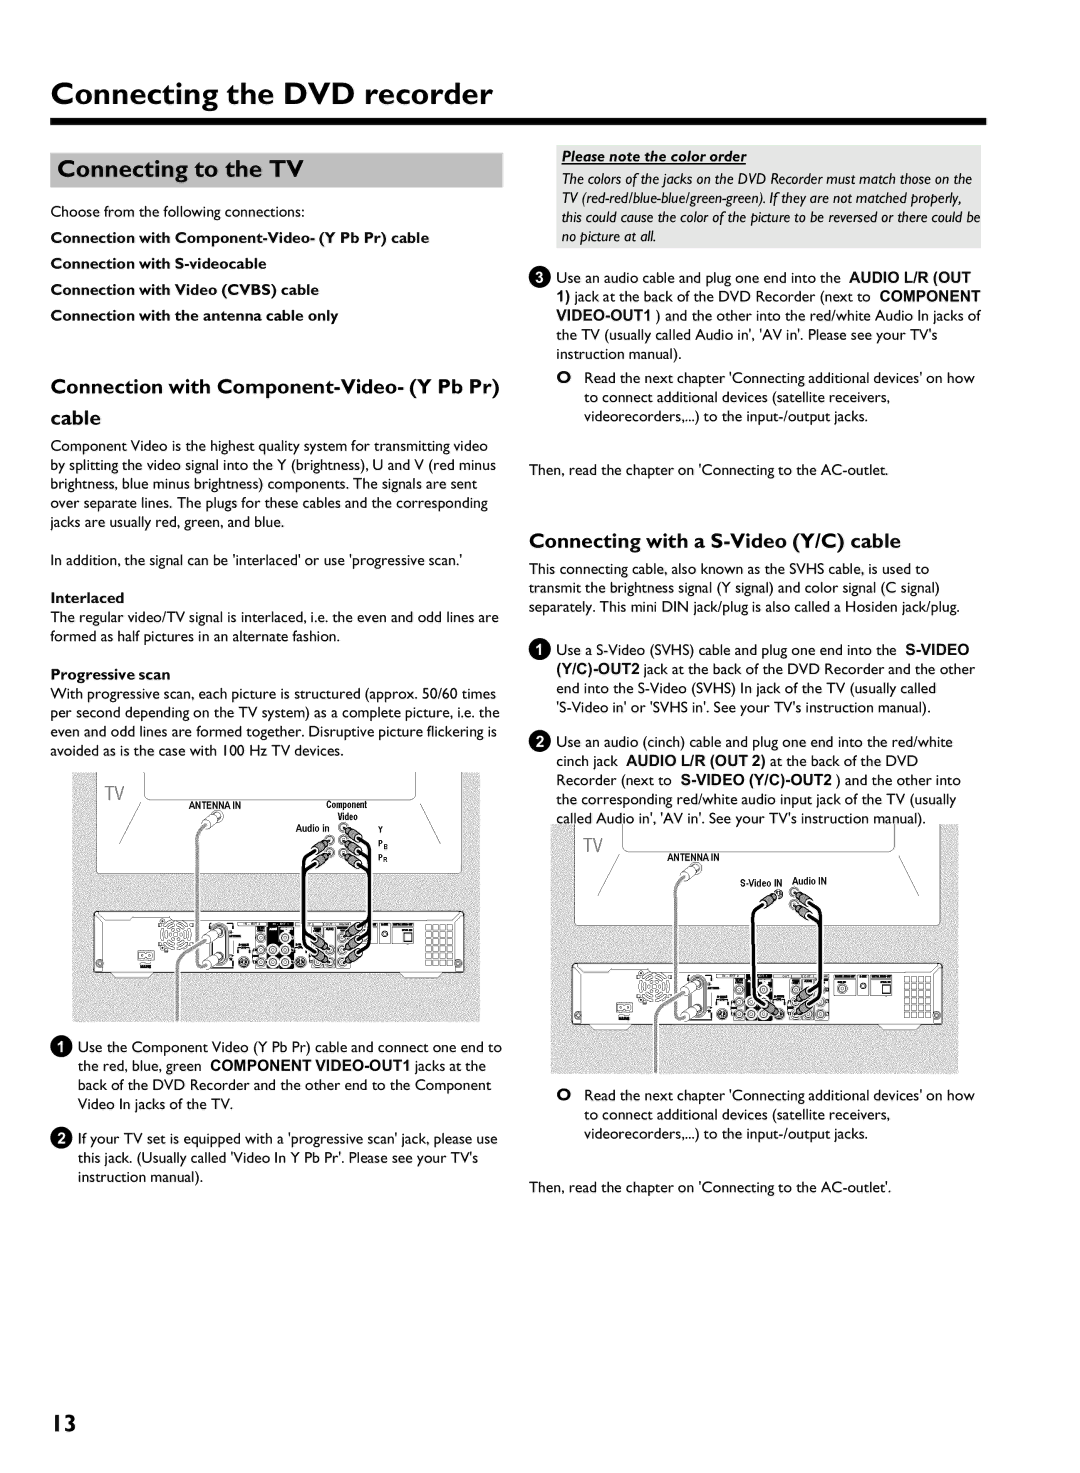
1Use the Component Video (Y Pb Pr) cable and connect one end to the red, blue, green COMPONENT VIDEO-OUT1jacks at the back of the DVD Recorder and the other end to the Component Video In jacks of the TV.

2If your TV set is equipped with a 'progressive scan' jack, please use this jack. (Usually called 'Video In Y Pb Pr'. Please see your TV's instruction manual).

Please note the color order

The colors of the jacks on the DVD Recorder must match those on the TV (red-red/blue-blue/green-green). If they are not matched properly, this could cause the color of the picture to be reversed or there could be no picture at all.

3Use an audio cable and plug one end into the AUDIO L/R (OUT 1) jack at the back of the DVD Recorder (next to COMPONENT VIDEO-OUT1) and the other into the red/white Audio In jacks of the TV (usually called Audio in', 'AV in'. Please see your TV's instruction manual).

ORead the next chapter 'Connecting additional devices' on how to connect additional devices (satellite receivers, videorecorders,...) to the input-/output jacks.

Then, read the chapter on 'Connecting to the AC-outlet.

Connecting with a S (Y/C) cable

This connecting cable, also known as the SVHS cable, is used to transmit the brightness signal (Y signal) and color signal (C signal) separately. This mini DIN jack/plug is also called a Hosiden jack/plug.

1Use a S-Video (SVHS) cable and plug one end into the S-VIDEO(Y/C)-OUT2jack at the back of the DVD Recorder and the other end into the S-Video (SVHS) In jack of the TV (usually called 'S-Video in' or 'SVHS in'. See your TV's instruction manual).

2Use an audio (cinch) cable and plug one end into the red/white cinch jack AUDIO L/R (OUT 2) at the back of the DVD Recorder (next to S-VIDEO(Y/C)-OUT2) and the other into the corresponding red/white audio input jack of the TV (usually called Audio in', 'AV in'. See your TV's instruction manual).

ORead the next chapter 'Connecting additional devices' on how to connect additional devices (satellite receivers, videorecorders,...) to the input-/output jacks.

Then, read the chapter on 'Connecting to the AC-outlet'.

13

Page 20
Image 20
Philips HDRW 720/17 manual Connecting to the TV, Connection with Component Y Pb Pr Cable, Connecting with a S Y/C cable

HDRW 720/17 specifications

The Philips HDRW 720/17 is a versatile and user-friendly DVD recorder that brings the convenience of digital recording into the home. Designed for both casual users and serious enthusiasts, it combines a range of features that enhance home entertainment experiences.

One of the standout features of the HDRW 720/17 is its ability to record television shows directly onto DVDs, allowing users to preserve their favorite programming without the hassle of traditional VHS tapes. The recorder supports a variety of disc formats, including DVD-R, DVD-RW, DVD+R, and DVD+RW, making it adaptable to different user preferences. This flexibility ensures that users can choose the media type that best suits their needs.

Equipped with a built-in TV tuner, the HDRW 720/17 allows for direct recording from over-the-air broadcasts, providing an easy way to capture live TV. The high-definition recording capability further enhances the viewing experience, producing sharp, clear images and excellent sound quality. Additionally, the unit supports progressive scan, which minimizes motion blurriness in fast-paced scenes, providing a more cinematic experience.

The HDRW 720/17 also features Philips’ Smart Recording technology, which enables users to optimize recording quality and maximize available disc space. This feature intelligently adjusts the recording quality based on content length and the chosen media, ensuring that users get the best possible video quality without wasting storage.

Another notable characteristic is the user-friendly interface. Philips has integrated a simple menu setup that makes navigation easy, even for those who may not be tech-savvy. The inclusion of one-touch recording functionality allows quick starts to recording, making it easier to capture spontaneous moments or programs.

For those who want to watch their recordings on different devices, the HDRW 720/17 boasts compatibility with a range of playback systems, allowing users to enjoy their recordings on standard DVD players or other compatible devices.

In summary, the Philips HDRW 720/17 stands out with its robust recording capabilities, compatibility with multiple disc formats, and user-friendly interface. Whether archiving shows or creating personal collections, this DVD recorder caters to a wide variety of recording needs, making it an excellent addition to any home entertainment setup.