INSTALLATION/OPERATION
1.Unpack unit, save all packaging material for off-season storage.
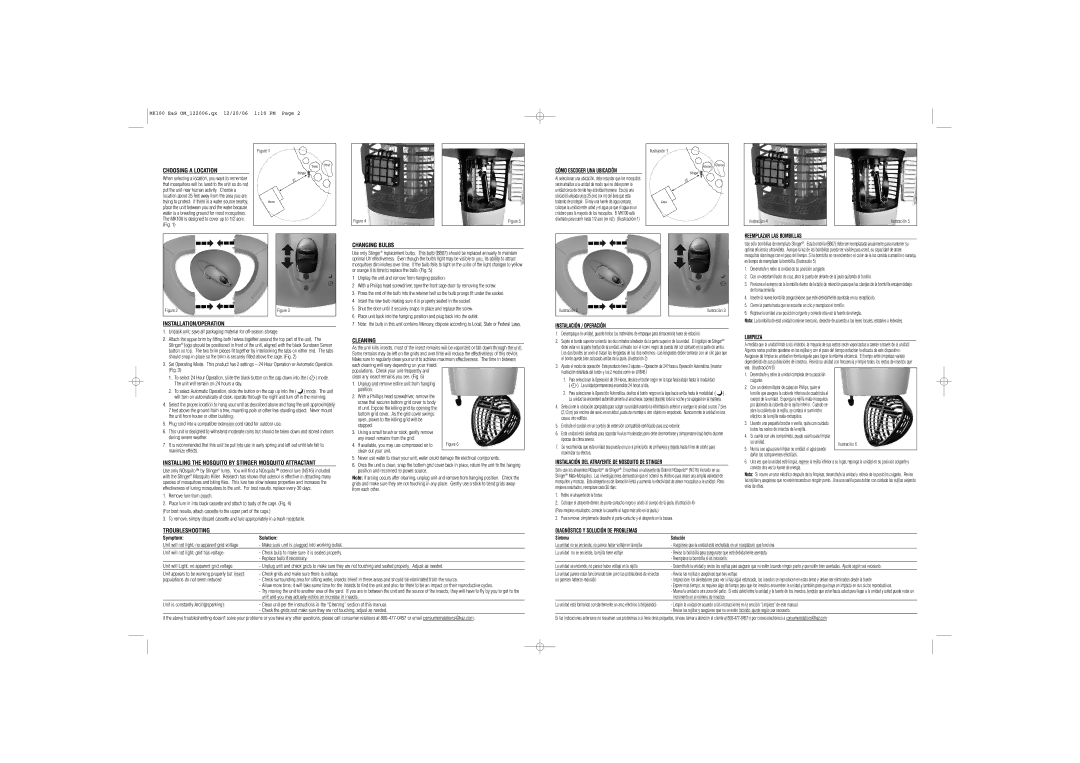
2.Attach the upper brim by fitting both halves together around the top part of the unit. The Stinger® logo should be positioned in front of the unit, aligned with the black Sundown Sensor button on top. The two brim pieces fit together by interlocking the tabs on either end. The tabs should snap in place so the brim is securely fitted above the cage. (Fig. 2)
3.Set Operating Mode. This product has 2 settings – 24 Hour Operation or Automatic Operation. (Fig. 3)
1.To select 24 Hour Operation, slide the black button on the cap down into the (  ) mode. The unit will remain on 24 hours a day.
2.To select Automatic Operation, slide the button on the cap up into the (  ) mode. The unit will turn on automatically at dusk, operate through the night and turn off in the morning.
4.Select the proper location to hang your unit as described above and hang the unit approximately
7feet above the ground from a tree, mounting pole or other free standing object. Never mount the unit from house or other building.
5.Plug cord into a compatible extension cord rated for outdoor use.
6.This unit is designed to withstand moderate rains but should be taken down and stored indoors during severe weather.
7.It is recommended that this unit be put into use in early spring and left out until late fall to maximize effects.
INSTALLING THE NOSQUITO BY STINGER MOSQUITO ATTRACTANT
Use only NOsquito™ by Stinger® lures. You will find a NOsquito™ octenol lure (NS16) included with the Stinger® Mosquito Killer. Research has shown that octenol is effective in attracting many species of mosquitoes and biting flies. This lure has slow release properties and increases the effectiveness of luring mosquitoes to the unit. For best results, replace every 30 days.
1.Remove lure from pouch.
2.Place lure in into black cassette and attach to body of the cage. (Fig. 4) (For best results, attach cassette to the upper part of the cage.)
3.To remove, simply discard cassette and lure appropriately in a trash receptacle.
1Unplug the unit and remove from hanging position.
2With a Philips head screwdriver, open the front cage door by removing the screw.
3Press the end of the bulb into the retainer ball so the bulb prongs fit under the socket.
4Insert the new bulb making sure it is properly seated in the socket.
5Shut the door until it securely snaps in place and replace the screw.
6Place unit back into the hanging position and plug back into the outlet.
7Note: the bulb in this unit contains Mercury, dispose according to Local, State or Federal Laws.
CLEANING
As the unit kills insects, most of the insect remains will be vaporized or fall down through the unit. Some remains may be left on the grids and over time will reduce the effectiveness of this device. Make sure to regularly clean your unit to achieve maximum effectiveness. The time in between each cleaning will vary depending on your insect
populations. Check your unit frequently and clean any insect remains you see. (Fig. 6)
1.Unplug and remove entire unit from hanging position.
2.With a Phillips head screwdriver, remove the screw that secures bottom grid cover to body of unit. Expose the killing grid by opening the bottom grid cover. As the grid cover swings open, power to the killing grid will be stopped.
3.Using a small brush or stick, gently remove any insect remains from the grid.
4. If available, you may use compressed air to | Figure 6 |
clean out your unit. | |
|
5.Never use water to clean your unit, water could damage the electrical components.
6.Once the unit is clean, snap the bottom grid cover back in place, return the unit to the hanging position and reconnect to power source.
Note: If arcing occurs after cleaning, unplug unit and remove from hanging position. Check the grids and make sure they are not touching in any place. Gently use a stick to bend grids away from each other.
Ilustración 2 | Ilustración 3 |
INSTALACIÓN / OPERACIÓN
1.Desempaque la unidad, guarde todos los materiales de empaque para almacenarla fuera de estación.
2.Sujete el borde superior uniendo las dos mitades alrededor de la parte superior de la unidad. El logotipo de StingerMR debe estar en la parte frontal de la unidad, alineado con el Icono negro de puesta del sol ubicado en la parte de arriba. Los dos bordes se unen al trabar las lengüetas de los dos extremos. Las lengüetas deben cerrarse con un clic para que el borde quede bien colocado arriba de la jaula. (Ilustración 2)
3.Ajuste el modo de operación Este producto tiene 2 ajustes – Operación de 24 Horas u Operación Automática. [insertar ilustración detallada del botón y los 2 modos como en UVB45]
1.Para seleccionar la Operación de 24 Horas, deslice el botón negro en la tapa hacia abajo hasta la modalidad (  ). La unidad permanecerá encendida 24 horas al día.
2.Para seleccionar la Operación Automática, deslice el botón negro en la tapa hacia arriba hasta la modalidad (  ) . La unidad se encenderá automáticamente al anochecer, operará durante toda la noche y se apagará en la mañana.
4.Seleccione la ubicación apropiada para colgar su unidad usando la información anterior y cuelgue la unidad a unos 7 pies (2,13 m) por encima del suelo en un árbol, poste de montaje u otro objeto no empotrado. Nunca monte la unidad en una casa u otro edificio.
5.Enchufe el cordón en un cordón de extensión compatible certificado para uso exterior.
6.Esta unidad está diseñada para soportar lluvias moderadas pero debe desmontarse y almacenarse bajo techo durante épocas de clima severo.
7.Se recomienda que esta unidad sea puesta en uso a principios de primavera y dejada hasta fines de otoño para maximizar su efectos.
INSTALACIÓN DEL ATRAYENTE DE NOSQUITO DE STINGER
Sólo use los atrayentes NOsquitoMC de StingerMR. Encontrará un atrayente de Octenol NOsquitoMC (NS16) incluído en su StingerMR Mata-Mosquitos. Las investigaciones demuestran que el octenol es efectivo para atraer una amplia variedad de mosquitos y moscas. Este atrayente es de liberación lenta y aumenta la efectividad de atraer mosquitos a la unidad. Para mejores resultados, reemplaze cada 30 días.
1.Retire el atrayente de la bolsa.
2.Coloque el atrayente dentro de porta-cartucho negro y únalo al cuerpo de la jaula. (Ilustración 4) (Para mejores resultados, conecte la cassette al lugar más alto en la jaula.)
3.Para remover, simplemente deseche el porta-cartucho y el atrayente en la basura.
2. | Con un desatornillador de cruz, abra la puerta de delante de la jaula quitando el tornillo. |
3. | Presione el extremo de la bombilla dentro de la bola de retención para que las clavijas de la bombilla encajen debajo |
| del tomacorriente. |
4. | Inserte la nueva bombilla asegurándose que esté debidamente asentada en su receptáculo. |
5. | Cierre la puerta hasta que se escuche un clic y reemplace el tornillo. |
6. | Regrese la unidad a su posición colgante y conecte otra vez la fuente de energía. |
Nota: La bombilla de está unidad contiene mercurio, deseche de acuerdo a las leyes locales, estatales o federales.
LIMPIEZA
A medida que la unidad mata a los insectos, la mayoría de sus restos serán vaporizados o caerán a través de la unidad. Algunos restos podrían quedarse en las rejillas y con el paso del tiempo reducirán la eficacia de este dispositivo. Asegúrese de limpiar su unidad en forma regular para lograr la máxima eficiencia. El tiempo entre limpiezas variará dependiendo de sus poblaciones de insectos. Revise su unidad con frecuencia y limpie todos los restos de insectos que vea. (Ilustración 6)
1.Desenchufe y retire la unidad completa de su posición colgante.
2.Con un destornillador de cabez de Philips, quite el tornillo que asegura la cubierta inferiora de cuadrícula al cuerpo de la unidad. Exponga la rejilla mata-mosquitos por abriendo la cubierta de la rejilla inferior. Cuando se abre la cubierta de la rejilla, se cortará el suministro eléctrico de la rejilla mata-mosquitos.
3.Usando una pequeña brocha o varilla, quite con cuidado todos los restos de insectos de la rejilla.
4.Si cuenta con aire comprimido, puede usarlo para limpiar
5.Nunca use agua para limpiar su unidad, el agua puede dañar los componentes eléctricos.
6.Una vez que la unidad esté limpia, regrese la rejilla inferior a su lugar, reponga la unidad en su posición colgante y conecte otra vez la fuente de energía.
Nota: Si ocurre un arco eléctrico después de la limpieza, desenchufe la unidad y retírela de la posición colgante. Revise las rejillas y asegúrese que no estén tocando en ningún punto. Use una varilla para doblar con cuidado las rejillas alejando unas de otras.