Philips VR158 Connecting the video recorder, Preparing the remote control for operation

Models: VR158

1 16
Download 16 pages 9.89 Kb
Page 4
Image 4

HE273ED(EN).QX3 03.3.12 1:47 PM Page 4

3. Connecting the video recorder

Preparing the remote control for operation

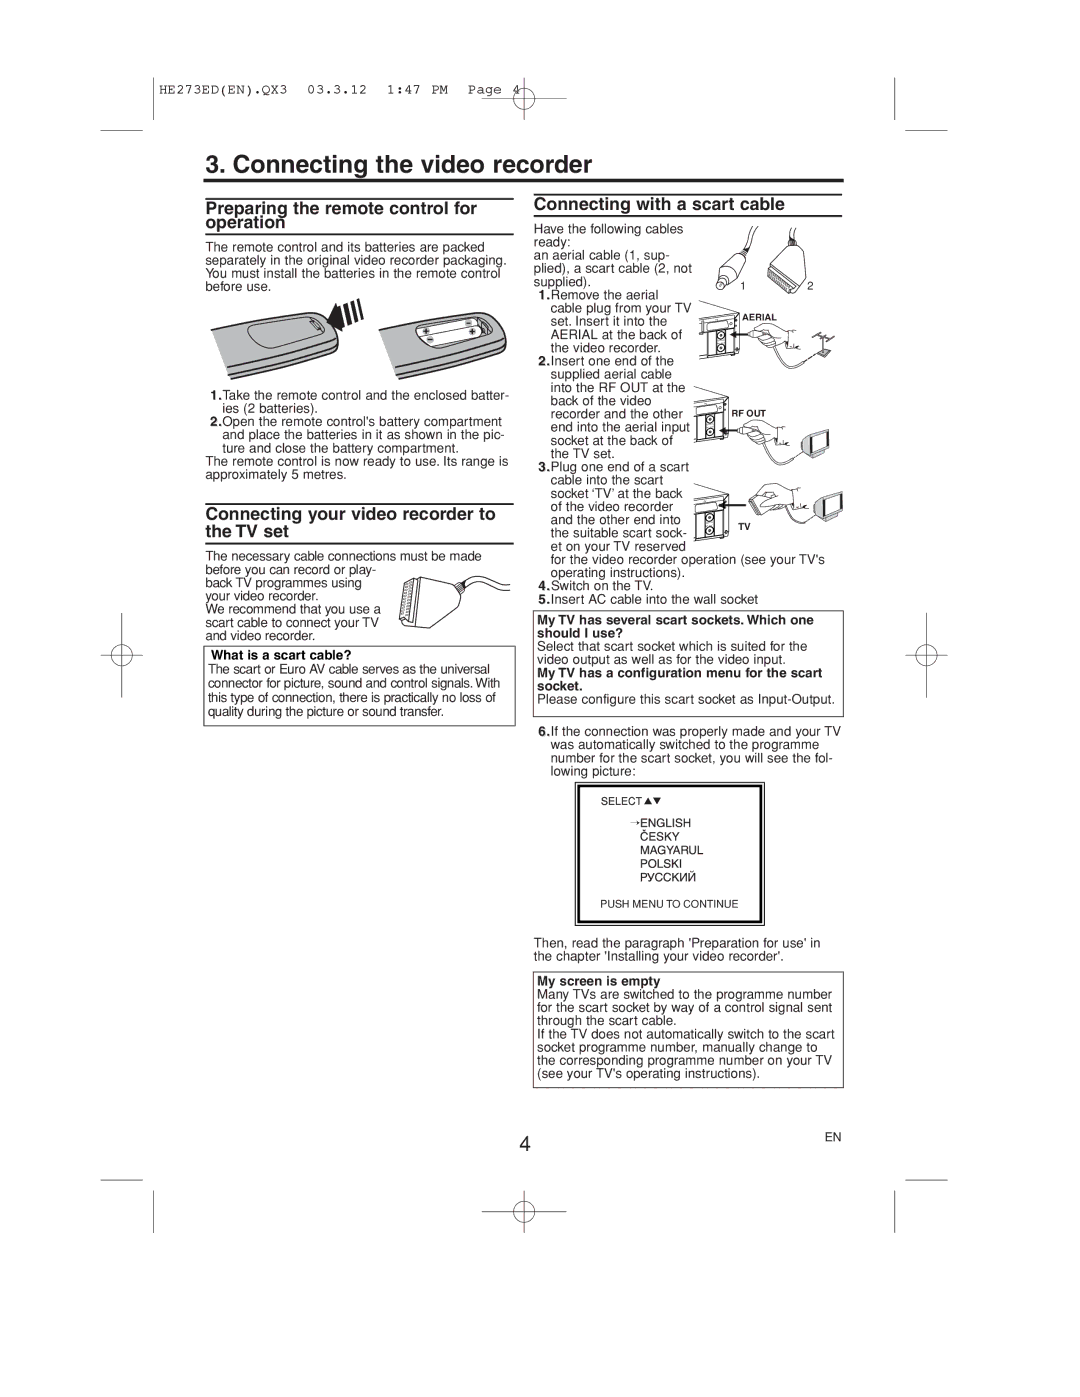
The remote control and its batteries are packed separately in the original video recorder packaging. You must install the batteries in the remote control before use.

1.Take the remote control and the enclosed batter- ies (2 batteries).

2.Open the remote control's battery compartment and place the batteries in it as shown in the pic- ture and close the battery compartment.

The remote control is now ready to use. Its range is approximately 5 metres.

Connecting your video recorder to the TV set

The necessary cable connections must be made before you can record or play-

back TV programmes using your video recorder.

We recommend that you use a scart cable to connect your TV and video recorder.

What is a scart cable?

The scart or Euro AV cable serves as the universal connector for picture, sound and control signals. With this type of connection, there is practically no loss of quality during the picture or sound transfer.

Connecting with a scart cable

Have the following cables


ready:


an aerial cable (1, sup-


plied), a scart cable (2, not


supplied).


1

2

1.Remove the aerial


cable plug from your TV


AERIAL


set. Insert it into the

R)

TV


AERIAL at the back of


the video recorder.


2.Insert one end of the


supplied aerial cable


into the RF OUT at the


back of the video


TV


recorder and the other


RF OUT


end into the aerial input


socket at the back of


the TV set.


3.Plug one end of a scart


cable into the scart


socket ‘TV’ at the back


of the video recorder


TV


and the other end into


TV


the suitable scart sock-


et on your TV reserved


for the video recorder operation (see your TV's

operating instructions).


4.Switch on the TV.


5.Insert AC cable into the wall socket


My TV has several scart sockets. Which one should I use?

Select that scart socket which is suited for the video output as well as for the video input.

My TV has a configuration menu for the scart socket.

Please configure this scart socket as Input-Output.

6.If the connection was properly made and your TV was automatically switched to the programme number for the scart socket, you will see the fol- lowing picture:

PUSH MENU TO CONTINUE

Then, read the paragraph 'Preparation for use' in the chapter 'Installing your video recorder'.

My screen is empty

Many TVs are switched to the programme number for the scart socket by way of a control signal sent through the scart cable.

If the TV does not automatically switch to the scart socket programme number, manually change to the corresponding programme number on your TV (see your TV's operating instructions).

4

EN


Page 4
Image 4
Philips VR158 Connecting the video recorder, Preparing the remote control for operation, Connecting with a scart cable

VR158 specifications

The Philips VR158 is a distinguished addition to the line of video recording devices, combining functionality with modern technology to enhance the user experience. As a versatile VCR, it caters to both avid collectors of VHS tapes and modern users seeking an efficient method of preserving and enjoying their video content.

One of the main features of the Philips VR158 is its robust playback capabilities. It fully supports various tape formats and includes advanced tracking technology, ensuring that playback is smooth and uninterrupted. The VCR incorporates features like automatic tracking adjustment and tape counter functions, allowing users to navigate their tapes with ease. This function is especially helpful for those who may have inherited old tapes or wish to revisit cherished memories without the hassle of poor tracking.

In addition to playback, the Philips VR158 boasts impressive recording features. Equipped with a timer recording function, it allows users to schedule recordings of their favorite shows, enabling a hands-free experience. The device also ensures high-quality recordings with its built-in stereo sound feature, making it perfect for capturing not only video but also audio clearly.

The design of the Philips VR158 is user-friendly, with a clear interface that simplifies the operation for all users, regardless of their technical expertise. The remote control enhances convenience, offering access to all functions without requiring physical interaction with the unit.

Connectivity is another hallmark of the Philips VR158. It features composite video inputs and outputs, making it compatible with various television models and external devices. This ensures seamless integration into any home entertainment setup, whether for traditional viewing or for digitizing content for modern displays.

Furthermore, the Philips VR158 is recognized for its reliability and durability. Built with quality materials, it is designed to withstand the rigors of regular use. This makes it an excellent choice for those who wish to rely on a trustworthy device for their video recording and playback needs.

In summary, the Philips VR158 combines advanced playback and recording technologies with user-friendly design and robust connectivity. Its impressive features make it a standout choice for anyone looking to enjoy or preserve their video collection in a world increasingly focused on digital. This VCR remains a valuable asset for both nostalgic collectors and contemporary users alike.