CABLE BOX (WITH RF IN / OUTPUTS):

1

2

3

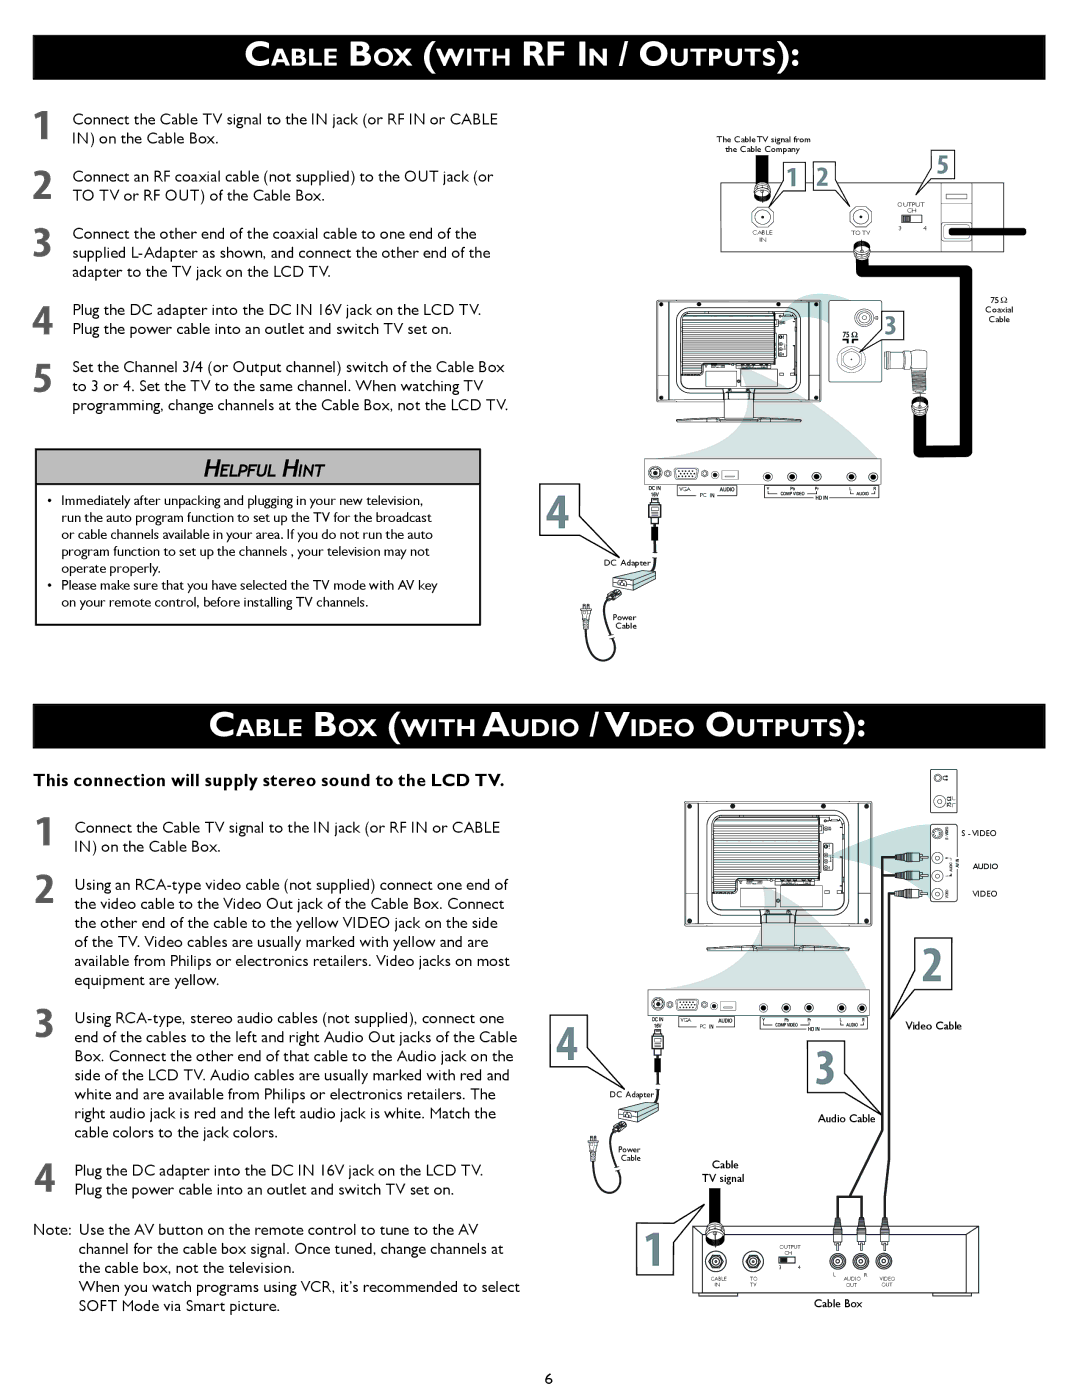
Connect the Cable TV signal to the IN jack (or RF IN or CABLE IN) on the Cable Box.

Connect an RF coaxial cable (not supplied) to the OUT jack (or TO TV or RF OUT) of the Cable Box.

Connect the other end of the coaxial cable to one end of the supplied L-Adapter as shown, and connect the other end of the adapter to the TV jack on the LCD TV.

The Cable TV signal from


the Cable Company


OUTPUT


CH

CABLE

TO TV

3

4


IN

4

Plug the DC adapter into the DC IN 16V jack on the LCD TV.


Plug the power cable into an outlet and switch TV set on.


5

Set the Channel 3/4 (or Output channel) switch of the Cable Box


to 3 or 4. Set the TV to the same channel. When watching TV


programming, change channels at the Cable Box, not the LCD TV.


HELPFUL HINT


Immediately after unpacking and plugging in your new television,

VGA


PC


run the auto program function to set up the TV for the broadcast


or cable channels available in your area. If you do not run the auto


program function to set up the channels , your television may not

operate properly.

DC Adapter


Please make sure that you have selected the TV mode with AV key


on your remote control, before installing TV channels.


Power


Cable

75

Coaxial

Cable

CABLE BOX (WITH AUDIO / VIDEO OUTPUTS):

This connection will supply stereo sound to the LCD TV.

1

Connect the Cable TV signal to the IN jack (or RF IN or CABLE


S - VIDEO

IN) on the Cable Box.


AUDIO


Using an RCA-type video cable (not supplied) connect one end of


VIDEO

2 the video cable to the Video Out jack of the Cable Box. Connect


the other end of the cable to the yellow VIDEO jack on the side


of the TV. Video cables are usually marked with yellow and are


available from Philips or electronics retailers. Video jacks on most


equipment are yellow.


Using RCA-type, stereo audio cables (not supplied), connect one


VGA


3 end of the cables to the left and right Audio Out jacks of the Cable

Video Cable

PC


Box. Connect the other end of that cable to the Audio jack on the


side of the LCD TV. Audio cables are usually marked with red and


white and are available from Philips or electronics retailers. The


DC Adapter


right audio jack is red and the left audio jack is white. Match the


Audio Cable


cable colors to the jack colors.


4

Note:

Plug the DC adapter into the DC IN 16V jack on the LCD TV. Plug the power cable into an outlet and switch TV set on.

Use the AV button on the remote control to tune to the AV channel for the cable box signal. Once tuned, change channels at the cable box, not the television.

When you watch programs using VCR, it’s recommended to select SOFT Mode via Smart picture.

Power


Cable

Cable


TV signal


OUTPUT


CH


CABLE

TO

3

4

L AUDIO R

VIDEO


IN

TV


OUT

OUT

Cable Box

6

Page 6
Image 6
Philips Wall Mounting quick start Cable BOX with RF in / Outputs, Cable BOX with Audio / Video Outputs, Helpful Hint

Wall Mounting specifications

Philips Wall Mounting solutions are designed to provide a versatile and secure approach to displaying televisions, monitors, and other electronic devices in both residential and commercial settings. These wall mounts offer a range of features that cater to different needs, ensuring an optimal viewing experience while maintaining the aesthetic appeal of any space.

One of the standout features of Philips Wall Mounts is their robustness and reliability. Crafted from high-quality materials, these mounts support various screen sizes and weights, accommodating various devices from small TVs to larger, more complex displays. The ability to hold substantial weight without compromising stability is crucial for users, as it minimizes the risk of accidents and enhances safety.

Another significant characteristic of Philips Wall Mounts is their flexibility. Many models come with the ability to tilt, swivel, and extend, allowing for customized viewing angles. This adjustability is particularly beneficial in rooms with multiple seating areas, ensuring that everyone can enjoy the best possible view of the screen. The mounts are designed to facilitate seamless installation, often featuring straightforward instructions and necessary hardware to simplify the process.

In terms of technology, Philips employs innovative designs that include cable management systems. These built-in features help to reduce clutter by concealing unsightly wires and cables, promoting a clean and organized space. This attention to detail enhances the overall user experience, making it easier to enjoy media without distractions.

Durability is another hallmark of Philips Wall Mounting systems. The products undergo rigorous testing to ensure they withstand everyday use while preserving their aesthetic finish. This commitment to quality is reflected in the corrosion-resistant coatings and long-lasting construction, which ensure that the mounts perform reliably over time.

Additionally, Philips Wall Mounts are designed with compatibility in mind. They accommodate a wide range of devices and are compatible with various mounting standards, which makes them an excellent choice for anyone looking to upgrade their setup. Whether for entertainment purposes in a living room or for professional presentations in a boardroom, Philips Wall Mounting solutions offer the ideal blend of style, function, and durability, making them a go-to choice for many consumers.