ACCESSORIES

When you unpack this unit, make sure it includes the

following:

Power adapter & cable


Owner`s Manual & Quick Start Guide


d


d


ar


ar


e


y

C


te


n


nt


ra


ra


ua


ar


G


W


(/79)


(/98)

Tuner L-Adapter


Warranty Card


BATTERY INSTALLATION

1Remove the battery compartment lid on the bottom of the remote control.

2Place lithium cell in the remote control. Be sure the (+) and (-) ends of the

batteries line up as marked inside the battery (CR2025) compartment.

3

Reattach the battery

2

compartment lid.


1

3

REMOTE CONTROL OPERATION

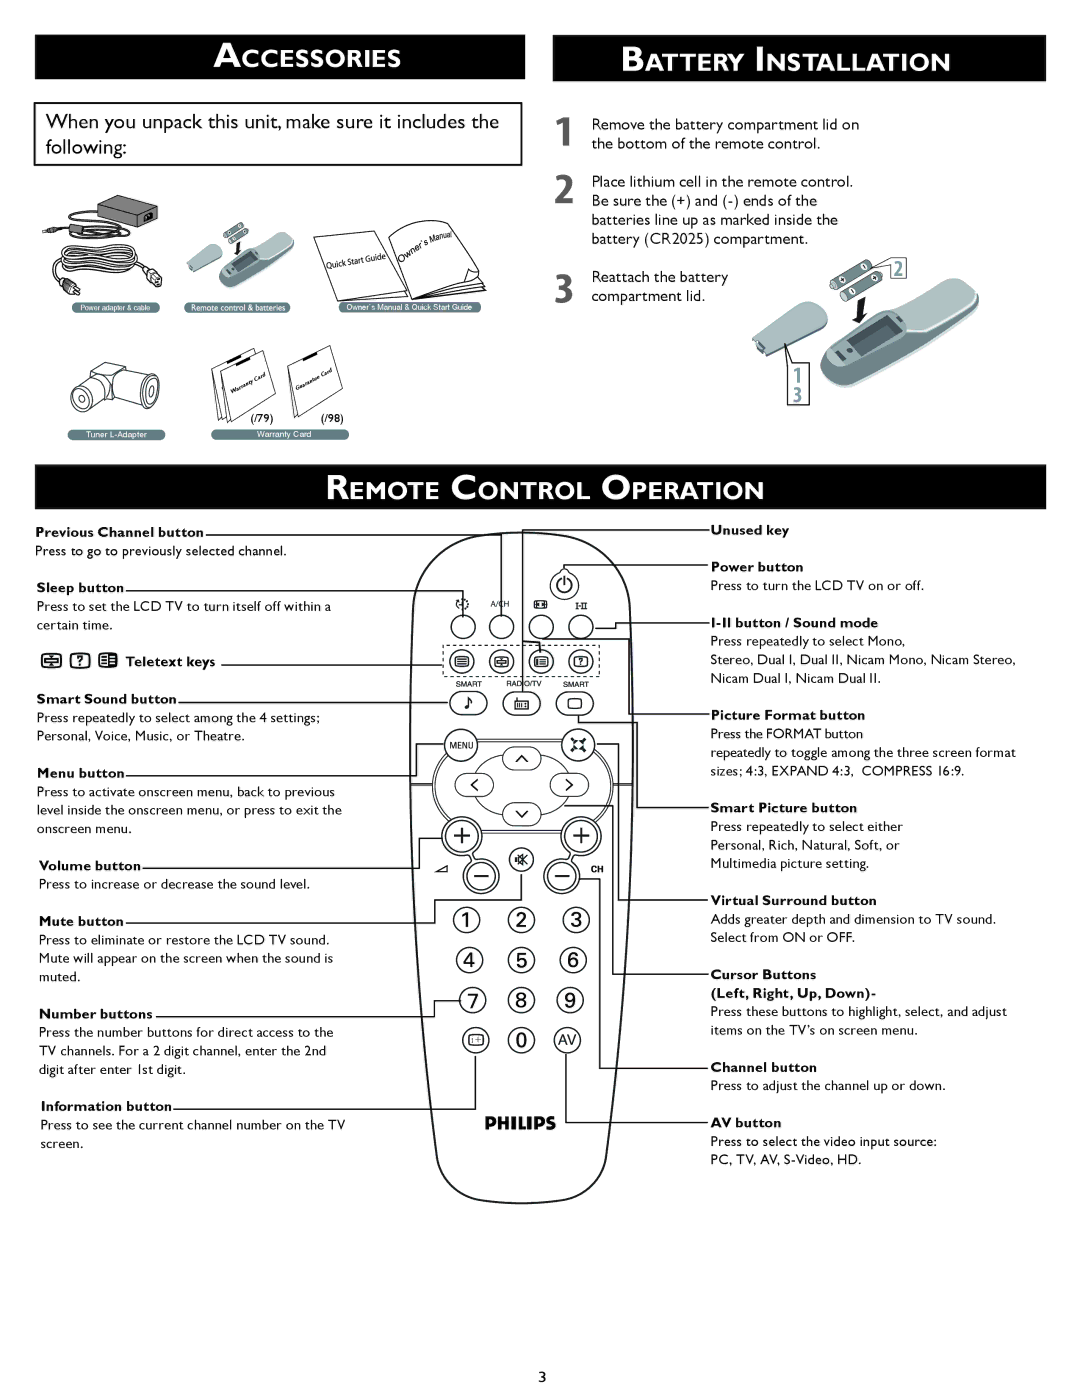
Press to go to previously selected channel.

Sleep button

Press to set the LCD TV to turn itself off within a certain time.

Teletext keys

Smart Sound button

Press repeatedly to select among the 4 settings;

Personal, Voice, Music, or Theatre.

Menu butto n

Press to activate onscreen menu, back to previous level inside the onscreen menu, or press to exit the onscreen menu.

Volume button

Press to increase or decrease the sound level

Mute button

Press to eliminate or restore the LCD TV sound. Mute will appear on the screen when the sound is muted.

Unused key

Power button

Press to turn the LCD TV on or off.

I-II button / Sound mode

Press repeatedly to select Mono,

Stereo, Dual I, Dual II , N icam Mono, Nicam Stereo,

Nicam Dual I, Nicam Dual II.

Picture Format button

Press the FORMAT button

repeatedly to toggle among the three screen format sizes; 4:3, EXPAND 4:3, COMPRESS 16:9

Smart Picture button

Press repeatedly to select either

Personal, Rich, Natural, Soft, or

Multimedia picture setting.

Virtual Surround button

Adds greater depth and dimension to TV sound.

Select from ON or OFF.

Cursor Buttons

(Left, Right, Up, Down)-

Number buttons

Press the number buttons for direct access to the

i +

TV channels. For a 2 digit channel, enter the 2nd


AV

Press these buttons to highlight, select, and adjust items on the TV’s on screen menu.

digit after enter 1st digit.

Information button

Press to see the current channel number on the TV screen.

Channel button

Press to adjust the channel up or down.

AV button

Press to select the video input source:

PC, TV, AV, S-Video, HD

3

Page 3
Image 3
Philips Wall Mounting quick start Accessories, Battery Installation, Remote Control Operation

Wall Mounting specifications

Philips Wall Mounting solutions are designed to provide a versatile and secure approach to displaying televisions, monitors, and other electronic devices in both residential and commercial settings. These wall mounts offer a range of features that cater to different needs, ensuring an optimal viewing experience while maintaining the aesthetic appeal of any space.

One of the standout features of Philips Wall Mounts is their robustness and reliability. Crafted from high-quality materials, these mounts support various screen sizes and weights, accommodating various devices from small TVs to larger, more complex displays. The ability to hold substantial weight without compromising stability is crucial for users, as it minimizes the risk of accidents and enhances safety.

Another significant characteristic of Philips Wall Mounts is their flexibility. Many models come with the ability to tilt, swivel, and extend, allowing for customized viewing angles. This adjustability is particularly beneficial in rooms with multiple seating areas, ensuring that everyone can enjoy the best possible view of the screen. The mounts are designed to facilitate seamless installation, often featuring straightforward instructions and necessary hardware to simplify the process.

In terms of technology, Philips employs innovative designs that include cable management systems. These built-in features help to reduce clutter by concealing unsightly wires and cables, promoting a clean and organized space. This attention to detail enhances the overall user experience, making it easier to enjoy media without distractions.

Durability is another hallmark of Philips Wall Mounting systems. The products undergo rigorous testing to ensure they withstand everyday use while preserving their aesthetic finish. This commitment to quality is reflected in the corrosion-resistant coatings and long-lasting construction, which ensure that the mounts perform reliably over time.

Additionally, Philips Wall Mounts are designed with compatibility in mind. They accommodate a wide range of devices and are compatible with various mounting standards, which makes them an excellent choice for anyone looking to upgrade their setup. Whether for entertainment purposes in a living room or for professional presentations in a boardroom, Philips Wall Mounting solutions offer the ideal blend of style, function, and durability, making them a go-to choice for many consumers.