Installation

Connecting and installing the optical cable connection box

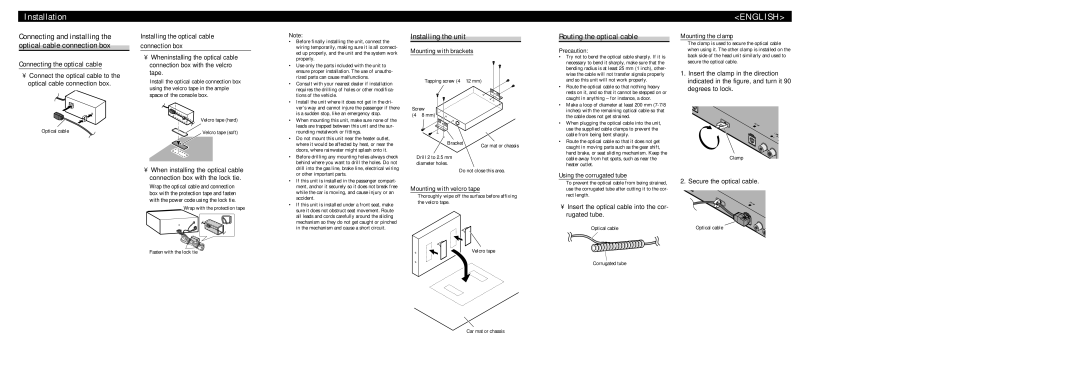
Connecting the optical cable

Connect the optical cable to the optical cable connection box.

Installing the optical cable connection box

When installing the optical cable connection box with the velcro tape.

Install the optical cable connection box using the velcro tape in the ample space of the console box.

Note:

• Before finally installing the unit, connect the

wiring temporarily, making sure it is all connect-

ed up properly, and the unit and the system work

properly.

• Use only the parts included with the unit to

ensure proper installation. The use of unautho-

rized parts can cause malfunctions.

• Consult with your nearest dealer if installation

requires the drilling of holes or other modifica-

tions of the vehicle.

• Install the unit where it does not get in the dri-

Installing the unit

Mounting with brackets

Tapping screw (4 12 mm)

Routing the optical cable

Precaution:

• Try not to bend the optical cable sharply. If it is

necessary to bend it sharply, make sure that the

bending radius is at least 25 mm (1 inch), other-

wise the cable will not transfer signals properly

and so this unit will not work properly.

• Route the optical cable so that nothing heavy

rests on it, and so that it cannot be stepped on or

caught in anything – for instance, a door.

• Make a loop of diameter at least 200 mm (7-7/8

<ENGLISH>

Mounting the clamp

The clamp is used to secure the optical cable when using it. The other clamp is installed on the back side of the head unit similarly and used to secure the optical cable.

1.Insert the clamp in the direction indicated in the figure, and turn it 90 degrees to lock.

Optical cable

Velcro tape (hard) Velcro tape (soft)

ver’s way and cannot injure the passenger if there

is a sudden stop, like an emergency stop.

• When mounting this unit, make sure none of the

leads are trapped between this unit and the sur-

rounding metalwork or fittings.

• Do not mount this unit near the heater outlet,

where it would be affected by heat, or near the

doors, where rainwater might splash onto it.

• Before drilling any mounting holes always check

behind where you want to drill the holes. Do not

Screw

(4 8 mm)

Bracket

Drill 2 to 2.5 mm diameter holes.

Car mat or chassis

inches) with the remaining optical cable so that

the cable does not get strained.

• When plugging the optical cable into the unit,

use the supplied cable clamps to prevent the

cable from being bent sharply.

• Route the optical cable so that it does not get

caught in moving parts such as the gear shift,

hand brake, or seat sliding mechanism. Keep the

cable away from hot spots, such as near the

heater outlet.

Clamp

When installing the optical cable connection box with the lock tie.

Wrap the optical cable and connection box with the protection tape and fasten with the power code using the lock tie.

Wrap with the protection tape

Fasten with the lock tie

drill into the gas line, brake line, electrical wiring

or other important parts.

• If this unit is installed in the passenger compart-

ment, anchor it securely so it does not break free

while the car is moving, and cause injury or an

accident.

• If this unit is installed under a front seat, make

sure it does not obstruct seat movement. Route

all leads and cords carefully around the sliding

mechanism so they do not get caught or pinched

in the mechanism and cause a short circuit.

Do not close this area.

Mounting with velcro tape

Thoroughly wipe off the surface before affixing the velcro tape.

Velcro tape

Using the corrugated tube

To prevent the optical cable from being strained, use the corrugated tube after cutting it to the cor- rect length.

Insert the optical cable into the cor- rugated tube.

Optical cable

Corrugated tube

2. Secure the optical cable.

Optical cable

Car mat or chassis

Page 3
Image 3
Pioneer DEQ-P8000 installation manual Installing the unit, Routing the optical cable

DEQ-P8000 specifications

The Pioneer DEQ-P8000 is an advanced digital signal processor designed to elevate the audio experience in vehicles. This sophisticated device integrates seamlessly with aftermarket and factory-installed stereo systems, offering users a range of features tailored to enhance sound quality and customization.

At the heart of the DEQ-P8000 is its powerful digital signal processing capabilities. It includes a 32-bit DSP that allows for precise manipulation of audio signals, ensuring that every note and beat is delivered with clarity and integration. This processor is built to support a variety of audio formats, ensuring compatibility with contemporary digital music sources.

One of the standout features of the DEQ-P8000 is its 31-band equalizer. This extensive EQ allows users to fine-tune their audio to suit personal taste and vehicle acoustics. Each channel can be adjusted, making it possible to compensate for speaker placement and the inherent acoustic challenges of the car environment. Additionally, with the built-in Time Alignment function, users can adjust the timing of the audio signals, ensuring that sound from different speakers reaches the listener at the same moment for a more cohesive listening experience.

The Pioneer DEQ-P8000 also supports various surround sound formats, enhancing the audio experience for any style of music or media. Users can choose from multiple listening modes that simulate different sound environments, allowing for dynamic listening experiences whether on the road or parked.

Another significant advantage of the DEQ-P8000 is its user-friendly interface. The device includes a graphical display that makes navigation and adjustments intuitive. The connectivity options are another highlight, featuring multiple inputs including RCA inputs for a range of devices, enabling easy integration with other audio components.

Furthermore, the DEQ-P8000 is equipped with advanced digital crossover settings, allowing users to manage frequency ranges for subwoofers and full-range speakers effectively. This ensures that each speaker operates efficiently within its ideal frequency range.

In summary, the Pioneer DEQ-P8000 represents a powerful solution for auto audio enthusiasts seeking higher fidelity sound, personalized adjustments, and versatile compatibility with various systems. Its array of features, from advanced DSP to comprehensive equalization options, positions it as an exceptional choice for anyone looking to dramatically improve their mobile audio experience.