Pioneer DVR-108 manual Installation Einbau, Connections, Raccordement, Anschlüsse

Models: DVR-108

1 8
Download 8 pages 51.11 Kb
Page 7
Image 7

INSTALLATION

INSTALLATION


EINBAU


1Turn off the power of the personal computer and remove the power cord from the AC outlet, then remove the cover or the front panel.

2Remove the blank panel installed on the front of the 5.25 inch slot.

3Insert the drive into the slot.

4When affixing is required, please refer to the instruction manual for the computer.

÷Please use screws with a length of 5 mm (3/16 in.) or less for mounting. Using longer screws may cause damage on the drive.

÷When the mounting screws are loose etc., the vibrations from disc rotation may generate ripping noise. To prevent it the screws should be tightened securely.

÷When slide rails are required, please contact your shop or the computer manufacturer.

CONNECTIONS

1Couper l’alimentation de l’ordinateur personnel, débrancher le cordon d’alimentation et déposer le capot ou le panneau avant.

2Retirer la plaque masquant de la fente de 5,25 pouces.

3Introduire le lecteur dans la fente.

4Si un ajustement est nécessaire, se reporter au manuel d'instruction de l'ordinateur.

÷ Utiliser des vis ayant une longueur inférieure ou égale à 5 mm. L’utilisation de vis plus longues pourrait

endommager le lecteur.

÷Lorsque les vis de fixation ne sont pas suffisamment serrées, etc., les vibrations provoquées par la rotation du disque peuvent générer un bruit de déchirure et il faut donc serrer les vis solidement pour éliminer ce bruit.

÷S'adresser au magasin ou au fabricant de l’ordinateur lorsque des glissières sont nécessaires.

RACCORDEMENT

1Schalten Sie die Spannungsversorgung des Personal- Computers aus, ziehen Sie den Netzstecker ab und nehmen Sie die Abdeckung oder die Frontplatte ab.

2Entfernen Sie die Blende von einem leeren 5,25-Zoll- Laufwerkschacht.

3Schieben Sie das Laufwerk in den Schacht ein.

4Falls eine Befestigung erforderlich ist, schlagen Sie bitte im Handbuch des Computers nach.

÷Verwenden Sie Montageschrauben mit einer Länge von höchstens 5 mm.

Durch längere Schrauben kann das Laufwerk beschädigt werden.

÷Bei lockeren Befestigungsschrauben erzeugen die Vibrationen durch die rotierende DVD/CD ein störendes Geräusch. Die Schrauben müssen daher gut festgezogen werden.

÷Wenn Schiebeschienen benötigt werden, wenden Sie sich an das Geschäft, wo Sie den Computer erworben haben, oder an den Hersteller des Computers.

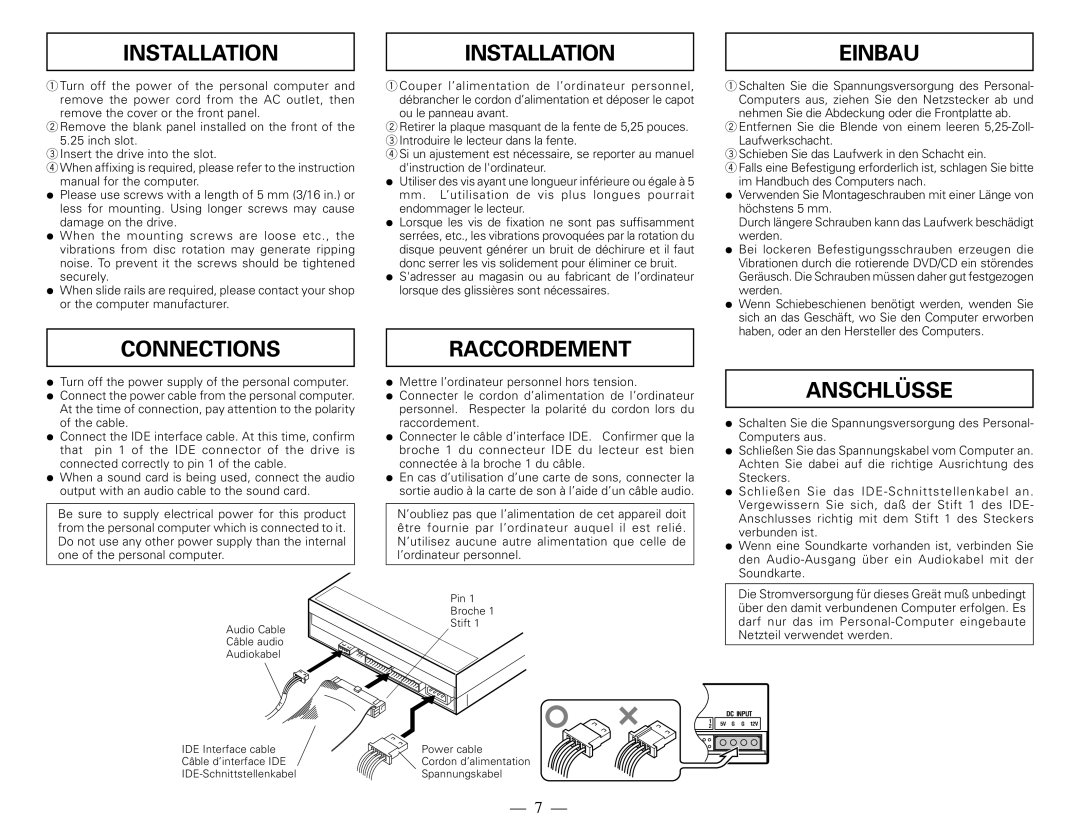
÷Turn off the power supply of the personal computer.

÷Connect the power cable from the personal computer. At the time of connection, pay attention to the polarity of the cable.

÷Connect the IDE interface cable. At this time, confirm that pin 1 of the IDE connector of the drive is connected correctly to pin 1 of the cable.

÷When a sound card is being used, connect the audio output with an audio cable to the sound card.

Be sure to supply electrical power for this product from the personal computer which is connected to it. Do not use any other power supply than the internal one of the personal computer.

Audio Cable

Câble audio

Audiokabel

IDE Interface cable

Câble d’interface IDE

IDE-Schnittstellenkabel

÷Mettre l’ordinateur personnel hors tension.

÷Connecter le cordon d’alimentation de l’ordinateur personnel. Respecter la polarité du cordon lors du raccordement.

÷Connecter le câble d’interface IDE. Confirmer que la broche 1 du connecteur IDE du lecteur est bien connectée à la broche 1 du câble.

÷En cas d’utilisation d’une carte de sons, connecter la sortie audio à la carte de son à l’aide d’un câble audio.

N’oubliez pas que l’alimentation de cet appareil doit

être fournie par l’ordinateur auquel il est relié. N’utilisez aucune autre alimentation que celle de l’ordinateur personnel.

Pin 1

Broche 1

Stift 1

Power cable

Cordon d’alimentation

Spannungskabel

7

ANSCHLÜSSE

÷Schalten Sie die Spannungsversorgung des Personal- Computers aus.

÷Schließen Sie das Spannungskabel vom Computer an. Achten Sie dabei auf die richtige Ausrichtung des Steckers.

÷Schließen Sie das IDE-Schnittstellenkabel an. Vergewissern Sie sich, daß der Stift 1 des IDE- Anschlusses richtig mit dem Stift 1 des Steckers verbunden ist.

÷Wenn eine Soundkarte vorhanden ist, verbinden Sie den Audio-Ausgang über ein Audiokabel mit der Soundkarte.

Die Stromversorgung für dieses Greät muß unbedingt über den damit verbundenen Computer erfolgen. Es darf nur das im Personal-Computer eingebaute Netzteil verwendet werden.

DC INPUT


1

5V G G 12V


2


Page 7
Image 7
Pioneer DVR-108 manual Installation Einbau, Connections, Raccordement, Anschlüsse

DVR-108 specifications

The Pioneer DVR-108 is a versatile and highly regarded internal DVD/CD writer that was widely popular among computer enthusiasts and professionals during the mid-2000s. Known for its reliability and performance, the DVR-108 supports a range of disc formats, including DVD-R, DVD-RW, DVD+R, DVD+RW, and CD-R, making it an ideal choice for both data backup and multimedia applications.

One of the standout features of the DVR-108 is its impressive write speeds. The drive offers up to 16x writing speed for DVD-R and DVD+R discs, which significantly reduces the time required to burn data onto DVDs. Furthermore, it supports 4x writing speeds for DVD-RW and DVD+RW formats, ensuring compatibility with a broad spectrum of media types. This high write speed translates to quicker backups, faster movie burning, and efficient media creation for home and professional use.

Another technological highlight of the DVR-108 is its support for Pioneer’s Precision Recording Technology. This innovative feature enhances the quality of the burns by optimizing the laser's power and focus on the disc's surface. As a result, users can expect cleaner, more precise writing, which minimizes errors and reduces the risk of unreadable discs. Additionally, this technology extends the compatibility of the drive with a wider array of media brands and types.

The DVR-108 also boasts a dual-layer writing capability, allowing users to create DVDs that can hold up to 8.5GB of data—double the capacity of standard single-layer discs. This feature is particularly beneficial for those dealing with large files, such as high-definition videos or extensive software installations.

In terms of design, the DVR-108 features a sleek, black enclosure that seamlessly blends with most computer setups. The drive utilizes a SATA interface, making it suitable for modern motherboards and enhancing data transfer rates. It also includes various built-in technologies for buffer underrun prevention, ensuring that the writing process remains uninterrupted even if the data stream fluctuates.

The Pioneer DVR-108 stands out as a powerful and reliable DVD/CD writer. Its combination of high write speeds, dual-layer capabilities, and advanced recording technologies make it a valuable tool for anyone looking to produce high-quality optical media. Even years after its initial release, the DVR-108 remains a beloved choice for users seeking dependable performance in disc writing.