Controlling the Rest of Your System

Recalling Preset Codes

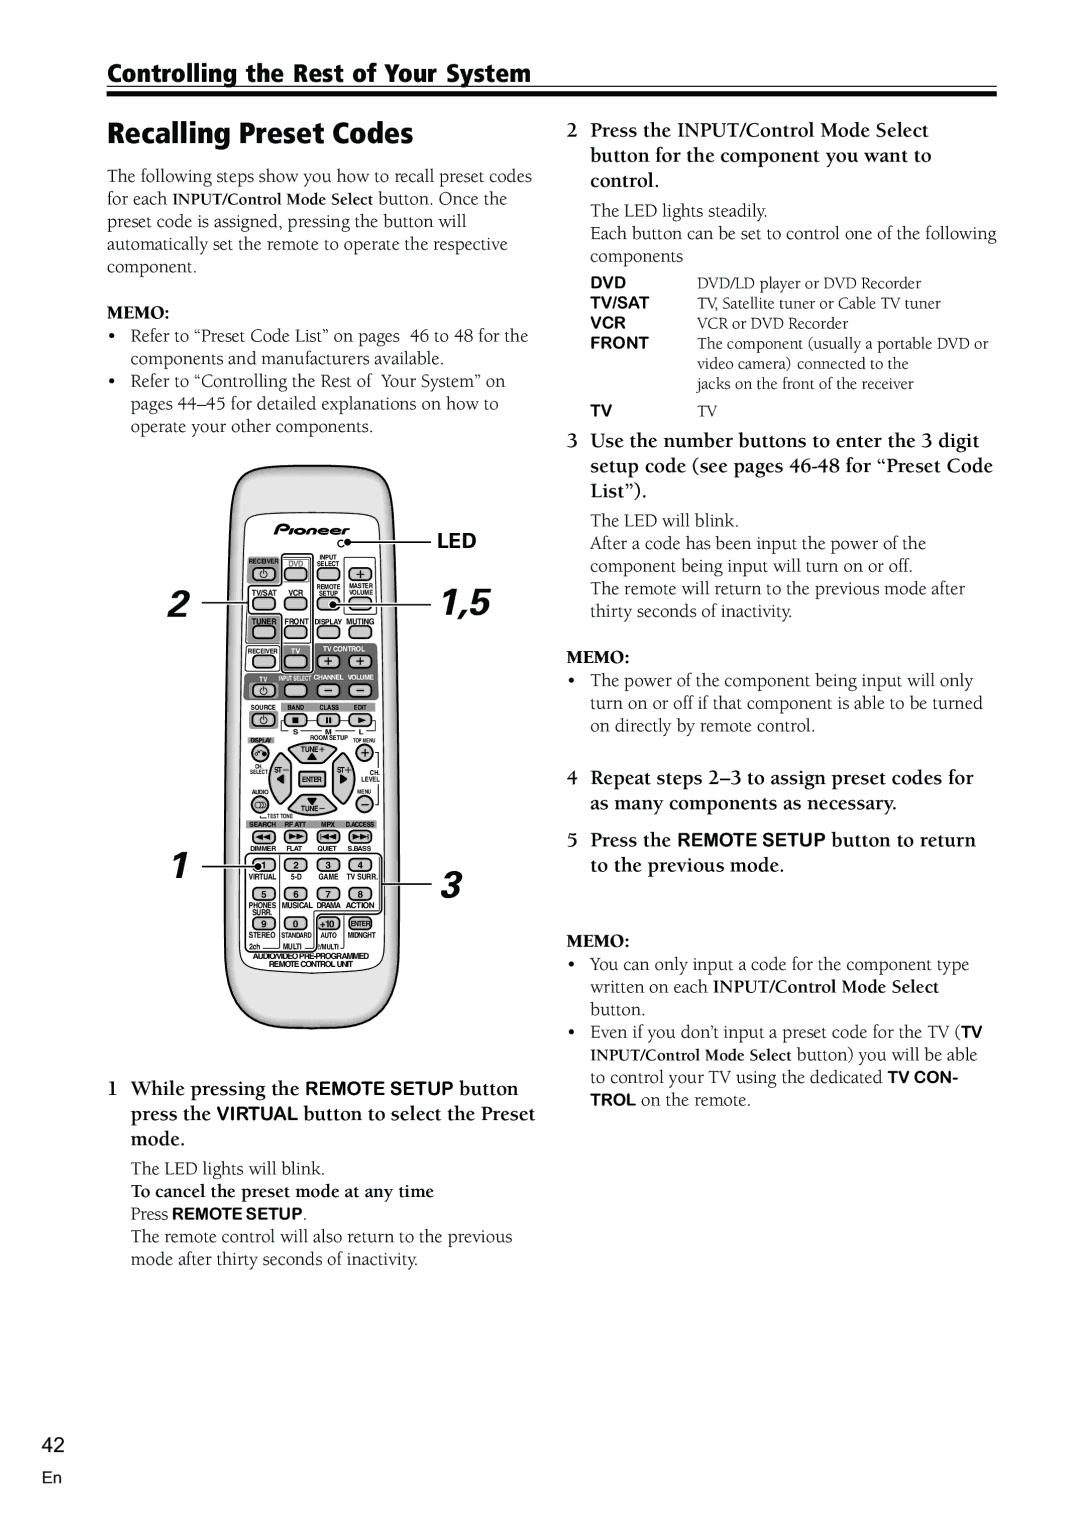
The following steps show you how to recall preset codes for each INPUT/Control Mode Select button. Once the preset code is assigned, pressing the button will automatically set the remote to operate the respective component.

MEMO:

Refer to “Preset Code List” on pages 46 to 48 for the components and manufacturers available.

Refer to “Controlling the Rest of Your System” on pages 44–45 for detailed explanations on how to operate your other components.


LED


RECEIVER

DVD

INPUT


SELECT


2

TV/SAT

VCR

REMOTE

MASTER

1,5

SETUP

VOLUME

TUNER

FRONT

DISPLAY MUTING


RECEIVER

TV

TV CONTROL


2Press the INPUT/Control Mode Select button for the component you want to control.

The LED lights steadily.

Each button can be set to control one of the following components

DVD

DVD/LD player or DVD Recorder

TV/SAT

TV, Satellite tuner or Cable TV tuner

VCR

VCR or DVD Recorder

FRONT

The component (usually a portable DVD or


video camera) connected to the


jacks on the front of the receiver

TV

TV

3Use the number buttons to enter the 3 digit setup code (see pages 46-48 for “Preset Code List”).

The LED will blink.

After a code has been input the power of the component being input will turn on or off.

The remote will return to the previous mode after thirty seconds of inactivity.

MEMO:

TV INPUT SELECT CHANNEL VOLUME

SOURCE BAND CLASS EDIT

S

M

L

DISPLAY

ROOM SETUP

TOP MENU

The power of the component being input will only turn on or off if that component is able to be turned on directly by remote control.


TUNE


CH.

ST


ST


SELECT


CH.


ENTER


LEVEL

AUDIO


MENU


TUNE


TEST TONE


SEARCH RF ATT

MPX


D.ACCESS

1

DIMMER

FLAT

QUIET

S.BASS


1

2

3

4

3

VIRTUAL

5-D

GAME

TV SURR.


5

6

7

8


PHONES

MUSICAL DRAMA ACTION


SURR.


9

0

+10 ENTER

STEREO STANDARD AUTO MIDNGHT

2ch MULTI 2/MULTI

AUDIO/VIDEOPRE-PROGRAMMED

REMOTECONTROLUNIT

1While pressing the REMOTE SETUP button press the VIRTUAL button to select the Preset mode.

The LED lights will blink.

To cancel the preset mode at any time

Press REMOTE SETUP.

The remote control will also return to the previous mode after thirty seconds of inactivity.

4Repeat steps 2–3 to assign preset codes for as many components as necessary.

5Press the REMOTE SETUP button to return to the previous mode.

MEMO:

You can only input a code for the component type written on each INPUT/Control Mode Select button.

Even if you don’t input a preset code for the TV (TV

INPUT/Control Mode Select button) you will be able to control your TV using the dedicated TV CON- TROL on the remote.

42

En

Page 42
Image 42
Pioneer VSX-C300-S Recalling Preset Codes, Controlling the Rest of Your System, To cancel the preset mode at any time

VSX-C300-S, VSX-C300 specifications

The Pioneer VSX-C300 and VSX-C300-S are compact, versatile audio receivers that cater to both casual listeners and home theater enthusiasts. Designed with modern technology and user-friendly features, these models deliver impressive sound quality in a sleek and stylish package.

One of the standout features of both the VSX-C300 and VSX-C300-S is their 5.1 channel surround sound capability. This allows users to enjoy a rich audio experience, whether watching movies or listening to music. The receivers support various audio formats, including Dolby Digital and DTS, ensuring comprehensive compatibility with a wide range of media.

Both models are equipped with Advanced Direct Energy HD Amplification technology, which minimizes energy waste while maximizing output quality. This technology not only reduces power consumption but also enhances audio clarity, providing a dynamic listening experience. Additionally, the receivers feature 100 watts per channel, which ensures sufficient power for driving speakers while maintaining low distortion levels.

Integrated into the VSX-C300 and VSX-C300-S is a multitude of connectivity options. These receivers include HDMI inputs, which support high-definition video and audio, along with analog inputs for legacy devices. The availability of digital optical and coaxial inputs further enhances flexibility, offering users multiple ways to connect their media sources.

The user interface is intuitive, featuring a clear display and an easy-to-navigate remote control. Both receivers also support basic networking capabilities, allowing users to access music streaming services. This feature is particularly appealing in today's digital age, where convenience and access to a vast library of music are paramount.

Pioneer places a strong emphasis on ease of use, and both receivers reflect that ethos. Automatic speaker calibration simplifies the setup process, ensuring that users achieve optimal sound quality tailored to their room's acoustics. The included MCACC (Multi-Channel Acoustic Calibration System) automatically adjusts settings to create an immersive sound environment.

In summary, the Pioneer VSX-C300 and VSX-C300-S combine stylish design with advanced audio technology. Their 5.1 channel surround sound, Advanced Direct Energy HD Amplification, multiple connectivity options, and user-friendly features make these receivers an excellent choice for anyone looking to enhance their audio experience. Whether for movie nights or enjoying music, these receivers are a solid investment for quality sound.