05Fine Tuning Your Surround Sound

Room Setup

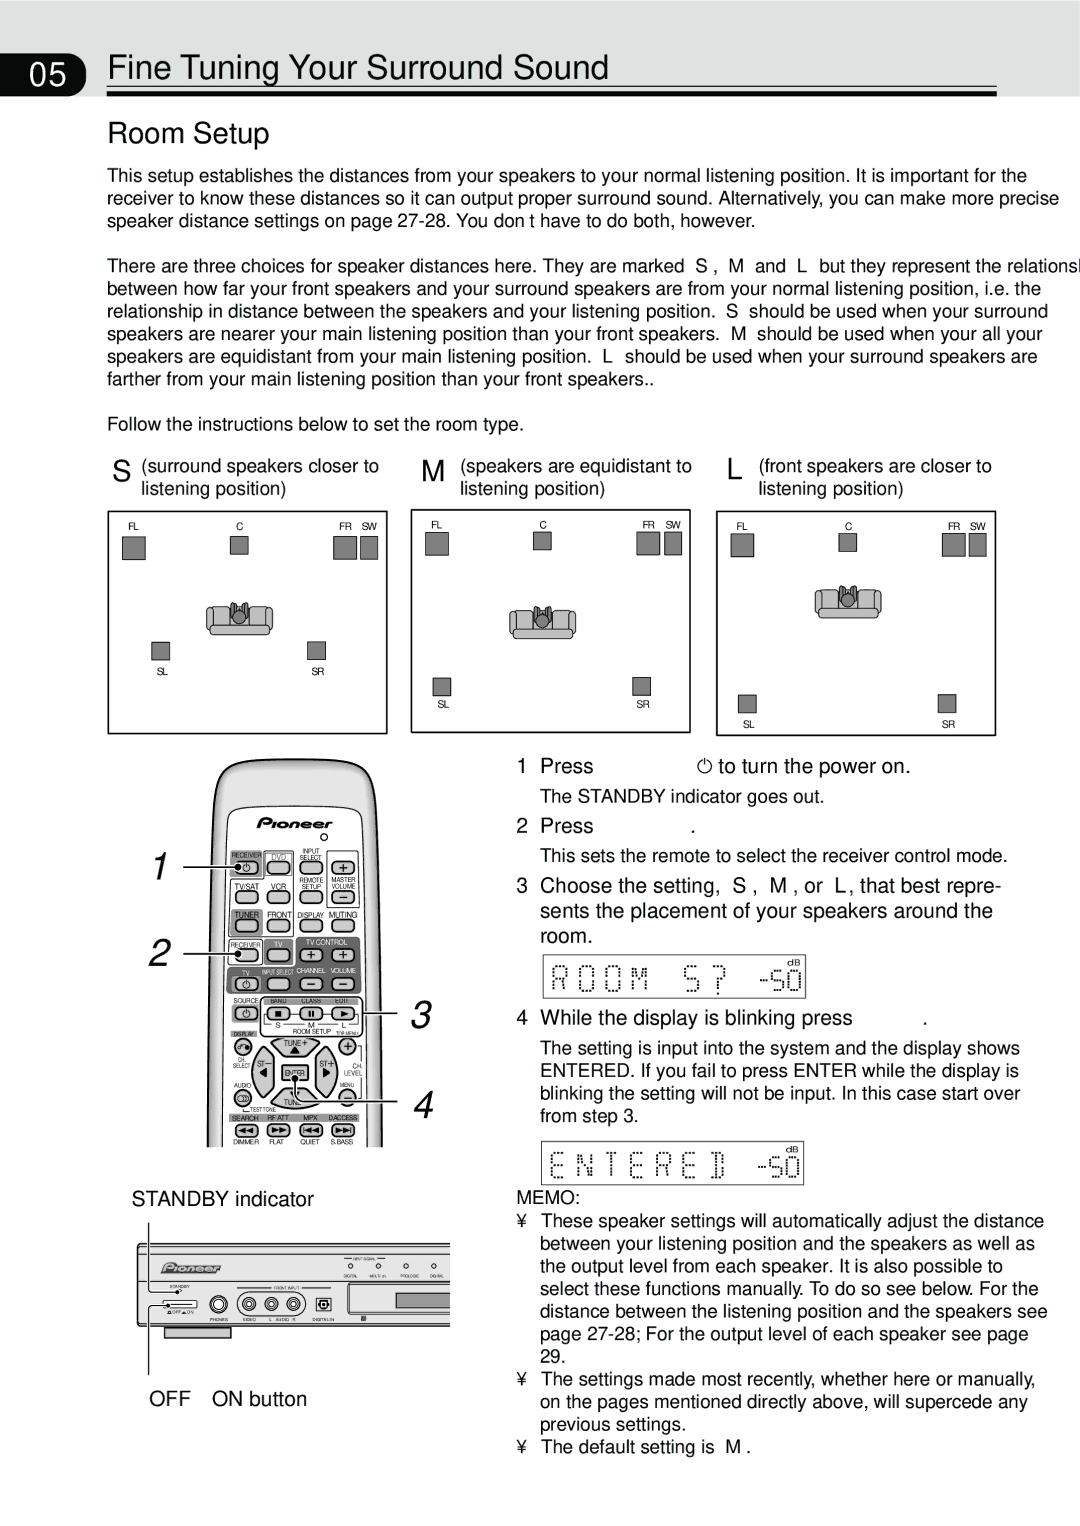
This setup establishes the distances from your speakers to your normal listening position. It is important for the receiver to know these distances so it can output proper surround sound. Alternatively, you can make more precise speaker distance settings on page 27-28. You don’t have to do both, however.

There are three choices for speaker distances here. They are marked ‘S’, ‘M’ and ‘L’ but they represent the relationship between how far your front speakers and your surround speakers are from your normal listening position, i.e. the relationship in distance between the speakers and your listening position. ‘S’ should be used when your surround speakers are nearer your main listening position than your front speakers. ‘M’ should be used when your all your speakers are equidistant from your main listening position. ‘L’ should be used when your surround speakers are farther from your main listening position than your front speakers..

Follow the instructions below to set the room type.

S (surround speakers closer to

M (speakers are equidistant to


listening position)


listening position)


FL


C

FR SW


FL


C

FR SW


SL

SR

SL

SR

L

(front speakers are closer to


listening position)


FL


C

FR SW


SL

SR

1

2

INPUT

RECEIVER DVD SELECT

REMOTE MASTER

TV/SAT VCR SETUP VOLUME

TUNER FRONT DISPLAY MUTING

RECEIVER

TV

TV CONTROL

TV

INPUT SELECT CHANNEL VOLUME

SOURCE BAND CLASS EDIT

S

M

L

DISPLAY

ROOM SETUP

TOP MENU


1

Press RECEIVER


to turn the power on.


The STANDBY indicator goes out.


2

Press RECEIVER.


This sets the remote to select the receiver control mode.


3

Choose the setting, ‘S’, ‘M’, or ‘L’, that best repre-


sents the placement of your speakers around the


room.


dB


3


4

While the display is blinking press ENTER.


TUNE


CH.

ST

ST


SELECT

CH.


ENTER


LEVEL

AUDIOMENU

TUNE

TEST TONE


4

SEARCH

RF ATT

MPX

D.ACCESS

DIMMER

FLAT

QUIET

S.BASS


STANDBY indicator

INPUT SIGNAL

DIGITAL

MULTI ch

2PROLOGIC 2DIGITAL

STANDBY


FRONT INPUT


OFF ON


PHONES

VIDEO

L AUDIO R

DIGITAL IN

OFF _ON button

24

The setting is input into the system and the display shows ENTERED. If you fail to press ENTER while the display is blinking the setting will not be input. In this case start over from step 3.

dB

MEMO:

These speaker settings will automatically adjust the distance between your listening position and the speakers as well as the output level from each speaker. It is also possible to select these functions manually. To do so see below. For the distance between the listening position and the speakers see page 27-28; For the output level of each speaker see page 29.

The settings made most recently, whether here or manually, on the pages mentioned directly above, will supercede any previous settings.

The default setting is ‘M’.

En

Page 24
Image 24
Pioneer VSX-C300-S manual Fine Tuning Your Surround Sound, Room Setup

VSX-C300-S, VSX-C300 specifications

The Pioneer VSX-C300 and VSX-C300-S are compact, versatile audio receivers that cater to both casual listeners and home theater enthusiasts. Designed with modern technology and user-friendly features, these models deliver impressive sound quality in a sleek and stylish package.

One of the standout features of both the VSX-C300 and VSX-C300-S is their 5.1 channel surround sound capability. This allows users to enjoy a rich audio experience, whether watching movies or listening to music. The receivers support various audio formats, including Dolby Digital and DTS, ensuring comprehensive compatibility with a wide range of media.

Both models are equipped with Advanced Direct Energy HD Amplification technology, which minimizes energy waste while maximizing output quality. This technology not only reduces power consumption but also enhances audio clarity, providing a dynamic listening experience. Additionally, the receivers feature 100 watts per channel, which ensures sufficient power for driving speakers while maintaining low distortion levels.

Integrated into the VSX-C300 and VSX-C300-S is a multitude of connectivity options. These receivers include HDMI inputs, which support high-definition video and audio, along with analog inputs for legacy devices. The availability of digital optical and coaxial inputs further enhances flexibility, offering users multiple ways to connect their media sources.

The user interface is intuitive, featuring a clear display and an easy-to-navigate remote control. Both receivers also support basic networking capabilities, allowing users to access music streaming services. This feature is particularly appealing in today's digital age, where convenience and access to a vast library of music are paramount.

Pioneer places a strong emphasis on ease of use, and both receivers reflect that ethos. Automatic speaker calibration simplifies the setup process, ensuring that users achieve optimal sound quality tailored to their room's acoustics. The included MCACC (Multi-Channel Acoustic Calibration System) automatically adjusts settings to create an immersive sound environment.

In summary, the Pioneer VSX-C300 and VSX-C300-S combine stylish design with advanced audio technology. Their 5.1 channel surround sound, Advanced Direct Energy HD Amplification, multiple connectivity options, and user-friendly features make these receivers an excellent choice for anyone looking to enhance their audio experience. Whether for movie nights or enjoying music, these receivers are a solid investment for quality sound.