1100Z
Precautions
DOC Compliance Notice
Installation
Power Supply
Cleaning
Lamp Replacement
Fire and Shock Precautions
Major Features
Sharp, clear picture
High contrast ration
Beautiful reproduction of high-quality images from DVD
Table of Contents
Adjustments and Settings
Table of Contents
Menu Operations
Miscellaneous
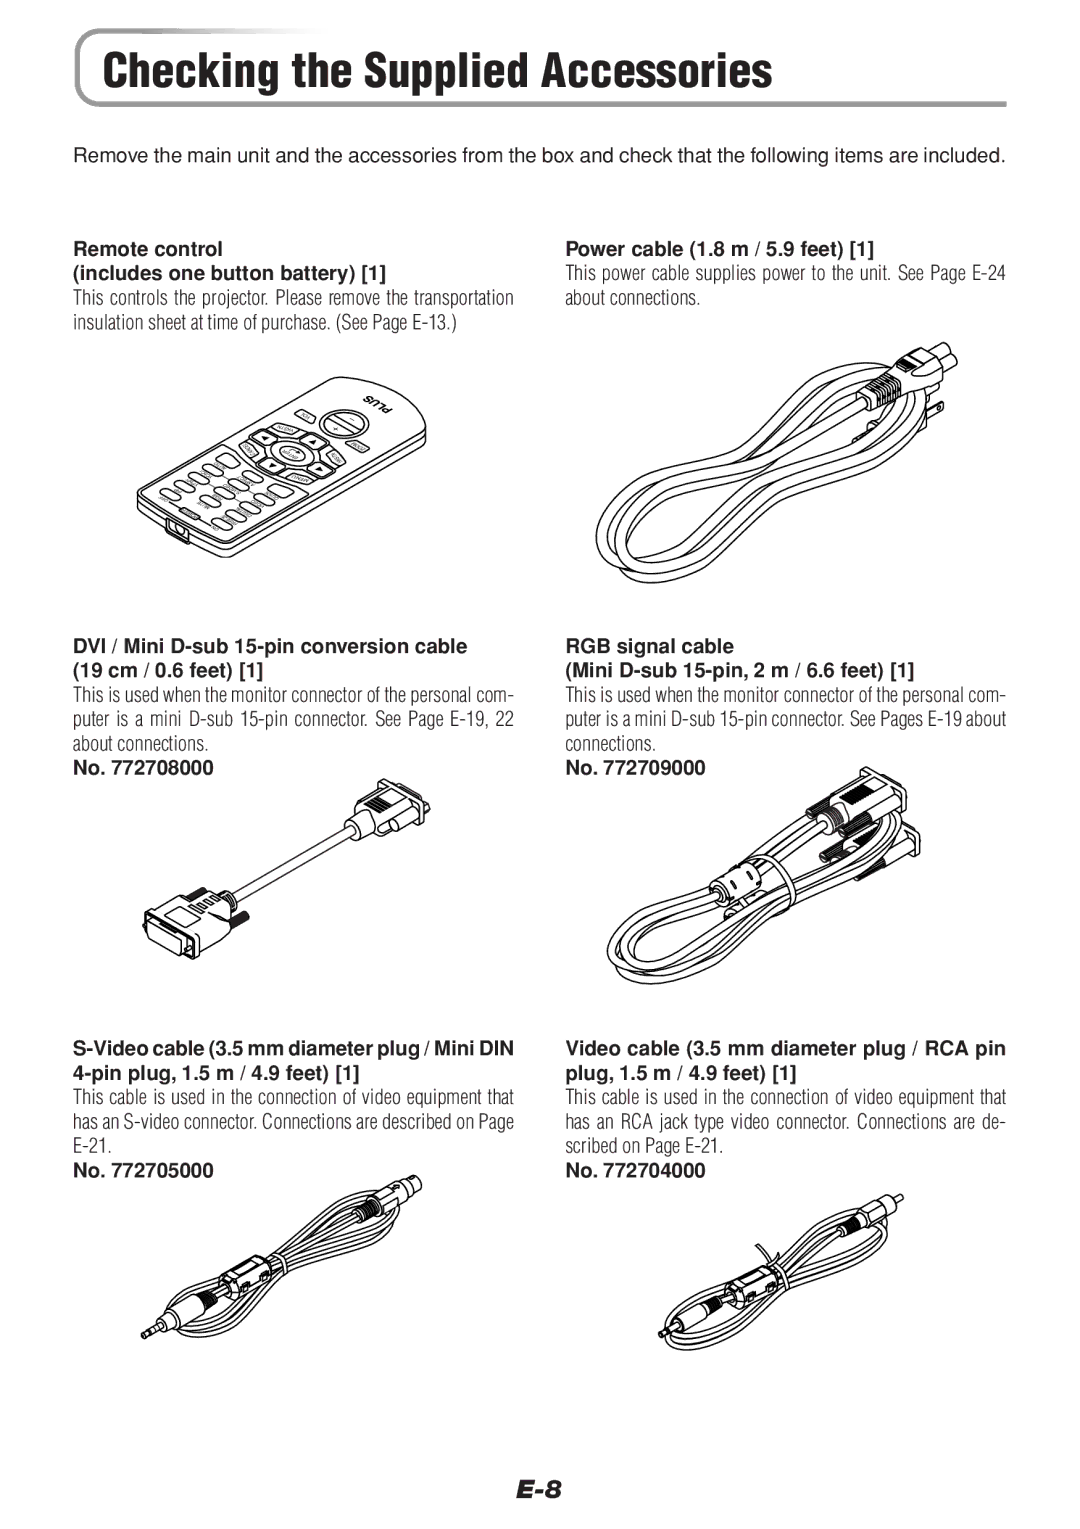
Checking the Supplied Accessories
Remote control Includes one button battery
Power cable 1.8 m / 5.9 feet
RGB signal cable Mini D-sub 15-pin, 2 m / 6.6 feet
Checking the Supplied Accessories
Accessories Projector
Names of the Main Unit Parts
PC connector E-18,19
Built-in Security Slot
Names of the Main Unit Parts
Audio jack E-23 Video jack E-21
Power button E-24
Infrared transmitter E-14
Freeze button E-31
Mute button E-31
Preparing the Remote Control
Button Battery Replacement
Using the remote control for the first time
Replacement Method
Remote Control Range
Preparing the Remote Control
Side View
Top View
Connecting the power cable and switching on the power
Focusing
Adjust the screen or video image
Position the projector
Screen Size Designation Inches
Placement Guide
Screen Size and Projection Distance
Placement Guide
Height
Monitor output
Connections with PC Connectors
Personal Computers with a DVI Connector
Personal computer
Personal Computers with a Mini D-Sub 15-Pin Connector
Monitor output RGB signal cable Supplied item
Manufacturer Model Key
To Output the External Output Signal of a Notebook Computer
Connecting Personal Computers and Video Equipment
Connections with Video Connectors
Video Equipment with Video Connectors
Video Equipment with S-VIDEO Connectors
Video cable Suppled item Video cable Supplied item
Connections with Component Signals
When the Video Connectors are Y, Cb, and Cr Connectors
When the Video Connectors are Y, Pb, and Pr Connectors
Component cable Available as an option
Audio cable Supplied item
Connections with Audio Connectors
Video equipment, personal computer
Switch on the projector power
Remote control operation Press the Power on button
Operating
Lit amber To wall outlet Firmly plug in all the way
Finishing
Power Cable Connections and Switching the Power On/Off
Unplug the power cable
Adjust the projection image to the screen
Adjustment of the Projection Screen
Projection Screen Position Adjustment
Adjustment of the Projection Screen
Focus Adjustment
Making Adjustments with the Adjusters
When Auto Source is On
When Auto Source is Off
General Operation
Input Selection
General Operation
Automatic Adjustment of Analog RGB
Main unit operation/Remote control operation Press
Projects the input signal without pixel conversion
Selection of Aspect Ratio
Full screen in a ratio
Mum displayable size
Cancelling Video and Audio Temporarily
Projecting a Sub-Picture
Freezing a Moving Picture
Sub-picture Main-picture
Using the Quick Menu
Remote control operation
Content of Adjustments and Settings
Straight on beforehand
Adjustment Method
Correcting Keystone Distortion of the Projection Screen
No enlargement Approximately 2 times enlargement Movement
Enlargement of the Image and Video Movement
Image can also be moved in the following circumstances
Adjustment of the Volume
Press the VOL button Volume adjustment display will appear
Menu Operation Method
Names and Functions of the Parts
Names and Functions of Menu Screen Parts
Menu Operation Method
Performing Menu Operations
Menu Display Press the Menu button to display the menu
Cursor Dark blue
This condition allows selection of the item name
Stone example of the description diagram
When Icon is displayed and depend
When a button is pressed, the image will also change
Displays Icon. The sub menu will be
Cursor
Press of the Menu button while
Cursor is not displayed will close the menu
Display
Selecting Another Menu Name with Remote Control Operation
When a sub menu is displayed, press the can
Press the Cancel button again and cancel
CEL button and close the sub menu
Input Signal
Menu Name Item Name
Name
Image
Status Factory Default Lamp Timer Reset Resolution Frequency
Sub Menu Item
Item Name Cursor � Button Cursor � Button
Picture
Brightness / Contrast / Color / Tint / Sharpness
Picture Adj. Picture Adjustment
Picture Adj. / Fine Picture / H Position / V Position
Fine Picture
Picture
Reset
Adjustment/setting value of the Image menu name
Press of the cursor � button forces the reset
Position
Color
Quick Color Adj
Gamma
Color Temp
White
Color System
Color Space
Color
Personal Computer Signal
Video Signals
View
Aspect
View
Filter
Projection
Keystone
Horizontal keystone the dotted screen outline
Size Settings
Position Settings
Picture in Picture
Keystone Save
Auto Source
Setup
Language
Auto Power Off
Setup
Operation when Function is On
On Screen
Menu Position
YPbPr
Background
This function sets the display position of the menu
White Balance
Factory Default
Lamp Timer Reset
Info
Status
Resolution / Frequency
Lamp Timer
This function displays the lamp timer
Info
When the Status Indicator is Lit/Flashes
Temperature has become abnormally high
Lamp will not light up
Fan is stopped
When the Status Indicator is Lit/Flashes
It is timer to replace the lamp
Lamps service life has ended
Thermal Protector
Troubleshooting
Check the following matters before requesting servicing
Troubleshooting
Cleaning
Cleaning a Soiled Projector Main Unit
Cleaning the Inside of the Projector
Dirty Lens
Replacing the Lamp Cartridge
Remove the lamp cartridge
Replacing the Lamp Cartridge
Reset the lamp timer to zero
Install the new lamp cartridge
Install the lamp cover
Specifications
Optical
Electrical
Mechanical
Table of Supported Frequency
Vesa
Unit mm inch 180
Cabinet Dimensions
163
2003