“POWERED-PASSIVE” SPEAKER PAIR HOOKUP & ADJUSTMENT
This pair of Self-Powered Atrium Speakers makes it easy to take your music with you to remote locations. You can even use them to add superb stereo sound to a non-amplified source such
as a television.
One speaker in the pair is the Powered speaker. It has a built-in power amplifier and must be plugged into a standard household AC power source in order to operate. The other speaker is the Passive (non-powered) speaker, which is run by power from the Powered speaker. This passive speaker can be placed as near or far from the Powered Speaker as is convenient.
Your Atrium Powered Speaker can be either the left or right speaker of a stereo pair, depending on convenient placement near a standard household AC power source. Use the “balance” control of your electronics to send the signal alternately to
the left and then to the right. If you find stereo imaging is “backwards” after you’ve hooked up the Line Level inputs, simply switch the 1 & 2 inputs to flip-flop the Left & Right stereo images.
Hookup #1—Line Level [figure 7]. Use this hookup option for:
-Multi-Zone (separate electronic zone controls)
-Television (audio Left & Right outputs from TV)
-Portable Music Device (use a “stereo mini plug” connected
to twin male RCA plugs available at RadioShack)
•Turn your source electronics off.
•Attach Line Level connections from your receiver, pre-amp output or TV set audio out jack to the L & R Line Level Inputs on the back panel of the Self-Powered Atrium Powered Speaker. Use well-shielded RCA cables.
•Use speaker wire of the correct length to attach the Powered Speaker to its Passive partner via Binding Post connections [figures 9 & 10].
CONNEXION ET RÉGLAGE D’UNE PAIRE D’ENCEINTES «ACTIVE-PASSIVE»
Cette paire d’enceintes Atrium vous permet d’avoir du son de qualité audiophile dans toute la maison. Vous pouvez les utiliser avec des appareils non amplifiés comme un téléviseur, un ordina- teur ou un lecteur portable. Une des enceintes de cette paire est active. Elle est dotée d’un amplificateur stéréo et doit être branchée dans une prise de courant CA standard pour fonction- ner. L’autre enceinte est passive (sans amplificateur) et reçoit sa puissance de l’amplificateur stéréo de l’enceinte active. Elle peut être installée à n'importe quelle distance de l’enceinte active. L’enceinte Atrium active peut être utilisée pour reproduire le canal gauche ou le canal droit selon sa distance pratique d'une prise de courant. Utilisez le contrôle de «balance» de votre com- posant électronique pour régler l’équilibre de volume entre les deux canaux. Si vous désirez inverser les canaux gauche et droit, inversez les câbles des entrées de l’enceinte active.
Méthode de connexion #1 - Niveau de ligne [figure 7]. Utilisezcette méthode pour:
-composants avec fonction «multi-zone» (contrôles électroniques individuels des zones)
-téléviseur (sortie audio des canaux gauche et droite du téléviseur)
-lecteur portable - utilisez un câble audio avec une mini fiche stéréo à un bout et deux connecteurs RCA mâles à l’autre bout.
•Éteignez votre composant de source.
•Raccordez les sorties niveau de ligne de votre récepteur, pré- ampli, télé ou autre composant de source aux entrées niveau de ligne situées à l'arrière de l’enceinte active Atrium.
Utilisez du câble blindé RCA.
•Raccordez les bornes h.p. de l’enceinte passive à celles de l’enceinte active avec du fil de h.p. [figures 9 et 10].
•Note that one of the “OUTPUT TO PASSIVE SPEAKER” termi- nals on the rear of the speaker is red (+) and the other is black (-). Make certain that you connect the wire from the red termi- nal of the amplified speaker to the red terminal on the passive speaker and the black terminal of your amplified speaker to the black terminal on the passive speaker [figures 9 & 10]. Most wire has some indicator (such as color-coding, ribbing or writing) on one of the two conductors to help you maintain consistency.
•Only after you have made your speaker connections, attach the External AC Power Pack to the Powered Speaker [figure 11]. Plug the Power Pack into a standard household AC power source, and then turn on your electronics.
Hookup Hookup #2—Speaker Wire [figure 8]. Use this hookup method with speaker wire to remote locations, for “Multi-Room” (selectable “A” or “B” speaker-set on your electronics) applications.
•Turn your source electronics off.
•Attach Speaker Wire from your receiver or amplifier to the Left and Right Speaker Wire Input Posts on the back panel of the Self-Powered Atrium Powered Speaker.
•Strip 1/2 inch (12.7mm) of insulation from each of the two conductors of the wire to expose the bare metal and twist each of the conductors into a single unfrayed strand (so you have two unfrayed strands). Note that one of the terminals on the rear of the speaker is red (+) and the other is black (-). Make certain that you connect the wire from the red terminal of your amplifier or receiver to the red terminal on your spea- ker and the wire from the black terminal of your amplifier or receiver to the black terminal on your speaker [figure 8]. Most wire has some indicator (such as color-coding, ribbing or writing) on one of the two conductors to help you maintain consistency.
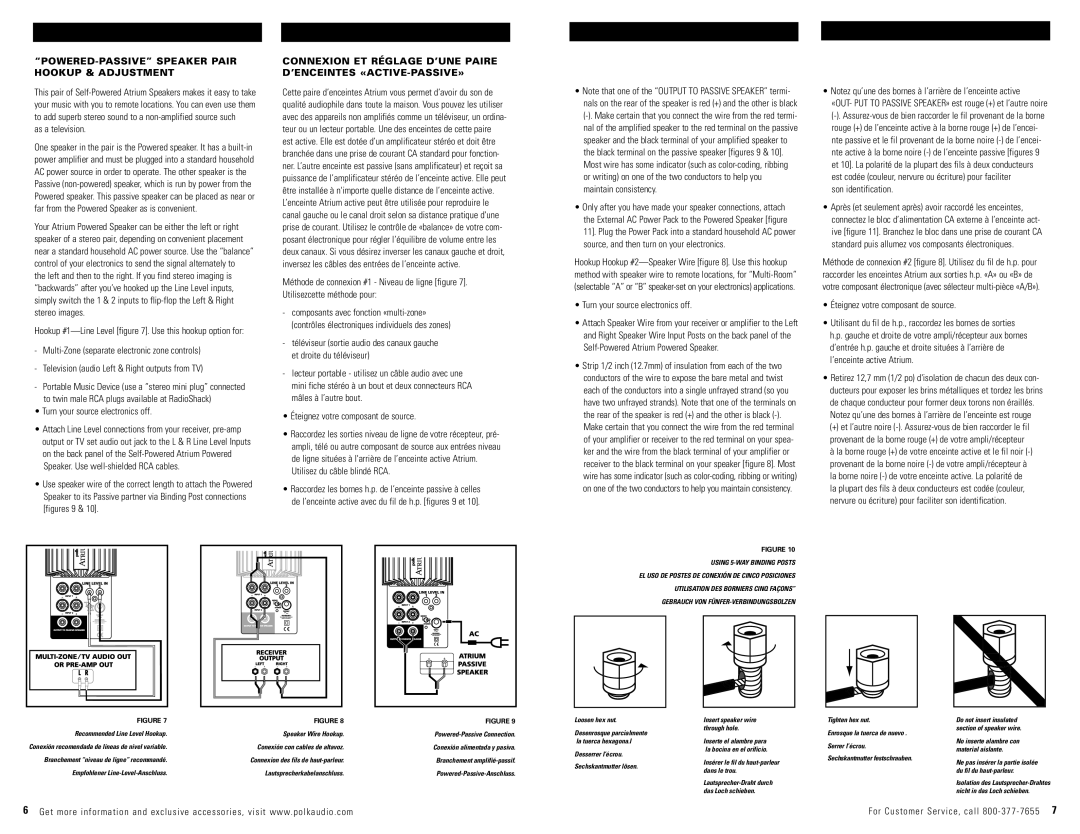
FIGURE 10
USING 5-WAY BINDING POSTS
EL USO DE POSTES DE CONEXIÓN DE CINCO POSICIONES
UTILISATION DES BORNIERS CINQ FAÇONS”
GEBRAUCH VON FÜNFER-VERBINDUNGSBOLZEN
•Notez qu’une des bornes à l’arrière de l’enceinte active «OUT- PUT TO PASSIVE SPEAKER» est rouge (+) et l’autre noire (-). Assurez-vous de bien raccorder le fil provenant de la borne rouge (+) de l’enceinte active à la borne rouge (+) de l’encei- nte passive et le fil provenant de la borne noire (-) de l’encei- nte active à la borne noire (-) de l’enceinte passive [figures 9 et 10]. La polarité de la plupart des fils à deux conducteurs est codée (couleur, nervure ou écriture) pour faciliter
son identification.
•Après (et seulement après) avoir raccordé les enceintes, connectez le bloc d’alimentation CA externe à l’enceinte act- ive [figure 11]. Branchez le bloc dans une prise de courant CA standard puis allumez vos composants électroniques.
Méthode de connexion #2 [figure 8]. Utilisez du fil de h.p. pour raccorder les enceintes Atrium aux sorties h.p. «A» ou «B» de votre composant électronique (avec sélecteur multi-pièce «A/B»).
•Éteignez votre composant de source.
•Utilisant du fil de h.p., raccordez les bornes de sorties h.p. gauche et droite de votre ampli/récepteur aux bornes d’entrée h.p. gauche et droite situées à l’arrière de l’enceinte active Atrium.
•Retirez 12,7 mm (1/2 po) d'isolation de chacun des deux con- ducteurs pour exposer les brins métalliques et tordez les brins de chaque conducteur pour former deux torons non éraillés. Notez qu’une des bornes à l’arrière de l’enceinte est rouge
(+) et l’autre noire (-). Assurez-vous de bien raccorder le fil provenant de la borne rouge (+) de votre ampli/récepteur à la borne rouge (+) de votre enceinte active et le fil noir (-) provenant de la borne noire (-) de votre ampli/récepteur à la borne noire (-) de votre enceinte active. La polarité de la plupart des fils à deux conducteurs est codée (couleur, nervure ou écriture) pour faciliter son identification.
FIGURE 7 | FIGURE 8 |
Recommended Line Level Hookup. | Speaker Wire Hookup. |
Conexión recomendada de líneas de nivel variable. | Conexión con cables de altavoz. |
Branchement “niveau de ligne” recommandé. | Connexion des fils de haut-parleur. |
Empfohlener Line-Level-Anschluss. | Lautsprecherkabelanschluss. |
| FIGURE 9 | Loosen hex nut. |
| Powered-Passive Connection. | Desenrosque parcialmente |
| Conexión alimentada y pasiva. | la tuerca hexagona.l |
| Desserrer l’écrou. |
| Branchement amplifié-passif. |
| Sechskantmutter lösen. |
| Powered-Passive-Anschluss. |
| |
Insert speaker wire through hole.
Inserte el alambre para la bocina en el orificio.
Insérer le fil du haut-parleur dans le trou.
Lautsprecher-Draht durch das Loch schieben.
Tighten hex nut.
Enrosque la tuerca de nuevo .
Serrer l’écrou.
Sechskantmutter festschrauben.
Do not insert insulated section of speaker wire.
No inserte alambre con material aislante.
Ne pas insérer la partie isolée du fil du haut-parleur.
Isolation des Lautsprecher-Drahtes nicht in das Loch schieben.