Polk Audio EX SERIES II There is sufficient depth behind the spot you choose, Still mounted

Models: EX SERIES II

1 8
Download 8 pages 25.67 Kb
Page 6
Image 6

The Polk EX2500 tweeter offers two mounting options for installation flexibility. Mounting Option #1 – Surface mounting the EX2500 Tweeter

1.Using the base of the surface mount cup as a template, mark the two screw holes and drill using a 1/8 inch drill bit. Drill a third hole (for the speaker wire) using the 1/4 inch drill bit.

2.Attach either surface mount cup (angled or straight) to the panel using #8 screws of appropriate length for the panel.

3.Push the tweeter wires through the open area at the bottom of the cup and through the 1/4" hole in the panel.

4.Connect wires from the tweeter terminals of the crossover, to the tweeter wires, using the faston connectors. Connect the red wire strand to the (+) terminal of the crossover tweeter output and to the red wire on your tweeters.

5.Mount the tweeter by snapping it into the mounting cup and turning the tweeter

clockwise, locking the tweeter in place.

Mounting Option #2 – Flush mounting the EX2500 Tweeter

1.

Remove the panel on which you are going to mount the tweeter and check for proper


clearance behind it. The flush mount kit is 1/2 inch deep. Measure to make sure


there is sufficient depth behind the spot you choose.

2.

Mark the center of the spot and cut a hole with the 1 3/4 inch hole saw attachment


for your power drill. Go slow. You can use a razor knife instead of a drill if you prefer.

3.

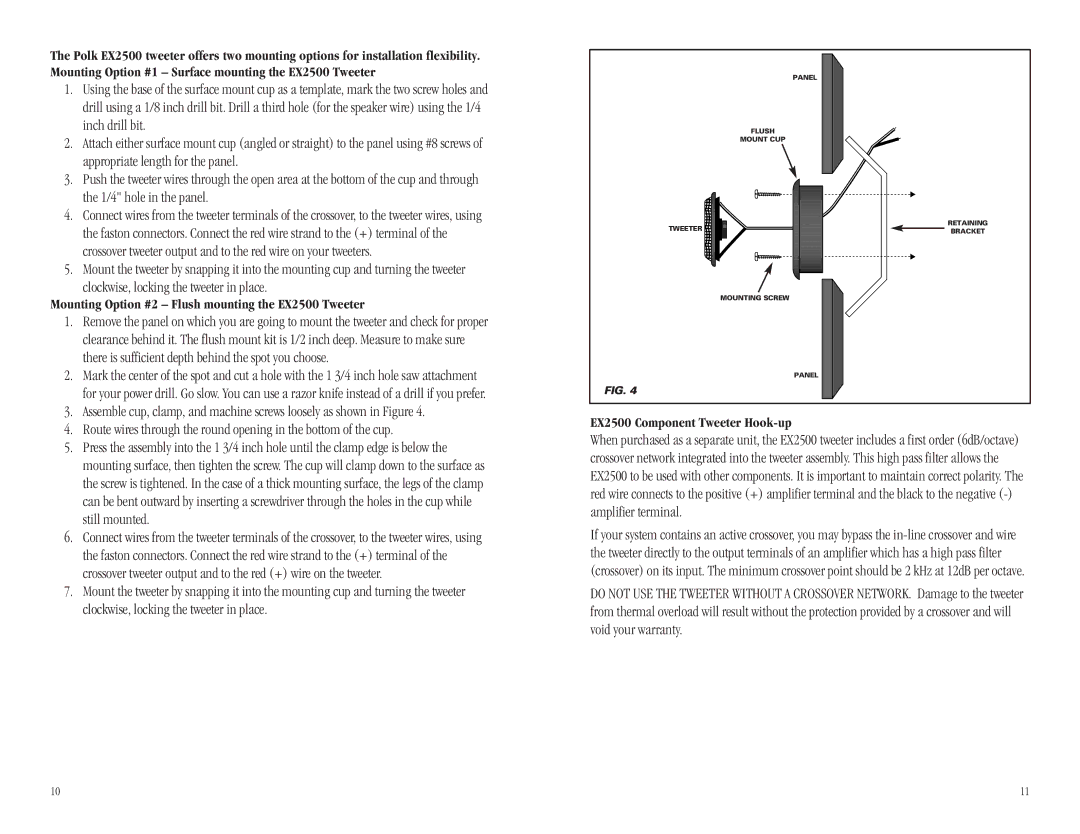
Assemble cup, clamp, and machine screws loosely as shown in Figure 4.

PANEL

FLUSH

MOUNT CUP

TWEETER

MOUNTING SCREW

PANEL

FIG. 4

RETAINING

BRACKET

4.

Route wires through the round opening in the bottom of the cup.

5.

Press the assembly into the 1 3/4 inch hole until the clamp edge is below the


mounting surface, then tighten the screw. The cup will clamp down to the surface as


the screw is tightened. In the case of a thick mounting surface, the legs of the clamp


can be bent outward by inserting a screwdriver through the holes in the cup while


still mounted.

6.

Connect wires from the tweeter terminals of the crossover, to the tweeter wires, using


the faston connectors. Connect the red wire strand to the (+) terminal of the


crossover tweeter output and to the red (+) wire on the tweeter.

7.

Mount the tweeter by snapping it into the mounting cup and turning the tweeter


clockwise, locking the tweeter in place.

EX2500 Component Tweeter Hook-up

When purchased as a separate unit, the EX2500 tweeter includes a first order (6dB/octave) crossover network integrated into the tweeter assembly. This high pass filter allows the EX2500 to be used with other components. It is important to maintain correct polarity. The red wire connects to the positive (+) amplifier terminal and the black to the negative (-) amplifier terminal.

If your system contains an active crossover, you may bypass the in-line crossover and wire the tweeter directly to the output terminals of an amplifier which has a high pass filter (crossover) on its input. The minimum crossover point should be 2 kHz at 12dB per octave.

DO NOT USE THE TWEETER WITHOUT A CROSSOVER NETWORK. Damage to the tweeter from thermal overload will result without the protection provided by a crossover and will void your warranty.

10

11

Page 6
Image 6
Polk Audio EX SERIES II owner manual There is sufficient depth behind the spot you choose, Still mounted

EX SERIES II specifications

Polk Audio has long been a respected name in the audio industry, and its EX Series II speakers continue this legacy with an impressive blend of performance, design, and value. Designed to deliver an immersive audio experience, the EX Series II is perfect for music lovers and movie enthusiasts alike.

One of the standout features of the EX Series II is its Dynamic Balance technology. This proprietary technology helps to eliminate distortion and provide a smooth, accurate sound profile. By utilizing a unique driver design, Polk ensures that every note across a wide frequency range is reproduced with clarity. The result is a balanced sound that captures the nuances of recordings, making it ideal for both music playback and surround sound systems.

The speakers in the EX Series II are constructed with high-quality materials, featuring lightweight, yet strong enclosures that minimize unwanted vibrations. This design characteristic not only enhances sound quality but also ensures durability over time. The sleek and modern appearance of the speakers means they can seamlessly integrate into any room’s décor, making them visually appealing as well.

Another impressive aspect of the EX Series II is its versatility. Whether you’re setting up a dedicated home theater or simply looking to enhance your everyday listening experience, these speakers shine. They are available in a range of configurations, including floor-standing, bookshelf, and center channel options, allowing users to build a customized audio setup that meets their specific needs.

Polk Audio also incorporates its patented Power Port technology in the EX Series II, which enhances low-frequency response by reducing turbulence and improving airflow. This innovative design results in deeper bass that you can feel while ensuring that the sound remains clear and articulated.

Additionally, the EX Series II is compatible with a range of amplifiers and receivers, making it easy to integrate into existing systems. The speakers are engineered to handle high power input, allowing them to produce loud volumes without sacrificing sound quality.

In conclusion, the Polk Audio EX Series II embodies the brand's dedication to quality and innovation. With features like Dynamic Balance technology, durable construction, versatile configurations, and enhanced bass response, these speakers are a strong choice for anyone looking to elevate their audio experience. Whether for movies, music, or gaming, the EX Series II delivers performance that promises to impress even the most discerning audiophiles.