Polk Audio TC610i TC615i owner manual

Models: TC610i TC615i

1 12
Download 12 pages 62.37 Kb
Page 8
Image 8

Once you have cut the hole, fish your previously positioned wiring out of the hole and connect the speaker. Follow the hookup directions included with your receiver. Strip 1/2 inch

(12 mm) of insulation from each of the two conductors of the wire to expose the bare metal and twist each of the conduc- tors into a single unfrayed strand (so you have two unfrayed strands). Note that one of the terminals on the rear of each speaker is red (+) and the other is black (-). Make certain that you connect the wire from the red terminal (+) of your amplifier or receiver to the red terminal (+) on your speaker and the wire from the black terminal (-) of your amplifier or receiver to the black terminal (-) on your speaker. Most wire has some indica- tor (such as color-coding, ribbing or writing) on one of the two conductors to help you maintain consistency [figure 12].

To install the speaker, first carefully remove the grille using a straightened paperclip or other pointed metal tool. Insert the point into one of the grille perforations near a corner and lift the grille free. Never use a knife or screwdriver to pry between the grille and the speaker frame. This will damage your speaker.

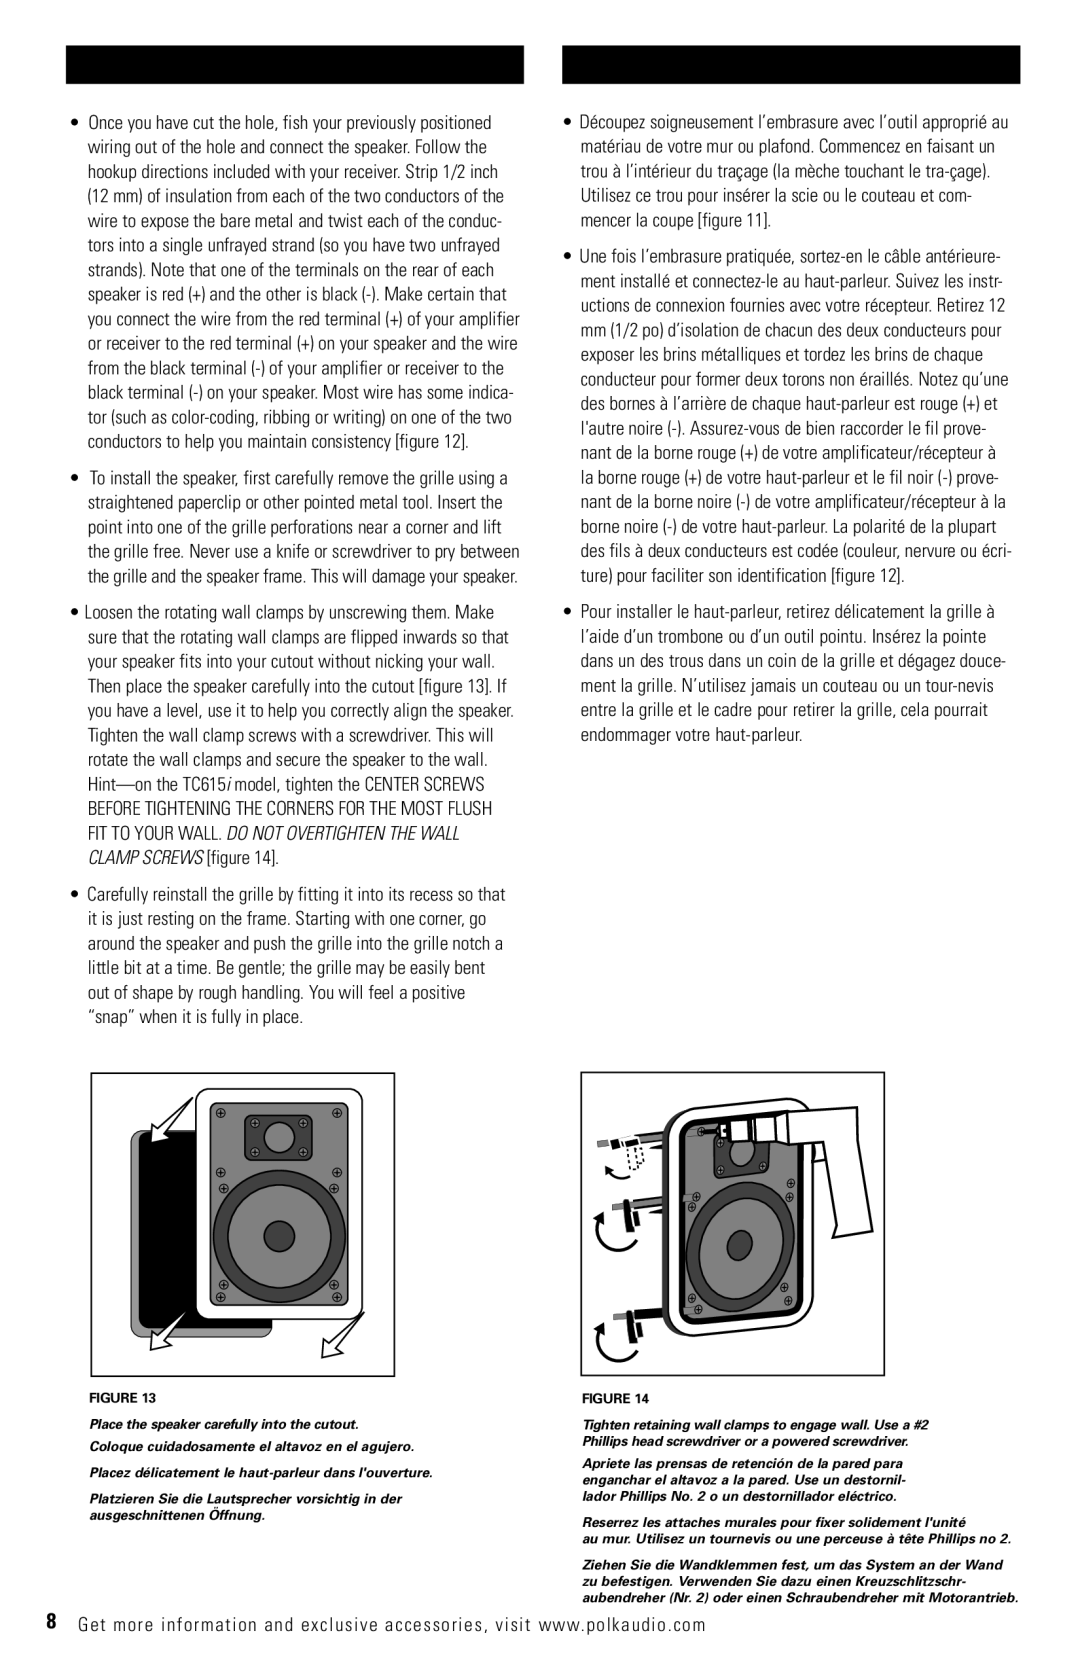
Loosen the rotating wall clamps by unscrewing them. Make sure that the rotating wall clamps are flipped inwards so that your speaker fits into your cutout without nicking your wall. Then place the speaker carefully into the cutout [figure 13]. If you have a level, use it to help you correctly align the speaker. Tighten the wall clamp screws with a screwdriver. This will rotate the wall clamps and secure the speaker to the wall. Hint—on the TC615i model, tighten the CENTER SCREWS BEFORE TIGHTENING THE CORNERS FOR THE MOST FLUSH FIT TO YOUR WALL. DO NOT OVERTIGHTEN THE WALL CLAMP SCREWS [figure 14].

Carefully reinstall the grille by fitting it into its recess so that it is just resting on the frame. Starting with one corner, go around the speaker and push the grille into the grille notch a little bit at a time. Be gentle; the grille may be easily bent out of shape by rough handling. You will feel a positive “snap” when it is fully in place.

Découpez soigneusement l’embrasure avec l’outil approprié au matériau de votre mur ou plafond. Commencez en faisant un trou à l’intérieur du traçage (la mèche touchant le tra-çage). Utilisez ce trou pour insérer la scie ou le couteau et com- mencer la coupe [figure 11].

Une fois l’embrasure pratiquée, sortez-en le câble antérieure- ment installé et connectez-le au haut-parleur. Suivez les instr- uctions de connexion fournies avec votre récepteur. Retirez 12 mm (1/2 po) d’isolation de chacun des deux conducteurs pour exposer les brins métalliques et tordez les brins de chaque conducteur pour former deux torons non éraillés. Notez qu’une des bornes à l’arrière de chaque haut-parleur est rouge (+) et l'autre noire (-). Assurez-vous de bien raccorder le fil prove- nant de la borne rouge (+) de votre amplificateur/récepteur à la borne rouge (+) de votre haut-parleur et le fil noir (-) prove- nant de la borne noire (-) de votre amplificateur/récepteur à la borne noire (-) de votre haut-parleur. La polarité de la plupart des fils à deux conducteurs est codée (couleur, nervure ou écri- ture) pour faciliter son identification [figure 12].

Pour installer le haut-parleur, retirez délicatement la grille à l’aide d’un trombone ou d’un outil pointu. Insérez la pointe dans un des trous dans un coin de la grille et dégagez douce- ment la grille. N’utilisez jamais un couteau ou un tour-nevis entre la grille et le cadre pour retirer la grille, cela pourrait endommager votre haut-parleur.

FIGURE 13

Place the speaker carefully into the cutout. Coloque cuidadosamente el altavoz en el agujero.

Placez délicatement le haut-parleur dans l'ouverture.

Platzieren Sie die Lautsprecher vorsichtig in der ausgeschnittenen Öffnung.

FIGURE 14

Tighten retaining wall clamps to engage wall. Use a #2 Phillips head screwdriver or a powered screwdriver.

Apriete las prensas de retención de la pared para enganchar el altavoz a la pared. Use un destornil- lador Phillips No. 2 o un destornillador eléctrico.

Reserrez les attaches murales pour fixer solidement l'unité

au mur. Utilisez un tournevis ou une perceuse à tête Phillips no 2.

Ziehen Sie die Wandklemmen fest, um das System an der Wand zu befestigen. Verwenden Sie dazu einen Kreuzschlitzschr- aubendreher (Nr. 2) oder einen Schraubendreher mit Motorantrieb.

8Get more information and exclusive accessories, visit www.polkaudio.com

Page 8
Image 8
Polk Audio TC610i TC615i owner manual

TC610i TC615i specifications

Polk Audio has a longstanding reputation for delivering high-performance speakers that cater to a wide variety of listening needs. Among their impressive lineup, the TC610i and TC615i models stand out for their innovative features and exceptional sound quality. Designed for home theater systems and music enthusiasts alike, these speakers offer a robust and immersive audio experience.

The TC610i is a compact, bookshelf speaker that boasts a 6.5-inch dynamic balance woofer and a 1-inch silk dome tweeter. This combination allows for a rich and detailed sound profile, making it ideal for music playback and movie watching. The advanced engineering behind the dynamic balance technology minimizes distortion and enhances clarity across various frequencies, ensuring that every note and effect is heard as intended.

On the other hand, the TC615i is designed for those who crave a bit more power and performance. It features a larger 6.5-inch woofer and a 1-inch silk dome tweeter, but its standout attribute lies in its dual front-firing ports. These ports allow the TC615i to deliver deeper bass response and a more extended low-end performance without compromising the overall sound quality. The design encourages efficient airflow, which contributes to the speaker's ability to handle higher volumes with ease.

One of the key characteristics of both the TC610i and TC615i is their stylish appearance. Polk Audio has designed these speakers to blend seamlessly into any home décor. The cabinet is available in various finishes, providing flexibility to match different aesthetics. Their acoustic suspension design not only contributes to their lush sound quality but also ensures that they remain compact and inconspicuous in your living space.

Both models utilize high-quality components, including durable voice coils and premium cabinetry, designed to enhance longevity and performance. They are engineered to work well with various receivers and amplifiers, making them a versatile choice for both novice and experienced audiophiles.

In summary, the Polk Audio TC610i and TC615i speakers exemplify the brand's commitment to delivering high-quality sound. Featuring dynamic balance technology, robust woofers, and stylish designs, these models cater to diverse audio needs while enriching the overall listening experience. Whether used for movie night or an evening of music, they promise to impress with their performance and aesthetic appeal.