RMX® 4000
Installation Quick Start Guide for
RMX 4000
Basic Setup
Before installing the RMX 4000 and performing the Basic Setup, please read the General Safety Precautions described in the Polycom RMX 4000 Hardware Guide.
For a detailed description of Unpacking and Rack mounting instructions, and connecting a DC system, see the Polycom RMX 4000 Hardware Guide.
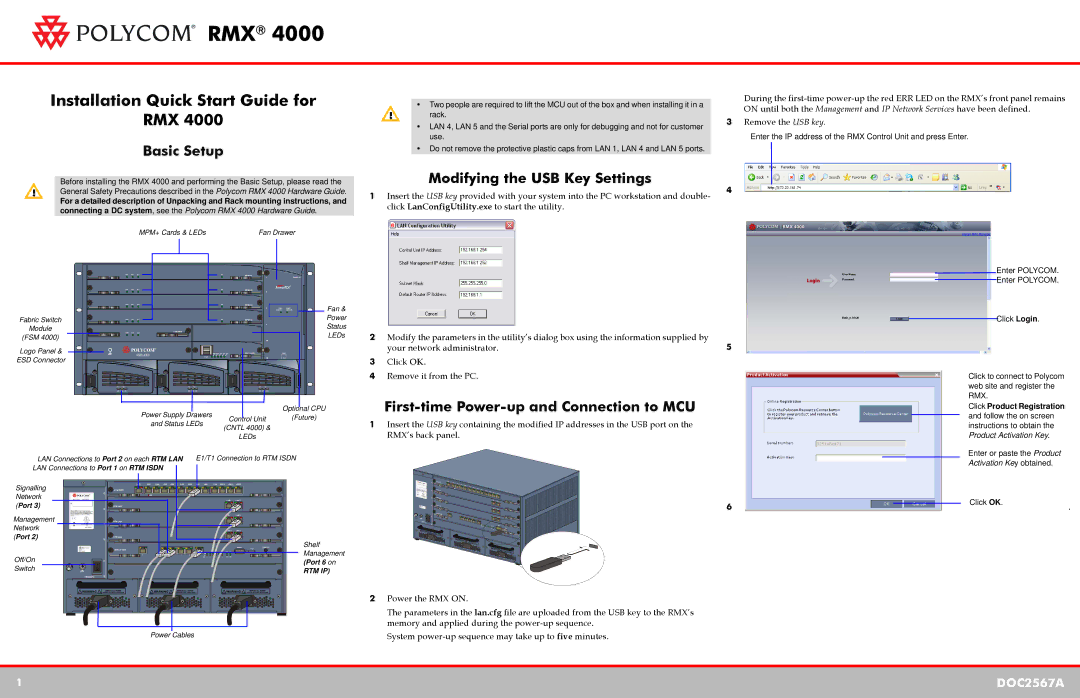
MPM+ Cards & LEDs | Fan Drawer |
•Two people are required to lift the MCU out of the box and when installing it in a rack.
•LAN 4, LAN 5 and the Serial ports are only for debugging and not for customer use.
•Do not remove the protective plastic caps from LAN 1, LAN 4 and LAN 5 ports.
Modifying the USB Key Settings
1Insert the USB key provided with your system into the PC workstation and double- click LanConfigUtility.exe to start the utility.
During the
3Remove the USB key.
Enter the IP address of the RMX Control Unit and press Enter.
4
|
|
|
|
|
|
|
|
|
|
|
|
|
|
|
|
|
| Fan & |
|
|
|
|
|
|
|
|
|
|
|
|
|
|
|
|
|
| |
|
|
|
|
|
|
|
|
|
|
|
|
|
|
|
|
|
| |
|
|
|
|
|
|
|
|
|
|
|
|
|
|
|
|
|
| |
|
|
|
|
|
|
|
|
|
|
|
|
|
|
|
|
|
| |
|
|
|
|
|
|
|
|
|
|
|
|
|
|
|
|
|
| |
Fabric Switch |
|
|
|
|
|
|
|
|
| Power | ||||||||
|
|
|
|
|
|
|
|
| ||||||||||
|
|
|
|
|
|
|
| |||||||||||
Module |
|
| Status | |||||||||||||||
(FSM 4000) |
|
|
|
|
|
|
|
|
|
|
|
|
|
| LEDs | |||
Logo Panel & |
|
|
|
|
|
|
| |||||||||||
|
|
|
| |||||||||||||||
ESD Connector |
|
|
| |||||||||||||||
Power Supply Drawers |
| Optional CPU | |
Control Unit | (Future) | ||
and Status LEDs | |||
(CNTL 4000) & |
| ||
|
| ||
| LEDs |
|
2Modify the parameters in the utility’s dialog box using the information supplied by your network administrator.
3Click OK.
4Remove it from the PC.
First-time Power-up and Connection to MCU
1Insert the USB key containing the modified IP addresses in the USB port on the RMX’s back panel.
5
Enter POLYCOM.
Enter POLYCOM.
Click Login.
Click to connect to Polycom web site and register the RMX.
Click Product Registration and follow the on screen instructions to obtain the Product Activation Key.
LAN Connections to Port 2 on each RTM LAN E1/T1 Connection to RTM ISDN LAN Connections to Port 1 on RTM ISDN
Signalling
Network (Port 3)
Management Network (Port 2)
Off/On
Switch
Shelf Management (Port 6 on
RTM IP)
6
Enter or paste the Product Activation Key obtained.
Click OK. | . |
|
Power Cables
2Power the RMX ON.
The parameters in the lan.cfg file are uploaded from the USB key to the RMX’s memory and applied during the
System
1 | DOC2567A |
|
|