1st Cut
2nd Cut
LIMBING AND PRUNING
![]() WARNING: Be alert for and guard against kickback. Do not allow the moving chain to contact any other branches or ob- jects at the nose of the guide bar when limb- ing or pruning. Allowing such contact can re- sult in serious injury.
WARNING: Be alert for and guard against kickback. Do not allow the moving chain to contact any other branches or ob- jects at the nose of the guide bar when limb- ing or pruning. Allowing such contact can re- sult in serious injury.
![]() WARNING: Never climb into a tree to limb or prune. Do not stand on ladders, plat- forms, a log, or in any position which can cause you to lose your balance or control of the saw.
WARNING: Never climb into a tree to limb or prune. Do not stand on ladders, plat- forms, a log, or in any position which can cause you to lose your balance or control of the saw.
IMPORTANT POINTS
S Work slowly, keeping both hands firmly gripped on saw. Maintain secure footing and balance.
S Watch out for springpoles. Use extreme caution when cutting small size limbs. Slen- der material may catch saw chain and be whipped toward you or pull you off balance.
S Be alert for springback. Watch out for branches that are bent or under pressure. Avoid being struck by the branch or the saw when the tension in the wood fibers is released.
SKeep a clear work area. Frequently clear branches out of the way to avoid tripping over them.
LIMBING
SAlways limb a tree after it is cut down. Only then can limbing be done safely and prop-
erly.
S Leave the larger limbs underneath the felled tree to support the tree as you work.
SStart at base of the felled tree and work to-
ward the top, cutting branches and limbs. Remove small limbs with one cut.
SKeep the tree between you and the chain as much as possible. Cut from the side of the tree opposite the branch your are cut-
ting.
SRemove larger, supporting branches with the cutting techniques described in BUCK-
ING WITHOUT A SUPPORT.
S Always use an overcut to cut small and freely hanging limbs. Undercutting could cause limbs to fall and pinch saw.
PRUNING
![]() WARNING: Limit pruning to limbs shoulder height or below. Do not cut if branches are higher than your shoulder. Get a professional to do the job.
WARNING: Limit pruning to limbs shoulder height or below. Do not cut if branches are higher than your shoulder. Get a professional to do the job.
SMake your fist cut 1/3 of the way through the bottom of the limb.
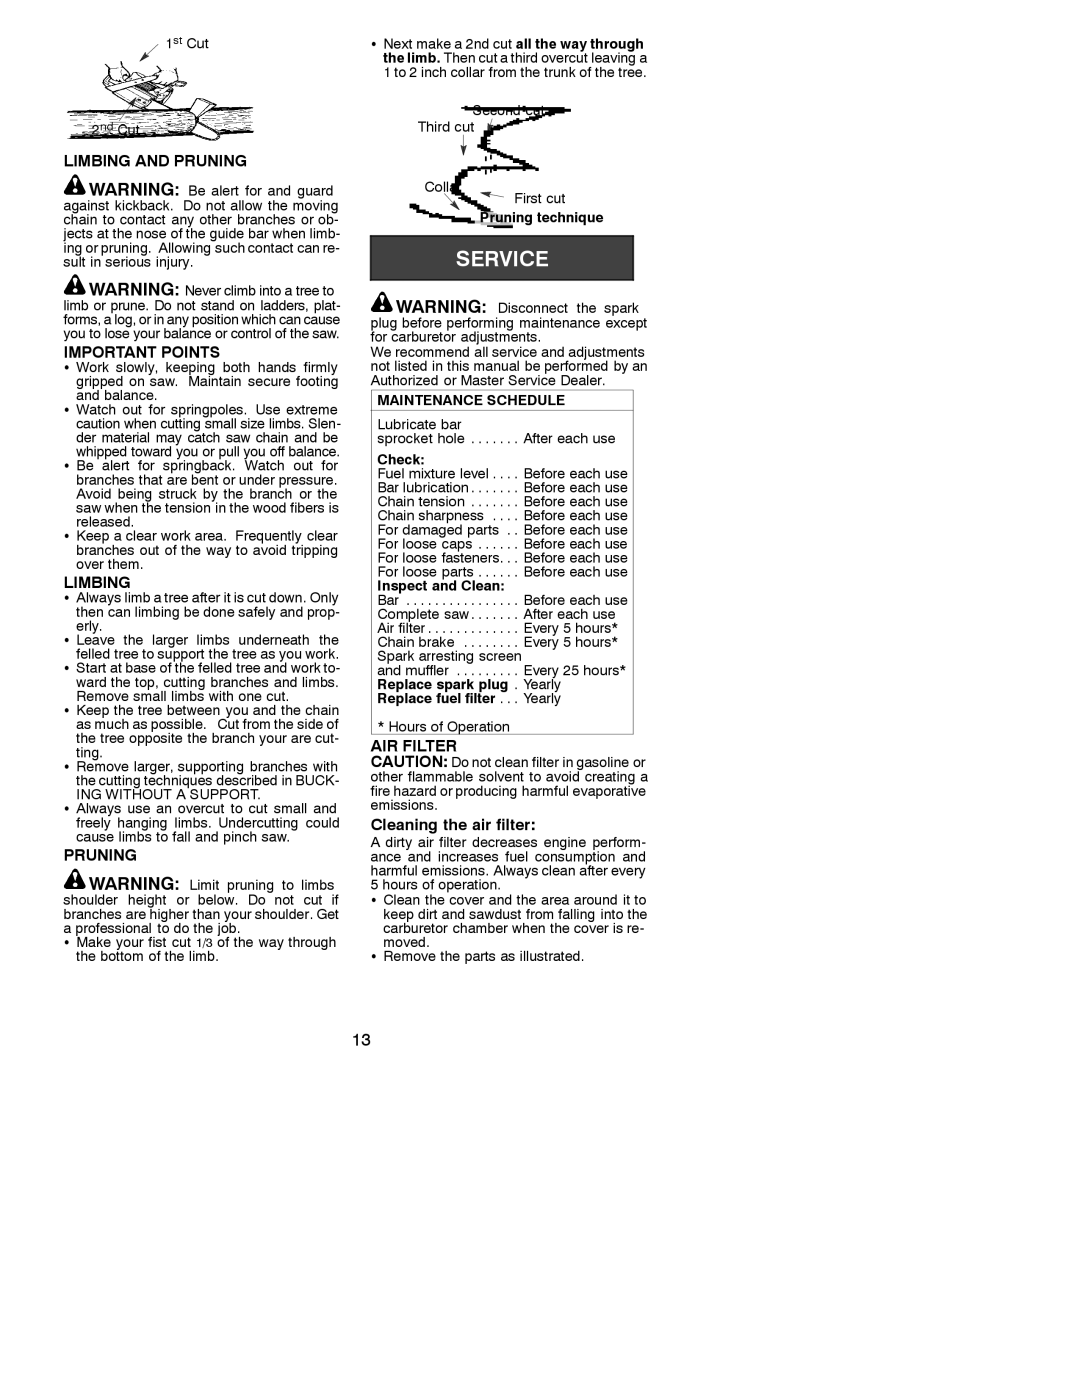
SNext make a 2nd cut all the way through the limb. Then cut a third overcut leaving a 1 to 2 inch collar from the trunk of the tree.
Second cut
Third cut
Collar
First cut
Pruning technique
![]() WARNING: Disconnect the spark plug before performing maintenance except for carburetor adjustments.
WARNING: Disconnect the spark plug before performing maintenance except for carburetor adjustments.
We recommend all service and adjustments not listed in this manual be performed by an Authorized or Master Service Dealer.
MAINTENANCE SCHEDULE
Lubricate bar
sprocket hole . . . . . . . After each use
Check:
Fuel mixture level . . . . Before each use Bar lubrication . . . . . . . Before each use Chain tension . . . . . . . Before each use Chain sharpness . . . . Before each use For damaged parts . . Before each use For loose caps . . . . . . Before each use For loose fasteners. . . Before each use For loose parts . . . . . . Before each use
Inspect and Clean:
Bar . . . . . . . . . . . . . . . . Before each use Complete saw . . . . . . . After each use Air filter . . . . . . . . . . . . . Every 5 hours* Chain brake . . . . . . . . Every 5 hours* Spark arresting screen
and muffler . . . . . . . . . Every 25 hours* Replace spark plug . Yearly Replace fuel filter . . . Yearly
* Hours of Operation
AIR FILTER
CAUTION: Do not clean filter in gasoline or other flammable solvent to avoid creating a fire hazard or producing harmful evaporative emissions.
Cleaning the air filter:
A dirty air filter decreases engine perform- ance and increases fuel consumption and harmful emissions. Always clean after every 5 hours of operation.
SClean the cover and the area around it to keep dirt and sawdust from falling into the
carburetor chamber when the cover is re- moved.
SRemove the parts as illustrated.
13