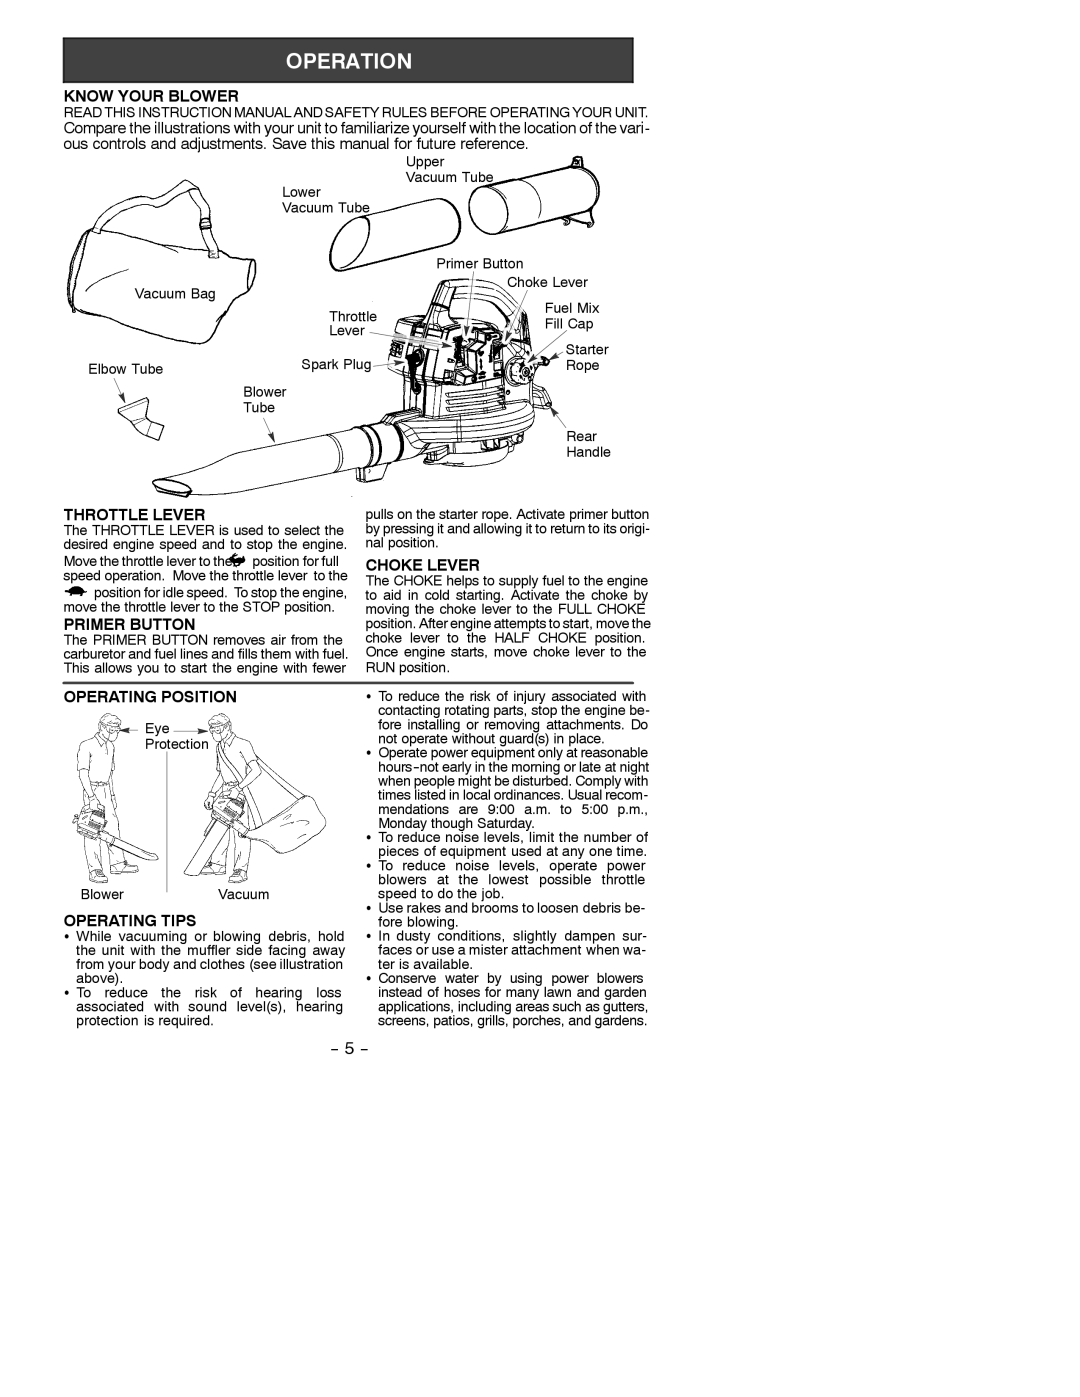
KNOW YOUR BLOWER
READ THIS INSTRUCTION MANUAL AND SAFETY RULES BEFORE OPERATING YOUR UNIT.
Compare the illustrations with your unit to familiarize yourself with the location of the vari- ous controls and adjustments. Save this manual for future reference.
Upper
Vacuum Tube
Lower
Vacuum Tube
Primer Button
Vacuum Bag
Throttle
Lever ![]()
Elbow Tube | Spark Plug |
|
Choke Lever
Fuel Mix
Fill Cap
Starter |
Rope |
Blower
Tube
|
|
|
|
|
|
|
|
|
|
|
|
|
|
|
|
|
|
|
|
|
|
|
|
|
|
|
|
| Rear | ||
|
|
|
|
|
|
|
|
|
|
|
| ||||
|
|
|
|
|
|
|
|
|
|
|
|
| Handle |
|
|
THROTTLE LEVER |
|
|
| pulls on the starter rope. Activate primer button | |||||||||||
The THROTTLE LEVER is used to select the | by pressing it and allowing it to return to its origi- | ||||||||||||||
desired engine speed and to stop the engine. | nal position. | ||||||||||||||
Move the throttle lever to the position for full | CHOKE LEVER | ||||||||||||||
speed operation. Move the throttle lever to the | |||||||||||||||
position for idle speed. To stop the engine, | The CHOKE helps to supply fuel to the engine | ||||||||||||||
to aid in cold starting. Activate the choke by | |||||||||||||||
move the throttle lever to the STOP position. | moving the choke lever to the FULL CHOKE | ||||||||||||||
PRIMER BUTTON |
|
|
| position. After engine attempts to start, move the | |||||||||||
The PRIMER BUTTON removes air from the | choke lever to the HALF CHOKE position. | ||||||||||||||
carburetor and fuel lines and fills them with fuel. | Once engine starts, move choke lever to the | ||||||||||||||
This allows you to start the engine with fewer | RUN position. | ||||||||||||||
|
|
|
|
|
|
|
|
|
|
| |||||
OPERATING POSITION | S To reduce the risk of injury associated with | ||||||||||||||
|
|
|
|
|
|
|
|
|
|
|
| contacting rotating parts, stop the engine be- | |||
|
|
|
| Eye |
|
|
|
|
| fore installing or removing attachments. Do | |||||
|
|
|
| Protection |
|
|
| not operate without guard(s) in place. | |||||||
|
|
|
|
|
|
| S Operate power equipment only at reasonable | ||||||||
|
|
|
|
|
|
|
|
|
|
|
| ||||
|
|
|
|
|
|
|
|
|
|
|
| ||||
|
|
|
|
|
|
|
|
|
|
|
| when people might be disturbed. Comply with | |||
|
|
|
|
|
|
|
|
|
|
|
| times listed in local ordinances. Usual recom- | |||
|
|
|
|
|
|
|
|
|
|
|
| mendations are 9:00 a.m. to 5:00 p.m., | |||
|
|
|
|
|
|
|
|
|
|
|
| Monday though Saturday. | |||
|
|
|
|
|
|
|
|
|
|
|
| S To reduce noise levels, limit the number of | |||
|
|
|
|
|
|
|
|
|
|
|
| pieces of equipment used at any one time. | |||
|
|
|
|
|
|
|
|
|
|
|
| S To reduce noise levels, operate power | |||
|
|
|
|
|
|
|
|
|
|
|
| blowers at the lowest possible throttle | |||
Blower |
|
|
|
| Vacuum | speed to do the job. | |||||||||
| |||||||||||||||
OPERATING TIPS |
|
|
| S Use rakes and brooms to loosen debris be- | |||||||||||
|
|
| fore blowing. | ||||||||||||
S While vacuuming or blowing debris, hold | S In dusty conditions, slightly dampen sur- | ||||||||||||||
the unit with the muffler side facing away | faces or use a mister attachment when wa- | ||||||||||||||
from your body and clothes (see illustration | ter is available. | ||||||||||||||
above). |
|
|
| S Conserve water by using power blowers | |||||||||||
S To reduce the risk of hearing loss | instead of hoses for many lawn and garden | ||||||||||||||
associated with sound level(s), hearing | applications, including areas such as gutters, | ||||||||||||||
protection is required. |
|
|
| screens, patios, grills, porches, and gardens. | |||||||||||
