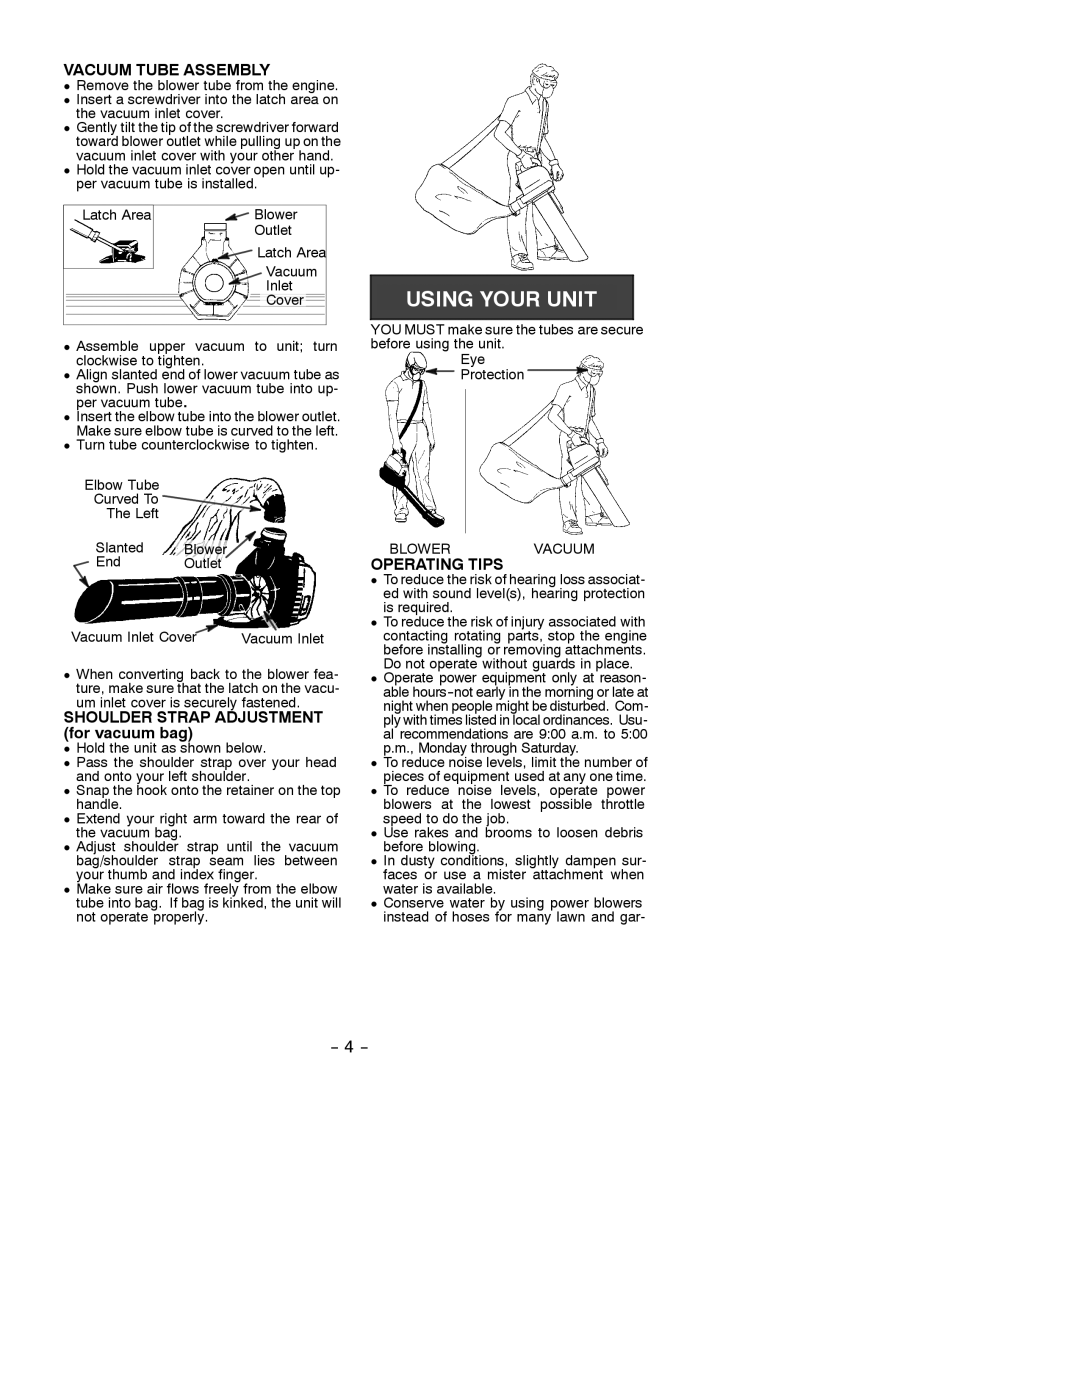
VACUUM TUBE ASSEMBLY
DRemove the blower tube from the engine. D Insert a screwdriver into the latch area on
the vacuum inlet cover.
D Gently tilt the tip of the screwdriver forward toward blower outlet while pulling up on the vacuum inlet cover with your other hand.
D Hold the vacuum inlet cover open until up- per vacuum tube is installed.
Latch Area |
|
|
|
|
|
|
|
|
|
|
|
|
|
|
|
|
| Blower | ||||||||
|
|
|
|
|
|
|
|
|
|
|
|
|
|
|
|
|
|
|
|
| Outlet | |||||
|
|
|
|
|
|
|
|
|
|
|
|
|
|
|
|
|
|
|
|
|
| Latch Area | ||||
|
|
|
|
|
|
|
|
|
|
|
|
|
|
|
|
|
|
|
|
|
|
|
| Vacuum | ||
|
|
|
|
|
|
|
|
|
|
|
|
|
|
|
|
|
|
|
|
|
|
| ||||
|
|
|
|
|
|
|
|
|
|
|
|
|
|
|
|
|
|
|
|
|
|
|
| Inlet |
| |
|
|
|
|
|
|
|
|
|
|
|
|
|
|
|
|
|
|
|
|
|
|
|
| Cover |
|
|
|
|
|
|
|
|
|
|
| ||||||||||||||||||
|
|
|
|
|
|
|
|
|
| |||||||||||||||||
|
|
|
|
|
|
|
|
|
|
| ||||||||||||||||
|
|
|
|
|
|
|
|
|
|
|
|
|
|
|
|
|
|
|
|
|
|
|
|
|
|
|
|
|
|
|
|
|
|
|
|
|
|
|
|
|
|
|
|
|
|
|
|
|
|
|
|
|
|
D Assemble upper vacuum to unit; turn clockwise to tighten.
DAlign slanted end of lower vacuum tube as shown. Push lower vacuum tube into up-
per vacuum tube.
DInsert the elbow tube into the blower outlet.
Make sure elbow tube is curved to the left.
DTurn tube counterclockwise to tighten.
Elbow Tube
Curved To ![]()
![]()
![]()
The Left
|
|
|
| Slanted |
|
|
|
|
|
|
| ||||||||
|
|
|
| Blower |
|
|
|
|
|
| |||||||||
|
|
|
| End | Outlet |
|
|
|
|
|
| ||||||||
|
|
|
|
|
|
|
|
|
| ||||||||||
|
|
|
|
|
|
|
|
|
|
|
|
|
|
|
|
|
|
|
|
|
|
|
|
|
|
|
|
|
|
|
|
|
|
|
|
|
|
|
|
|
|
|
|
|
|
|
|
|
|
|
|
|
|
|
|
|
|
|
|
Vacuum Inlet Cover |
|
|
|
|
|
|
|
|
|
|
|
|
|
| |||||
|
|
|
|
|
|
|
| Vacuum Inlet | |||||||||||
|
|
|
|
|
|
|
| ||||||||||||
D When converting back to the blower fea- ture, make sure that the latch on the vacu- um inlet cover is securely fastened.
SHOULDER STRAP ADJUSTMENT (for vacuum bag)
DHold the unit as shown below.
D Pass the shoulder strap over your head and onto your left shoulder.
DSnap the hook onto the retainer on the top handle.
D Extend your right arm toward the rear of the vacuum bag.
D Adjust shoulder strap until the vacuum bag/shoulder strap seam lies between your thumb and index finger.
DMake sure air flows freely from the elbow tube into bag. If bag is kinked, the unit will not operate properly.
YOU MUST make sure the tubes are secure before using the unit.
Eye ![]() Protection
Protection ![]()
BLOWERVACUUM
OPERATING TIPS
DTo reduce the risk of hearing loss associat- ed with sound level(s), hearing protection is required.
DTo reduce the risk of injury associated with contacting rotating parts, stop the engine before installing or removing attachments.
Do not operate without guards in place. D Operate power equipment only at reason-
able
DTo reduce noise levels, limit the number of
pieces of equipment used at any one time. D To reduce noise levels, operate power blowers at the lowest possible throttle
speed to do the job.
D Use rakes and brooms to loosen debris before blowing.
D In dusty conditions, slightly dampen sur- faces or use a mister attachment when water is available.
D Conserve water by using power blowers instead of hoses for many lawn and gar-
