TROUBLE SHOOTING (continued)
PROBLEM |
| POSSIBLE CAUSE |
| SOLUTION |
|
|
|
|
|
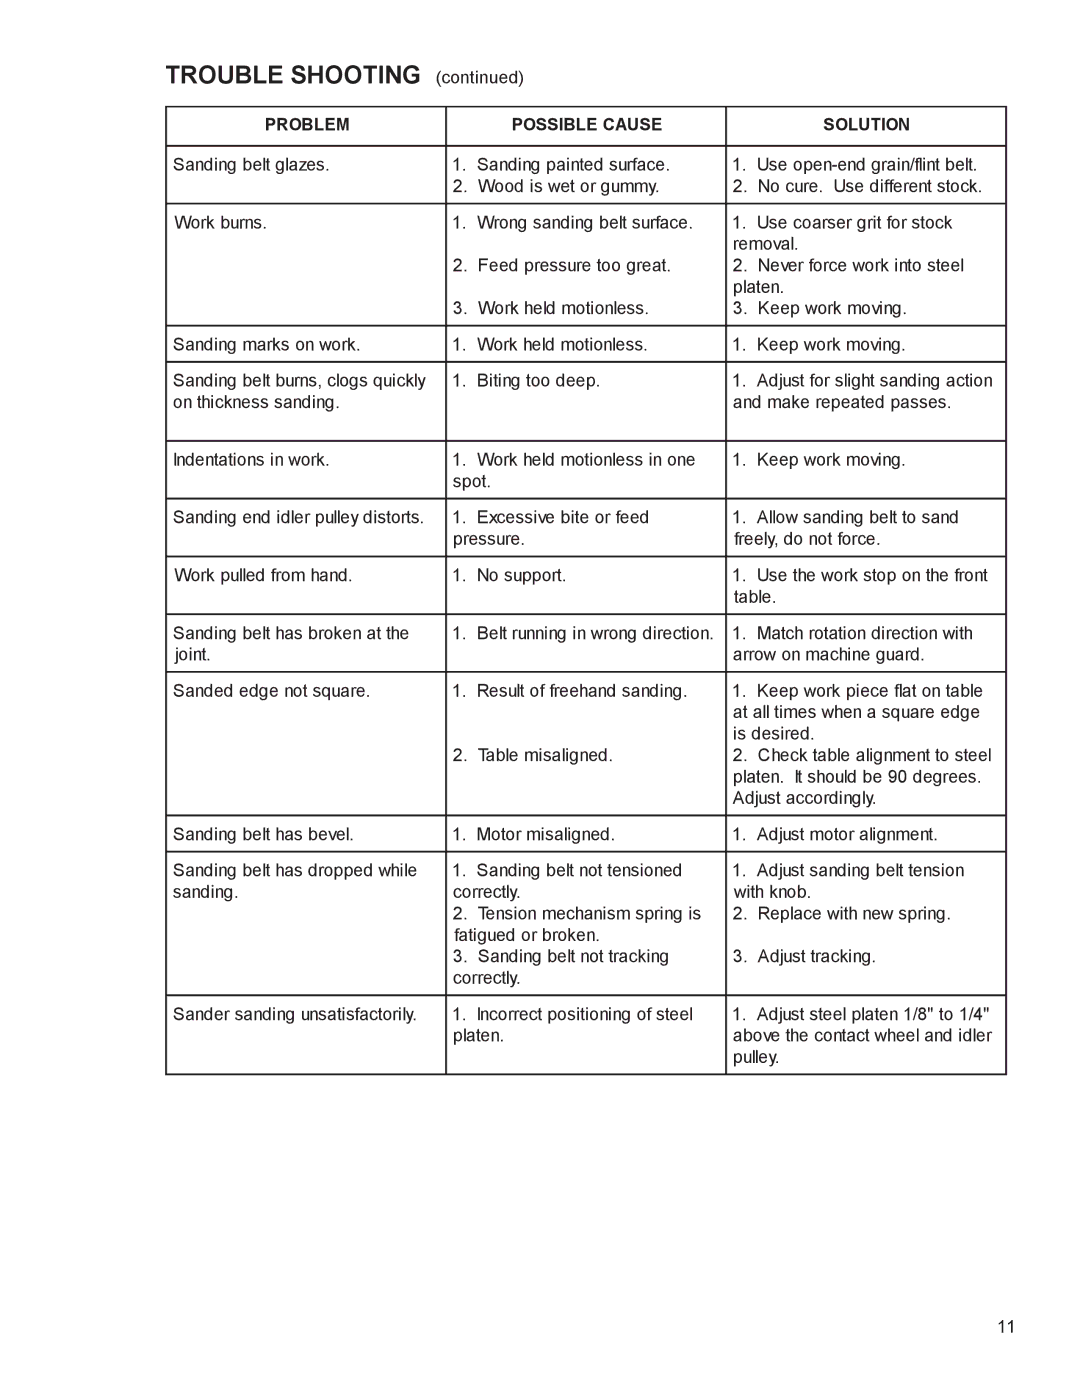
Sanding belt glazes. | 1. | Sanding painted surface. | 1. | Use |
| 2. | Wood is wet or gummy. | 2. | No cure. Use different stock. |
|
|
|
|
|
Work burns. | 1. | Wrong sanding belt surface. | 1. | Use coarser grit for stock |
|
|
| removal. | |
| 2. | Feed pressure too great. | 2. | Never force work into steel |
|
|
| platen. | |
| 3. | Work held motionless. | 3. | Keep work moving. |
|
|
|
| |
Sanding marks on work. | 1. Work held motionless. | 1. | Keep work moving. | |
|
|
|
| |
Sanding belt burns, clogs quickly | 1. Biting too deep. | 1. | Adjust for slight sanding action | |
on thickness sanding. |
|
| and make repeated passes. | |
|
|
|
|
|
Indentations in work. | 1. | Work held motionless in one | 1. | Keep work moving. |
| spot. |
|
| |
|
|
|
|
|
Sanding end idler pulley distorts. | 1. | Excessive bite or feed | 1. | Allow sanding belt to sand |
| pressure. | freely, do not force. | ||
|
|
|
| |
Work pulled from hand. | 1. No support. | 1. | Use the work stop on the front | |
|
|
| table. | |
|
|
|
| |
Sanding belt has broken at the | 1. Belt running in wrong direction. | 1. | Match rotation direction with | |
joint. |
|
| arrow on machine guard. | |
|
|
|
|
|
Sanded edge not square. | 1. | Result of freehand sanding. | 1. | Keep work piece flat on table |
|
|
| at all times when a square edge | |
|
|
| is desired. | |
| 2. | Table misaligned. | 2. | Check table alignment to steel |
|
|
| platen. It should be 90 degrees. | |
|
|
| Adjust accordingly. | |
|
|
|
| |
Sanding belt has bevel. | 1. Motor misaligned. | 1. | Adjust motor alignment. | |
|
|
|
|
|
Sanding belt has dropped while | 1. | Sanding belt not tensioned | 1. | Adjust sanding belt tension |
sanding. | correctly. | with knob. | ||
| 2. | Tension mechanism spring is | 2. | Replace with new spring. |
| fatigued or broken. |
|
| |
| 3. | Sanding belt not tracking | 3. | Adjust tracking. |
| correctly. |
|
| |
|
|
|
|
|
Sander sanding unsatisfactorily. | 1. | Incorrect positioning of steel | 1. | Adjust steel platen 1/8" to 1/4" |
| platen. | above the contact wheel and idler | ||
|
|
| pulley. | |
|
|
|
|
|
11
