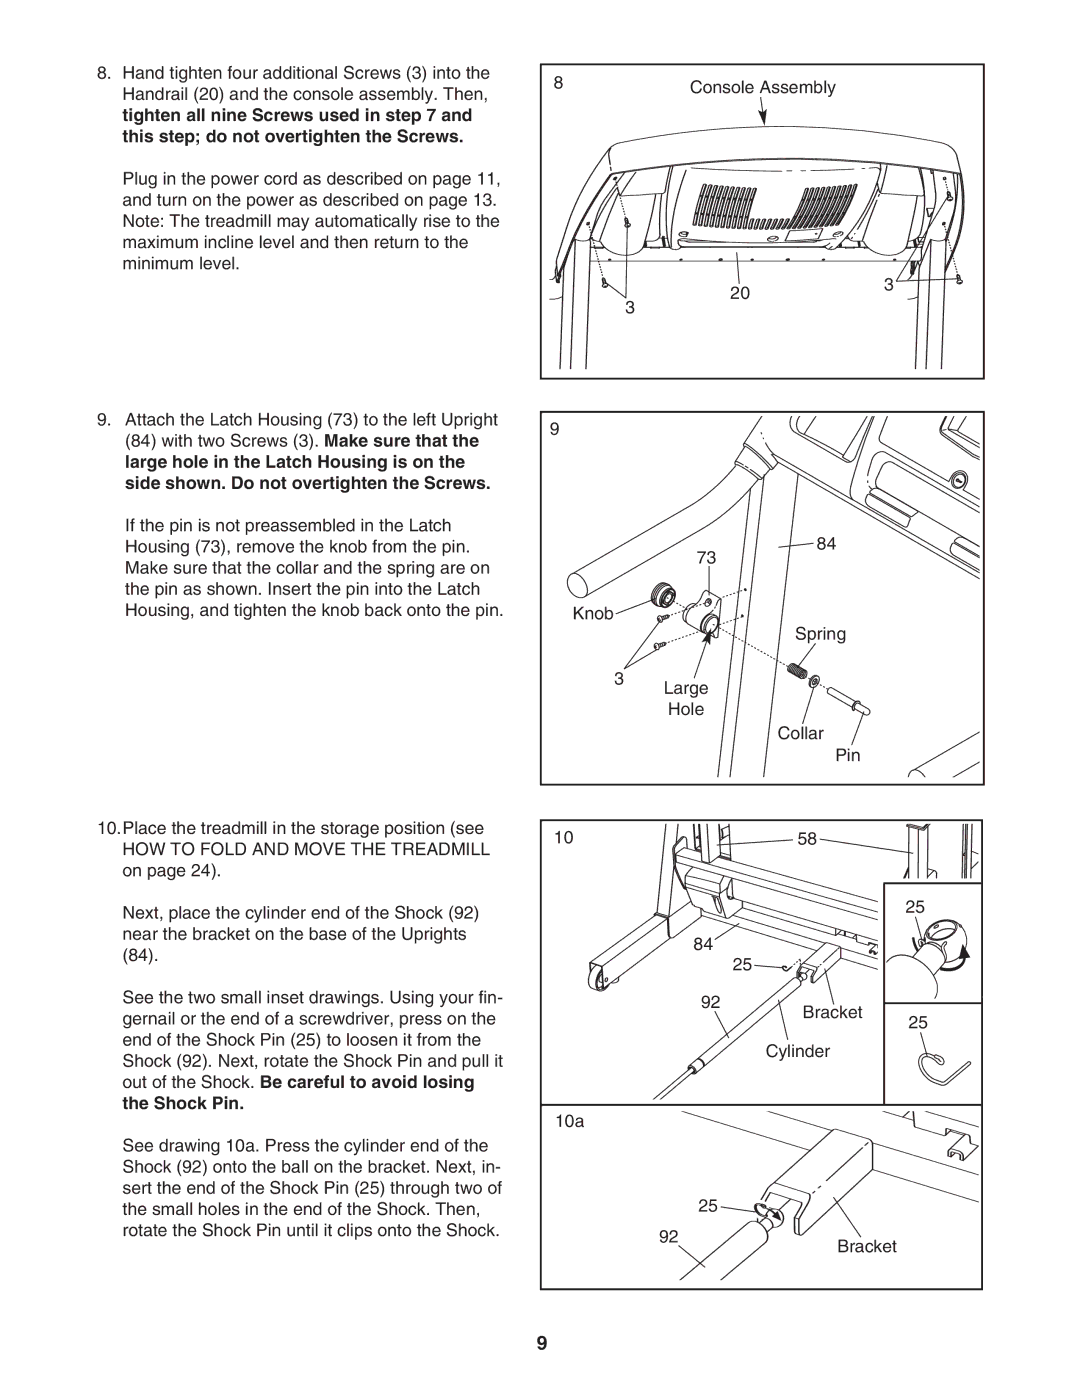
8. Hand tighten four additional Screws (3) into the | 8 |
| Console Assembly |
| ||
Handrail (20) and the console assembly. Then, |
|
| ||||
|
|
|
|
|
| |
tighten all nine Screws used in step 7 and |
|
|
|
|
|
|
this step; do not overtighten the Screws. |
|
|
|
|
|
|
Plug in the power cord as described on page 11, |
|
|
|
|
|
|
and turn on the power as described on page 13. |
|
|
|
|
|
|
Note: The treadmill may automatically rise to the |
|
|
|
|
|
|
maximum incline level and then return to the |
|
|
|
|
|
|
minimum level. |
|
|
|
|
|
|
|
|
|
| 20 | 3 |
|
|
|
| 3 |
|
| |
|
|
|
|
|
| |
9. Attach the Latch Housing (73) to the left Upright | 9 |
|
|
|
|
|
(84) with two Screws (3). Make sure that the |
|
|
|
|
| |
|
|
|
|
|
| |
large hole in the Latch Housing is on the |
|
|
|
|
|
|
side shown. Do not overtighten the Screws. |
|
|
|
|
|
|
If the pin is not preassembled in the Latch |
|
|
|
| 84 |
|
Housing (73), remove the knob from the pin. |
|
| 73 |
|
| |
Make sure that the collar and the spring are on |
|
|
|
|
| |
|
|
|
|
|
| |
the pin as shown. Insert the pin into the Latch |
|
|
|
|
|
|
Housing, and tighten the knob back onto the pin. | Knob |
|
|
| Spring |
|
|
|
|
|
|
| |
|
| 3 | Large |
|
|
|
|
|
|
|
|
| |
|
|
| Hole |
|
|
|
|
|
|
|
| Collar |
|
|
|
|
|
| Pin |
|
10.Place the treadmill in the storage position (see | 10 |
|
|
| 58 |
|
HOW TO FOLD AND MOVE THE TREADMILL |
|
|
|
| ||
|
|
|
|
|
| |
on page 24). |
|
|
|
|
|
|
Next, place the cylinder end of the Shock (92) |
|
|
|
|
| 25 |
|
|
|
|
|
| |
near the bracket on the base of the Uprights |
|
| 84 |
|
|
|
(84). |
|
|
|
|
| |
|
|
| 25 |
|
| |
|
|
|
|
|
| |
See the two small inset drawings. Using your fin- |
|
| 92 |
| Bracket |
|
gernail or the end of a screwdriver, press on the |
|
|
|
| 25 | |
|
|
|
|
| ||
end of the Shock Pin (25) to loosen it from the |
|
|
|
| Cylinder |
|
Shock (92). Next, rotate the Shock Pin and pull it |
|
|
|
|
| |
|
|
|
|
|
| |
out of the Shock. Be careful to avoid losing |
|
|
|
|
|
|
the Shock Pin. | 10a |
|
|
|
|
|
|
|
|
|
|
| |
See drawing 10a. Press the cylinder end of the |
|
|
|
|
|
|
Shock (92) onto the ball on the bracket. Next, in- |
|
|
|
|
|
|
sert the end of the Shock Pin (25) through two of |
|
| 25 |
|
|
|
the small holes in the end of the Shock. Then, |
|
|
|
|
| |
rotate the Shock Pin until it clips onto the Shock. |
|
| 92 |
| Bracket |
|
|
|
|
|
| ||
|
|
|
|
|
| |
| 9 |
|
|
|
|
|