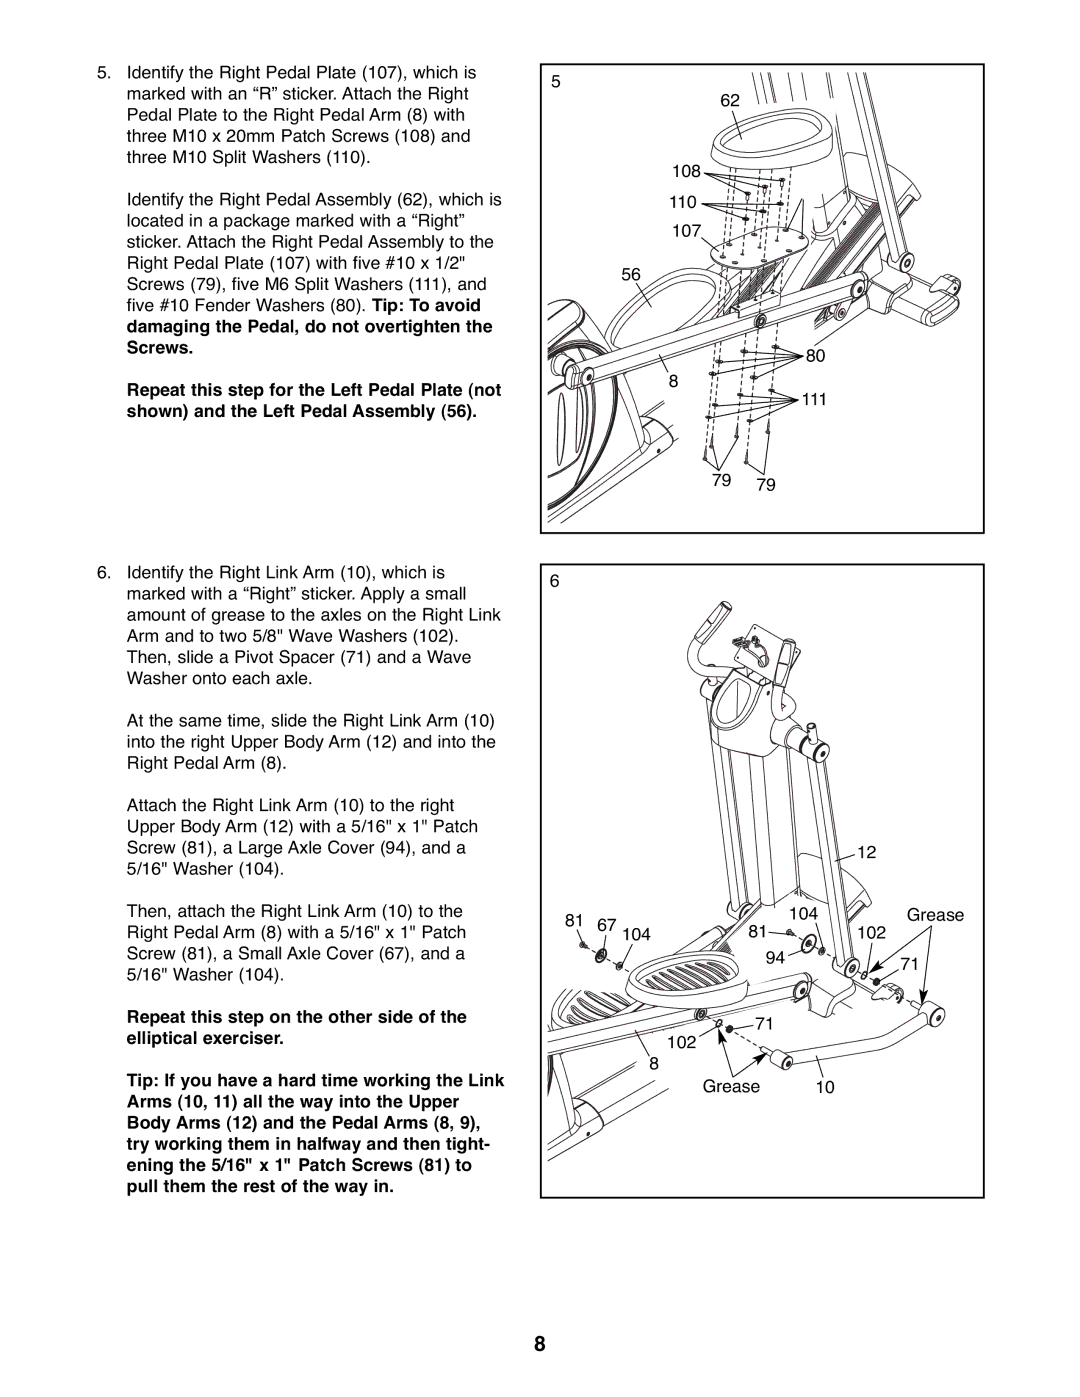
5. Identify the Right Pedal Plate (107), which is | 5 |
|
|
|
|
|
marked with an “R” sticker. Attach the Right |
| 62 |
|
|
| |
|
|
|
|
| ||
Pedal Plate to the Right Pedal Arm (8) with |
|
|
|
|
| |
|
|
|
|
|
| |
three M10 x 20mm Patch Screws (108) and |
|
|
|
|
|
|
three M10 Split Washers (110). |
|
| 108 |
|
|
|
|
|
|
|
|
| |
Identify the Right Pedal Assembly (62), which is |
|
| 110 |
|
|
|
located in a package marked with a “Right” |
|
| 107 |
|
|
|
sticker. Attach the Right Pedal Assembly to the |
|
|
|
|
| |
|
|
|
|
|
| |
Right Pedal Plate (107) with five #10 x 1/2" |
|
| 56 |
|
|
|
Screws (79), five M6 Split Washers (111), and |
|
|
|
|
| |
|
|
|
|
|
| |
five #10 Fender Washers (80). Tip: To avoid |
|
|
|
|
|
|
damaging the Pedal, do not overtighten the |
|
|
|
|
|
|
Screws. |
|
|
|
| 80 |
|
|
|
|
|
|
| |
Repeat this step for the Left Pedal Plate (not |
|
| 8 |
| 111 |
|
|
|
|
|
| ||
shown) and the Left Pedal Assembly (56). |
|
|
|
|
| |
|
|
|
|
|
| |
|
|
| 79 | 79 |
|
|
6. Identify the Right Link Arm (10), which is | 6 |
|
|
|
|
|
marked with a “Right” sticker. Apply a small |
|
|
|
|
| |
|
|
|
|
|
| |
amount of grease to the axles on the Right Link |
|
|
|
|
|
|
Arm and to two 5/8" Wave Washers (102). |
|
|
|
|
|
|
Then, slide a Pivot Spacer (71) and a Wave |
|
|
|
|
|
|
Washer onto each axle. |
|
|
|
|
|
|
At the same time, slide the Right Link Arm (10) |
|
|
|
|
|
|
into the right Upper Body Arm (12) and into the |
|
|
|
|
|
|
Right Pedal Arm (8). |
|
|
|
|
|
|
Attach the Right Link Arm (10) to the right |
|
|
|
|
|
|
Upper Body Arm (12) with a 5/16" x 1" Patch |
|
|
|
|
|
|
Screw (81), a Large Axle Cover (94), and a |
|
|
|
|
| 12 |
5/16" Washer (104). |
|
|
|
|
|
|
Then, attach the Right Link Arm (10) to the | 81 | 67 |
| 81 | 104 | Grease |
Right Pedal Arm (8) with a 5/16" x 1" Patch | 104 |
| 102 | |||
|
|
| ||||
Screw (81), a Small Axle Cover (67), and a |
|
|
| 94 |
| 71 |
5/16" Washer (104). |
|
|
|
|
| |
|
|
|
|
|
| |
Repeat this step on the other side of the |
|
|
| 71 |
|
|
elliptical exerciser. |
|
| 102 |
|
| |
|
|
|
|
| ||
Tip: If you have a hard time working the Link |
|
| 8 |
|
|
|
|
| Grease | 10 |
| ||
Arms (10, 11) all the way into the Upper |
|
|
| |||
|
|
|
|
|
| |
Body Arms (12) and the Pedal Arms (8, 9), |
|
|
|
|
|
|
try working them in halfway and then tight- |
|
|
|
|
|
|
ening the 5/16" x 1" Patch Screws (81) to |
|
|
|
|
|
|
pull them the rest of the way in. |
|
|
|
|
|
|
| 8 |
|
|
|
|
|
