General Cutting
For straight or contour cutting from an edge, line the blade up with your cutting line. Before the blade contacts the workpiece, grasp the handle firmly and pull the trigger. Then guide the tool along your cutting line. Always hold the shoe flat against the workpiece to avoid excessive vibration.
Cutting Metals
Begin cutting at a slow speed, gradually increasing speed as you cut. When cutting into metals or hard materials that can not be cut from an edge, drill a starting hole larger than the widest part of the blade. Extend blade life by using a solid blade cutting lubricant such as MILWAUKEE Band Saw Blade Lubricant Cat. No.
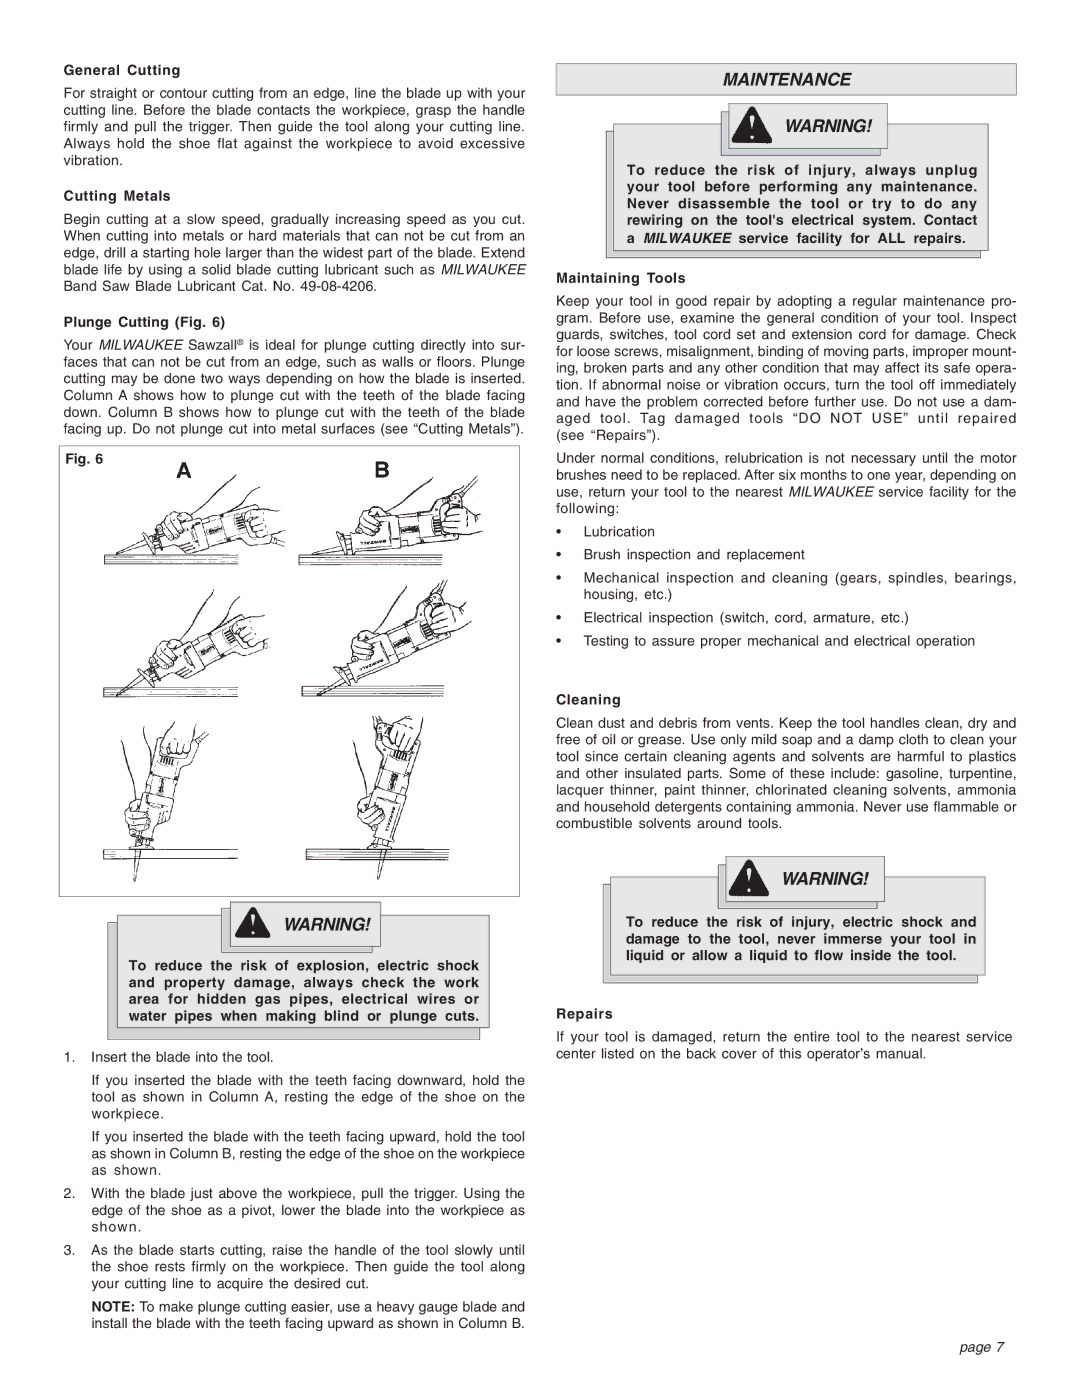
Plunge Cutting (Fig. 6)
Your MILWAUKEE Sawzall® is ideal for plunge cutting directly into sur- faces that can not be cut from an edge, such as walls or floors. Plunge cutting may be done two ways depending on how the blade is inserted. Column A shows how to plunge cut with the teeth of the blade facing down. Column B shows how to plunge cut with the teeth of the blade facing up. Do not plunge cut into metal surfaces (see “Cutting Metals”).
Fig. 6
WARNING!
To reduce the risk of explosion, electric shock and property damage, always check the work area for hidden gas pipes, electrical wires or water pipes when making blind or plunge cuts.
1.Insert the blade into the tool.
If you inserted the blade with the teeth facing downward, hold the tool as shown in Column A, resting the edge of the shoe on the workpiece.
If you inserted the blade with the teeth facing upward, hold the tool as shown in Column B, resting the edge of the shoe on the workpiece as shown.
2.With the blade just above the workpiece, pull the trigger. Using the edge of the shoe as a pivot, lower the blade into the workpiece as shown.
3.As the blade starts cutting, raise the handle of the tool slowly until the shoe rests firmly on the workpiece. Then guide the tool along your cutting line to acquire the desired cut.
NOTE: To make plunge cutting easier, use a heavy gauge blade and install the blade with the teeth facing upward as shown in Column B.
MAINTENANCE
WARNING!
To reduce the risk of injury, always unplug your tool before performing any maintenance. Never disassemble the tool or try to do any rewiring on the tool's electrical system. Contact a MILWAUKEE service facility for ALL repairs.
Maintaining Tools
Keep your tool in good repair by adopting a regular maintenance pro- gram. Before use, examine the general condition of your tool. Inspect guards, switches, tool cord set and extension cord for damage. Check for loose screws, misalignment, binding of moving parts, improper mount- ing, broken parts and any other condition that may affect its safe opera- tion. If abnormal noise or vibration occurs, turn the tool off immediately and have the problem corrected before further use. Do not use a dam- aged tool. Tag damaged tools “DO NOT USE” until repaired (see “Repairs”).
Under normal conditions, relubrication is not necessary until the motor brushes need to be replaced. After six months to one year, depending on use, return your tool to the nearest MILWAUKEE service facility for the following:
•Lubrication
•Brush inspection and replacement
•Mechanical inspection and cleaning (gears, spindles, bearings, housing, etc.)
•Electrical inspection (switch, cord, armature, etc.)
•Testing to assure proper mechanical and electrical operation
Cleaning
Clean dust and debris from vents. Keep the tool handles clean, dry and free of oil or grease. Use only mild soap and a damp cloth to clean your tool since certain cleaning agents and solvents are harmful to plastics and other insulated parts. Some of these include: gasoline, turpentine, lacquer thinner, paint thinner, chlorinated cleaning solvents, ammonia and household detergents containing ammonia. Never use flammable or combustible solvents around tools.
WARNING!
To reduce the risk of injury, electric shock and damage to the tool, never immerse your tool in liquid or allow a liquid to flow inside the tool.
Repairs
If your tool is damaged, return the entire tool to the nearest service center listed on the back cover of this operator’s manual.
page 7