Warning
To prevent fire or shock hazard, do not expose the MultiWave II+ kit to rain or moisture. To avoid electrical shock, the Power Plant must be unplugged and fully discharged before opening.
To prevent electric shock, use a 3 prong, grounded type power cable.
Any change or modifications not expressly approved in the manual could void your warranty.
Safety Instructions
General Instruction:
Read the operating instructions provided with your MultiWave II+ kit.
If the Power Plant is powered on with the oscillator card inserted backwards, the Power Plant will require service from an authorized PS Audio dealer.
Retain the operating instructions for later use and reference
Completely discharge the Power Plant before opening the chassis by unplugging the unit for at least 12 hours.
Unplug the Power Plant from the wall outlet before changing the fuse or performing any upgrade or service.
Do not operate the Power Plant near water. Avoid placement near a water reservoir or excessive moisture.
When replacement parts are required, be sure they are specified by the manufacturer to have the same characteristics as the orig- inal. Unauthorized substitutions may result in fire, electric shock, or other hazards.
Do not operate with faulty or frayed power cables.
MultiWave II+™ operation:
Any turntable or equipment with AC synchronous motors, such as some cooling
fans should not be used with MultiWave II+ unless it is in the sine wave mode. This equipment must be used with sin mode.
We recommend the use of the Sine Wave [sin], or TubeWave™ [tub] with any type of tube based audio products.
Overview
Read the entire instruction manual before starting the installation.
The benefits the Plus upgrade kit will pro- vide for your MultiWave II equiped power plant are:
•Fine tuning for turntables
•Clean Sweep
The MultiWave II+ upgrade is a fairly simple process. If you have any questions at any time, please contact your dealer, distributor or PS Audio by e-mail, fax or telephone at the numbers listed at the end of the instruc- tions.
The overview steps necessary to install MultiWave II+:
Make sure your unit already has been upgraded to MultiWave II! You can- not install the Plus upgrade without MultiWave II installed first.
1.Remove the input power cable from the rear of the power plant.
2.On the P300, remove the bottom cover. On the P600/P1200, remove the top cover.
3.Pull the socketed MW II oscillator board out.
4. Replace the microchip on the MultiWave
II oscillator board.
5.Remove display microchip.
6.Install new display microchip.
7.Insert the oscillator board with its new chip, back into the unit.
8.Replace the bottom cover or the top cover, depending on your model.
9.You are done.
Installing the Upgrade
Before beginning the Plus upgrade, you will need to do the following:
The Night Before
Unplug the Power Plant the night before (or at least several hours before) you plan to do the upgrade. Really unplug it! Take out the input power cable and take out all the power cables connecting to your a/v equipment. By letting the Power Plant sit overnight, most of the energy stored in the power supply will drain away.
The Day of the Upgrade
Assemble the following tools in your work area:
•A clean table to place the Power Plant while you are working.
•For the P300 - a #2 Phillips head screw- driver. For the P600/P1200 - A 7/64” Allen wrench.
•A desk lamp, gooseneck lamp or other light placed next to the Power Plant so you can see what you are doing.
•The MultiWave II+ Upgrade Kit.
Before opening the Power Plant
•Ensure it is fully unplugged and dis- charged for at least several hours or more.
Disassembly - P300
Turn the P300 upside down, with the feet facing up. Use the screwdriver to take out the 10 small screws holding on the bottom plate of the P300. Note: You do not need to remove the screws holding down the feet to the bottom cover of the P300.
After you take off the ten screws from the bottom cover, carefully and slowly lift the bottom cover straight off. You may notice some slight resistance. The oscillator card in the P300 is secured by a small gray plastic bracket on the inside of the bottom cover. Note: some P300’s may not have this plastic bracket.
Usually, the oscillator card will stay plugged into the P300 main board. Sometimes, the oscillator card gets unplugged from the main board and instead stays attached to the gray plastic support. If this is the case, simply remove the card from the support
and set it aside.
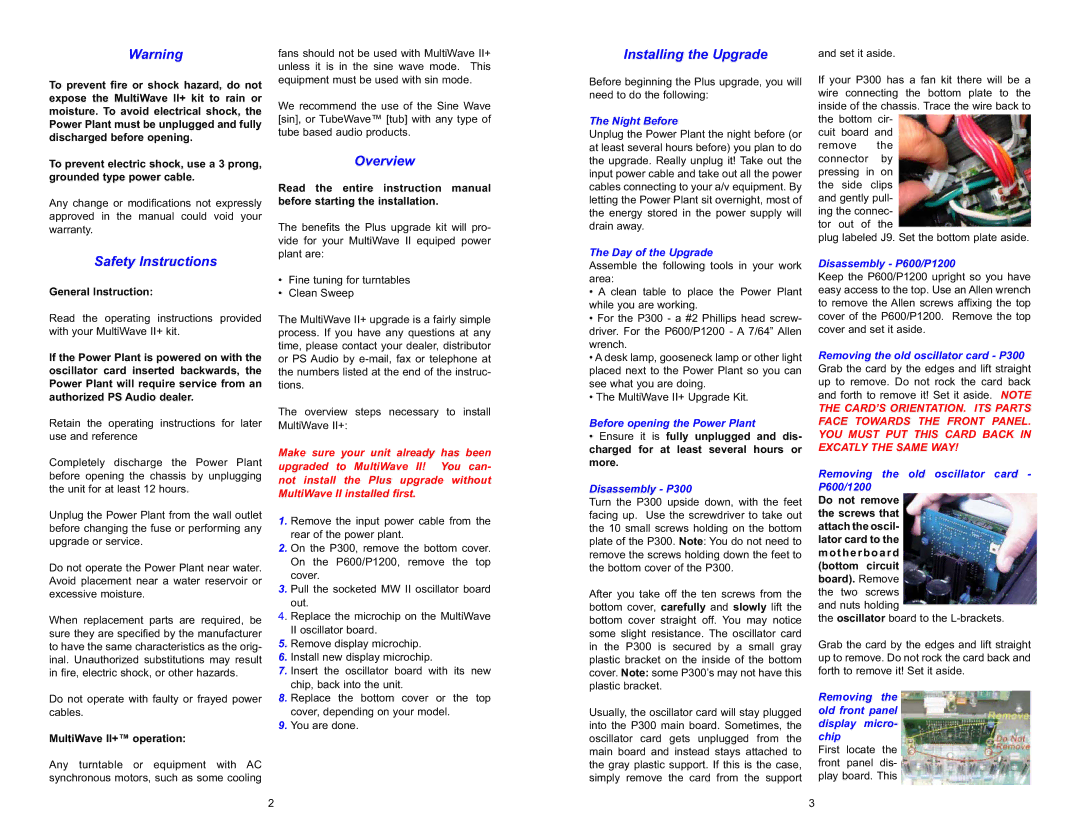
If your P300 has a fan kit there will be a wire connecting the bottom plate to the inside of the chassis. Trace the wire back to the bottom cir-
cuit board and remove the connector by pressing in on the side clips and gently pull- ing the connec- tor out of the
plug labeled J9. Set the bottom plate aside.
Disassembly - P600/P1200
Keep the P600/P1200 upright so you have easy access to the top. Use an Allen wrench to remove the Allen screws affixing the top cover of the P600/P1200. Remove the top cover and set it aside.
Removing the old oscillator card - P300 Grab the card by the edges and lift straight up to remove. Do not rock the card back and forth to remove it! Set it aside. NOTE
THE CARD’S ORIENTATION. ITS PARTS FACE TOWARDS THE FRONT PANEL. YOU MUST PUT THIS CARD BACK IN EXCATLY THE SAME WAY!
Removing the old oscillator card - P600/1200
Do not remove the screws that attach the oscil- lator card to the motherboard (bottom circuit board). Remove the two screws and nuts holding
the oscillator board to the L-brackets.
Grab the card by the edges and lift straight up to remove. Do not rock the card back and forth to remove it! Set it aside.
Removing the old front panel display micro- chip
First locate the front panel dis- play board. This