Note: When the IP address of the device being PINGed is in the same subnet/VLAN as the IP address of the Pinger, the Subnet Mask can be “ON” or “OFF” and a Gateway IP address is not required. When the IP address is in a different subnet/VLAN, the Subnet Mask must be “ON” with the mask entered and the IP address of the Gateway must be entered. (See Subnet Mask Setup and Gateway Setup).
CONTINUOUS PING
When the Pinger is configured to PING continuously (See Ping Count Setup) the letter “C” is displayed to the left of “Name” in the PING Screen. Pressing the PING function key displays the number of PINGs that have been sent and the percent of the PINGs with No Response or that had
corrupted data. Pressing the Info function key displays the PING Address and the running average of the Round Trip Times for all PINGs that received a response.
Pressing the Info function key again displays the PING Address and the count of PINGs that had no response.
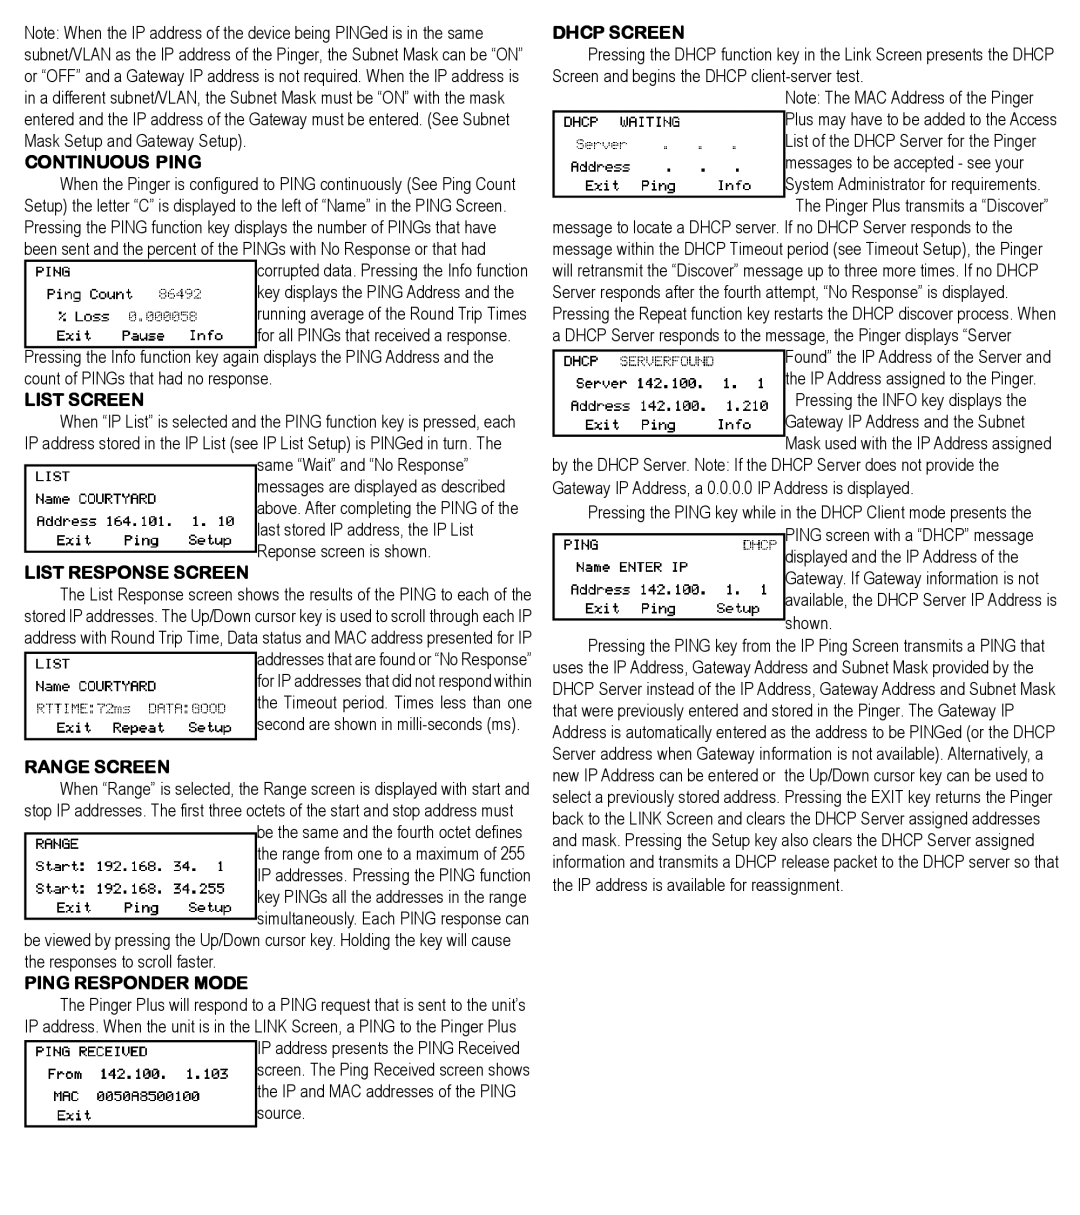
LIST SCREEN
When “IP List” is selected and the PING function key is pressed, each IP address stored in the IP List (see IP List Setup) is PINGed in turn. The
same “Wait” and “No Response” messages are displayed as described above. After completing the PING of the last stored IP address, the IP List
LIST RESPONSE SCREEN Reponse screen is shown.
The List Response screen shows the results of the PING to each of the stored IP addresses. The Up/Down cursor key is used to scroll through each IP address with Round Trip Time, Data status and MAC address presented for IP addresses that are found or “No Response” for IP addresses that did not respond within the Timeout period. Times less than one
second are shown in
RANGE SCREEN
When “Range” is selected, the Range screen is displayed with start and stop IP addresses. The first three octets of the start and stop address must
be the same and the fourth octet defines the range from one to a maximum of 255 IP addresses. Pressing the PING function key PINGs all the addresses in the range simultaneously. Each PING response can
be viewed by pressing the Up/Down cursor key. Holding the key will cause the responses to scroll faster.
PING RESPONDER MODE
The Pinger Plus will respond to a PING request that is sent to the unit’s IP address. When the unit is in the LINK Screen, a PING to the Pinger Plus
IP address presents the PING Received screen. The Ping Received screen shows the IP and MAC addresses of the PING source.
DHCP SCREEN
Pressing the DHCP function key in the Link Screen presents the DHCP Screen and begins the DHCP
Note: The MAC Address of the Pinger Plus may have to be added to the Access List of the DHCP Server for the Pinger messages to be accepted - see your System Administrator for requirements.
The Pinger Plus transmits a “Discover”
message to locate a DHCP server. If no DHCP Server responds to the message within the DHCP Timeout period (see Timeout Setup), the Pinger will retransmit the “Discover” message up to three more times. If no DHCP Server responds after the fourth attempt, “No Response” is displayed. Pressing the Repeat function key restarts the DHCP discover process. When a DHCP Server responds to the message, the Pinger displays “Server
Found” the IP Address of the Server and the IP Address assigned to the Pinger.
Pressing the INFO key displays the
Gateway IP Address and the Subnet
Mask used with the IP Address assigned
by the DHCP Server. Note: If the DHCP Server does not provide the Gateway IP Address, a 0.0.0.0 IP Address is displayed.
Pressing the PING key while in the DHCP Client mode presents the PING screen with a “DHCP” message displayed and the IP Address of the Gateway. If Gateway information is not available, the DHCP Server IP Address is shown.
Pressing the PING key from the IP Ping Screen transmits a PING that uses the IP Address, Gateway Address and Subnet Mask provided by the DHCP Server instead of the IP Address, Gateway Address and Subnet Mask that were previously entered and stored in the Pinger. The Gateway IP Address is automatically entered as the address to be PINGed (or the DHCP Server address when Gateway information is not available). Alternatively, a new IP Address can be entered or the Up/Down cursor key can be used to select a previously stored address. Pressing the EXIT key returns the Pinger back to the LINK Screen and clears the DHCP Server assigned addresses and mask. Pressing the Setup key also clears the DHCP Server assigned information and transmits a DHCP release packet to the DHCP server so that the IP address is available for reassignment.