3. With the help of a second person, raise an Upright (73) | 3 |
|
|
|
| ||
to the vertical position. |
|
|
|
|
|
| |
|
|
| 42 |
|
|
| |
|
|
|
|
|
|
| |
Identify the Right Handrail (72), which has a large hole |
| Large |
|
|
| ||
in the left side. Feed the Wire Harness (42) up into the |
|
| Bracket |
| |||
| Hole |
|
| ||||
bracket on the Right Handrail and out of the large hole in |
|
|
| ||||
|
|
|
| ||||
|
|
|
| 63 | |||
the left side. Note: It may be helpful to use needlenose |
|
|
|
| |||
pliers to pull the Wire Harness out of the large hole. |
|
|
| 76 |
| ||
|
|
|
|
|
|
| |
Insert the bracket on the Right Handrail (72) into the top |
| 72 |
|
|
| ||
of the Upright (73). Attach the Right Handrail with a 1” |
|
| 73 | ||||
|
|
| |||||
Bolt (63) and a Flat Washer (76). | Do not tighten the |
|
|
| |||
|
|
|
|
| |||
Bolt yet. |
|
|
|
|
|
|
|
4. Attach the Storage Latch (36) and the Latch Spacer (107) | 4 |
|
|
|
| ||
to the Left Handrail (71) with two 1” Latch Screws (112). |
|
|
|
| |||
|
|
|
|
| |||
Remove the Latch Knob (30) from the Latch Pin (35). |
| 30 |
|
|
| ||
Make sure that the Latch Pin Collar (33) and the Spring |
|
|
| 112 |
| ||
(32) are on the Latch Pin as shown. Insert the Latch Pin |
|
|
|
|
| ||
into the Storage Latch (36) and tighten the Latch Knob |
|
|
| 33 |
| ||
back onto the Latch Pin. |
|
|
| 107 |
|
|
|
Attach the Left Handrail (71) to the Upright (not shown) |
|
| 36 | 32 |
| ||
| 71 |
| 35 |
| |||
as described in step 3. |
|
|
|
|
| ||
|
|
|
|
|
|
| |
5. Set the Crossbar (40) on the brackets on the Handrails | 5 |
|
|
|
| ||
(71, 72). Attach the Crossbar with two Crossbar Screws |
|
|
|
| |||
|
|
|
|
| |||
(39)Do. not tighten the Crossbar Screws yet. |
|
|
|
|
| ||
Attach the end of the ground wire to the small hole in the | 71 | Bracket |
|
|
| ||
|
|
| Ground |
| |||
side of the Right Handrail (72) with a Silver Ground |
|
|
| 77 | |||
Screw (77). |
|
|
|
|
| Wire |
|
|
|
|
|
|
|
| |
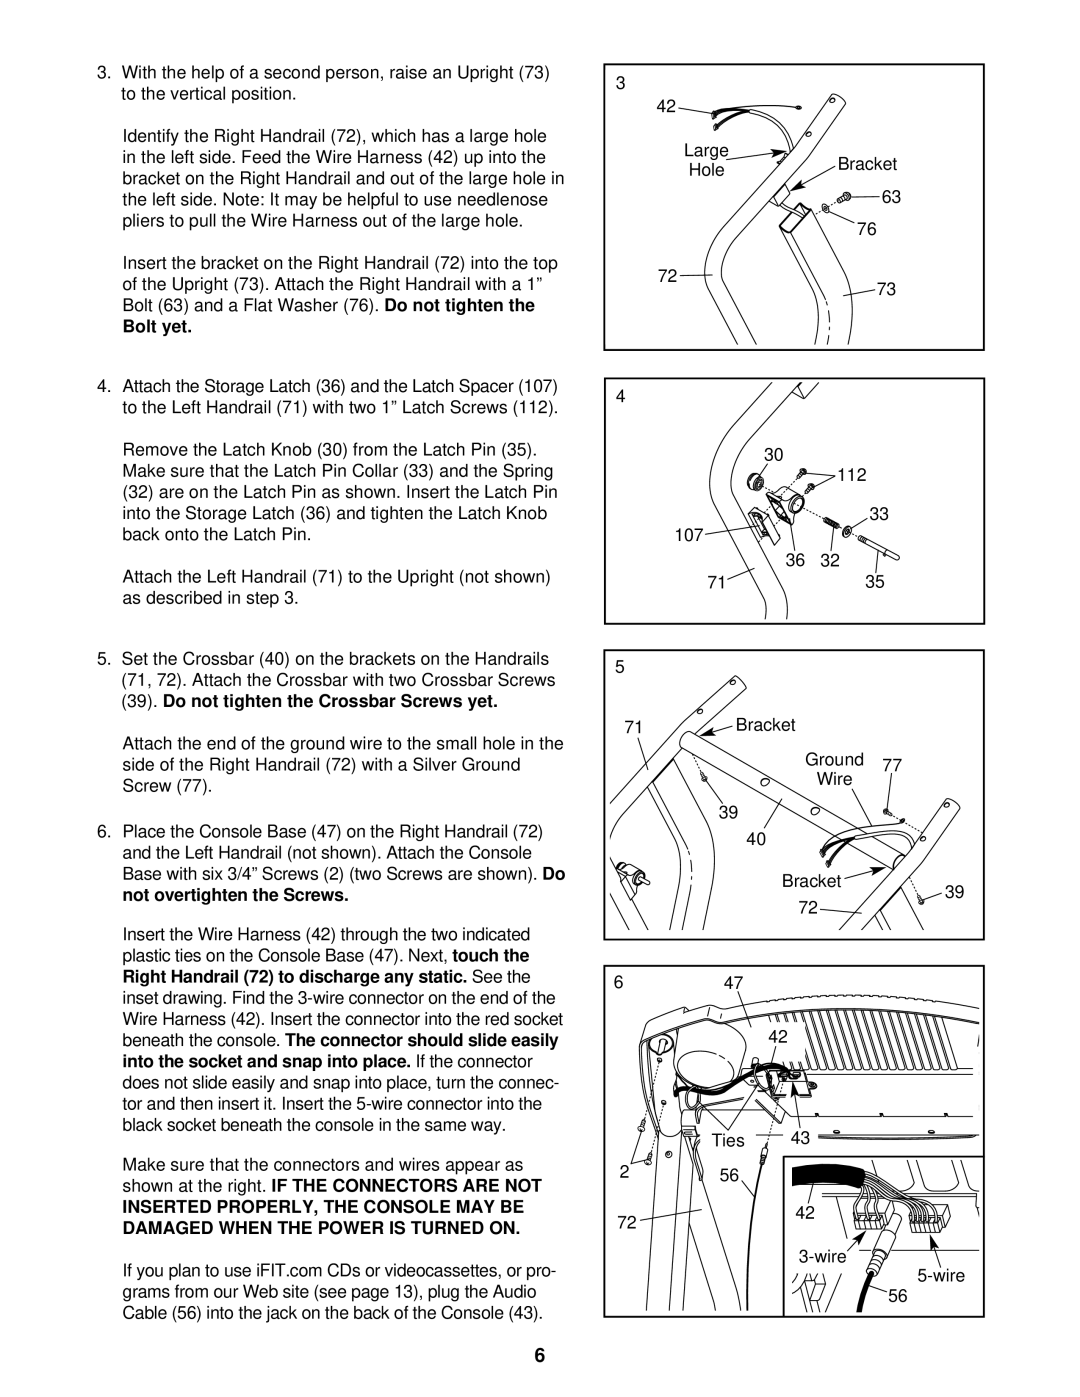
6. Place the Console Base (47) on the Right Handrail (72) |
| 39 |
|
|
| ||
| 40 |
|
|
| |||
and the Left Handrail (not shown). Attach the Console |
|
|
|
| |||
|
|
|
|
| |||
Base with six 3/4” Screws (2) (two Screws are shown). | Do |
| Bracket | 39 | |||
not overtighten the Screws. |
|
|
| ||||
|
|
| 72 | ||||
|
|
|
|
|
| ||
Insert the Wire Harness (42) through the two indicated |
|
|
|
|
| ||
plastic ties on the Console Base (47). Next, | touch the |
|
|
|
|
| |
Right Handrail (72) to discharge any static. | See the | 6 | 47 |
|
|
| |
inset drawing. Find the |
|
|
| ||||
|
|
|
|
| |||
Wire Harness (42). Insert the connector into the red socket |
| 42 |
|
|
| ||
beneath the console. | The connector should slide easily |
|
|
|
| ||
into the socket and snap into place. | If the connector |
|
|
|
|
| |
does not slide easily and snap into place, turn the connec- |
|
|
|
|
| ||
tor and then insert it. Insert the |
|
|
|
|
| ||
black socket beneath the console in the same way. |
| Ties | 43 |
|
| ||
|
|
|
|
|
| ||
Make sure that the connectors and wires appear as | 2 | 56 |
|
|
| ||
shown at the right. | IF THE CONNECTORS ARE NOT |
|
|
| |||
|
|
|
|
| |||
INSERTED PROPERLY, THE CONSOLE MAY BE |
| 72 |
| 42 |
|
| |
DAMAGED WHEN THE POWER IS TURNED ON. |
|
|
|
| |||
|
|
|
|
| |||
|
|
|
|
|
| ||
If you plan to use iFIT.com CDs or videocassettes, or pro- |
|
| |||||
|
|
|
| ||||
grams from our Web site (see page 13), plug the Audio |
|
|
|
| |||
|
|
|
| 56 | |||
Cable (56) into the jack on the back of the Console (43). |
|
|
|
|
| ||
|
|
| 6 |
|
|
|
|