PHRM40
SU MO TU WE TH FR SA
MODE/START/STOP/SET
Instructions Manual Heart Rate Watch One button
Thank you for purchasing this heart rate monitor. This set of heart rate monitor consists of a
watch and a heart rate watch. This watch was especially designed to be simplistic and
This heart rate watch requires 1x CR2032 lithium battery. Only the recommended batteries are to be used.
When replacing the batteries, the following are to be strictly observed.
1.Only adults should install and replace the battery.
2.DO NOT use rechargeable batteries.
3.Exhausted batteries should be removed from the pedometer watch.
Features:
Time (12/24 HR)/Date/Day
Heart Rate Measurement (Average and maximum heart rate)
Data Storage
Exercise (with setting of your own high/low zones)
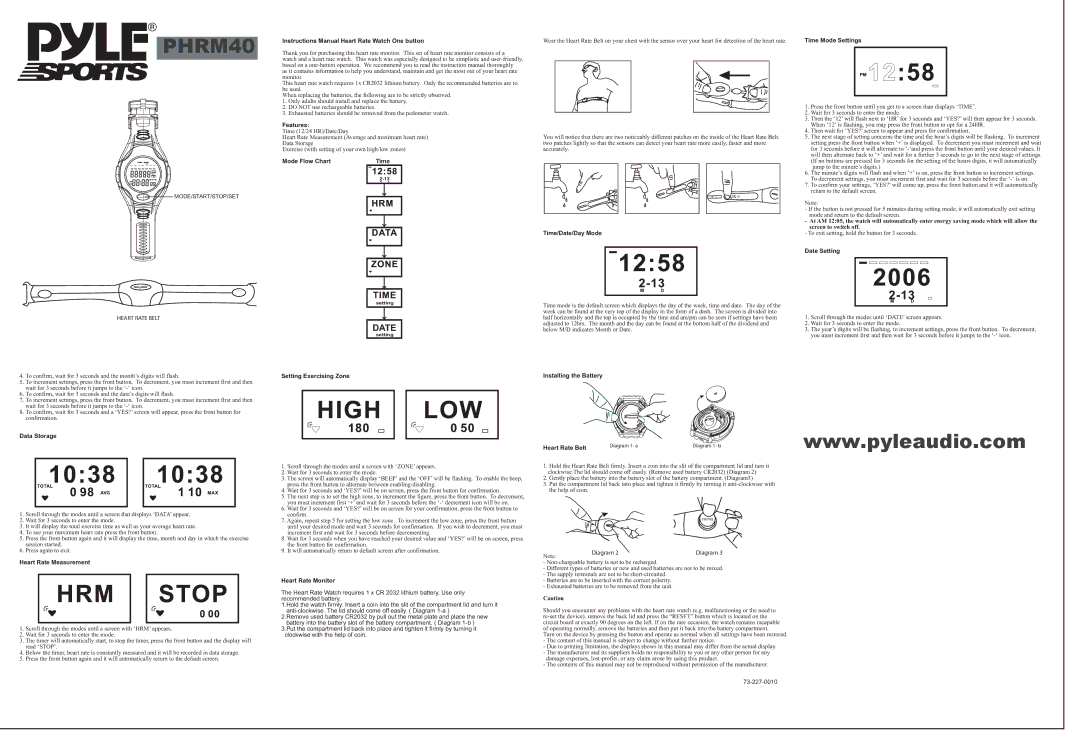
Mode Flow Chart | Time |
|
|
|
|
|
|
|
|
|
|
|
|
|
|
Wear the Heart Rate Belt on your chest with the sensor over your heart for detection of the heart rate.
You will notice that there are two noticeably different patches on the inside of the Heart Rate Belt. two patches lightly so that the sensors can detect your heart rate more easily, faster and more accurately.
Time/Date/Day Mode
Time Mode Settings
1.Press the front button until you get to a screen than displays ‘TIME’.
2.Wait for 3 seconds to enter the mode.
3.Then the ‘12’ will flash next to ‘HR’ for 3 seconds and ‘YES?’ will then appear for 3 seconds. When ‘12’ is flashing, you may press the front button to opt for a 24HR.
4.Then wait for ‘YES?’ screen to appear and press for confirmation.
5.The next stage of setting concerns the time and the hour’s digits will be flashing. To increment setting press the front button when ‘+’ is displayed. To decrement you must increment and wait for 3 seconds before it will alternate to
6.The minute’s digits will flash and when ‘+’ is on, press the front button to increment settings. To decrement settings, you must increment first and wait for 3 seconds before the
7.To confirm your settings, ‘YES?’ will come up, press the front button and it will automatically return to the default screen.
Note:
-If the button is not pressed for 5 minutes during setting mode, it will automatically exit setting mode and return to the default screen.
-At AM 12:05, the watch will automatically enter energy saving mode which will allow the screen to switch off.
-To exit setting, hold the button for 3 seconds.
Date Setting
HEART RATE BELT
4.To confirm, wait for 3 seconds and the month’s digits will flash.
5.To increment settings, press the front button. To decrement, you must increment first and then wait for 3 seconds before it jumps to the
6.To confirm, wait for 3 seconds and the date’s digits will flash.
7.To increment settings, press the front button. To decrement, you must increment first and then wait for 3 seconds before it jumps to the
8.To confirm, wait for 3 seconds and a ‘YES?’ screen will appear, press the front button for confirmation.
setting
DATE
setting
Setting Exercising Zone
Time mode is the default screen which displays the day of the week, time and date. The day of the week can be found at the very top of the display in the form of a dash. The screen is divided into half horizontally and the top is occupied by the time and am/pm can be seen if settings have been adjusted to 12hrs. The month and the day can be found at the bottom half of the dividend and below M/D indicates Month or Date.
Installing the Battery
1.Scroll through the modes until ‘DATE’ screen appears.
2.Wait for 3 seconds to enter the mode.
3.The year’s digits will be flashing, to increment settings, press the front button. To decrement, you must increment first and then wait for 3 seconds before it jumps to the
Data Storage
1.Scroll through the modes until a screen that displays ‘DATA’ appear.
2.Wait for 3 seconds to enter the mode.
3.It will display the total exercise time as well as your average heart rate.
4.To see your maximum heart rate press the front button.
5.Press the front button again and it will display the time, month and day in which the exercise session started.
6.Press again to exit.
Heart Rate Measurement
1.Scroll through the modes until a screen with ‘HRM’ appears.
2.Wait for 3 seconds to enter the mode.
3.The timer will automatically start, to stop the timer, press the front button and the display will read ‘STOP’.
4.Below the timer, heart rate is constantly measured and it will be recorded in data storage.
5.Press the front button again and it will automatically return to the default screen.
1.Scroll through the modes until a screen with ‘ZONE’ appears.
2.Wait for 3 seconds to enter the mode.
3.The screen will automatically display ‘BEEP’ and the ‘OFF’ will be flashing. To enable the beep, press the front button to alternate between enabling/disabling.
4.Wait for 3 seconds and ‘YES?’ will be on screen, press the front button for confirmation.
5.The next step is to set the high zone, to increment the figure, press the front button. To decrement, you must increment first ‘+’ and wait for 3 seconds before the
6.Wait for 3 seconds and ‘YES?’ will be on screen for your confirmation, press the front button to confirm.
7.Again, repeat step 5 for setting the low zone. To increment the low zone, press the front button until your desired mode and wait 3 seconds for confirmation. If you wish to decrement, you must increment first and wait for 3 seconds before decrementing.
8.Wait for 3 seconds when you have reached your desired value and ‘YES?’ will be on screen, press the front button for confirmation.
9.It will automatically return to default screen after confirmation.
Heart Rate Monitor
The Heart Rate Watch requires 1 x CR 2032 lithium battery. Use only recommended battery.
1.Hold the watch firmly. Insert a coin into the slit of the compartment lid and turn it
2.Remove used battery CR2032 by pull out the metal plate and place the new battery into the battery slot of the battery compartment. ( Diagram
3.Put the compartment lid back into place and tighten it firmly by turning it clockwise with the help of coin.
Heart Rate Belt | Diagram 1- a | Diagram 1- b | www.pyleaudio.com |
|
|
1.Hold the Heart Rate Belt firmly. Insert a coin into the slit of the compartment lid and turn it clockwise.The lid should come off easily. (Remove used battery CR2032) (Diagram 2)
2.Gently place the battery into the battery slot of the battery compartment. (Diagram3)
3.Put the compartment lid back into place and tighten it firmly by turning it
Note: | Diagram 2 | Diagram 3 |
|
|
-
-Different types of batteries or new and used batteries are not to be mixed.
-The supply terminals are not to be
-Batteries are to be inserted with the correct polarity.
-Exhausted batteries are to be removed from the unit.
Caution
Should you encounter any problems with the heart rate watch (e.g. malfunctioning or the need to
Turn on the device by pressing the button and operate as normal when all settings have been restored.
-The content of this manual is subject to change without further notice.
-Due to printing limitation, the displays shows in this manual may differ from the actual display.
-The manufacturer and its suppliers holds no responsibility to you or any other person for any damage expenses,
-The contents of this manual may not be reproduced without permission of the manufacturer.