Camera Set Up
STEP 5 Connecting the Cameras
IMPORTANT! If your bundle came with specialty cameras, such as a PTZ, please consult the instructions for that camera first.
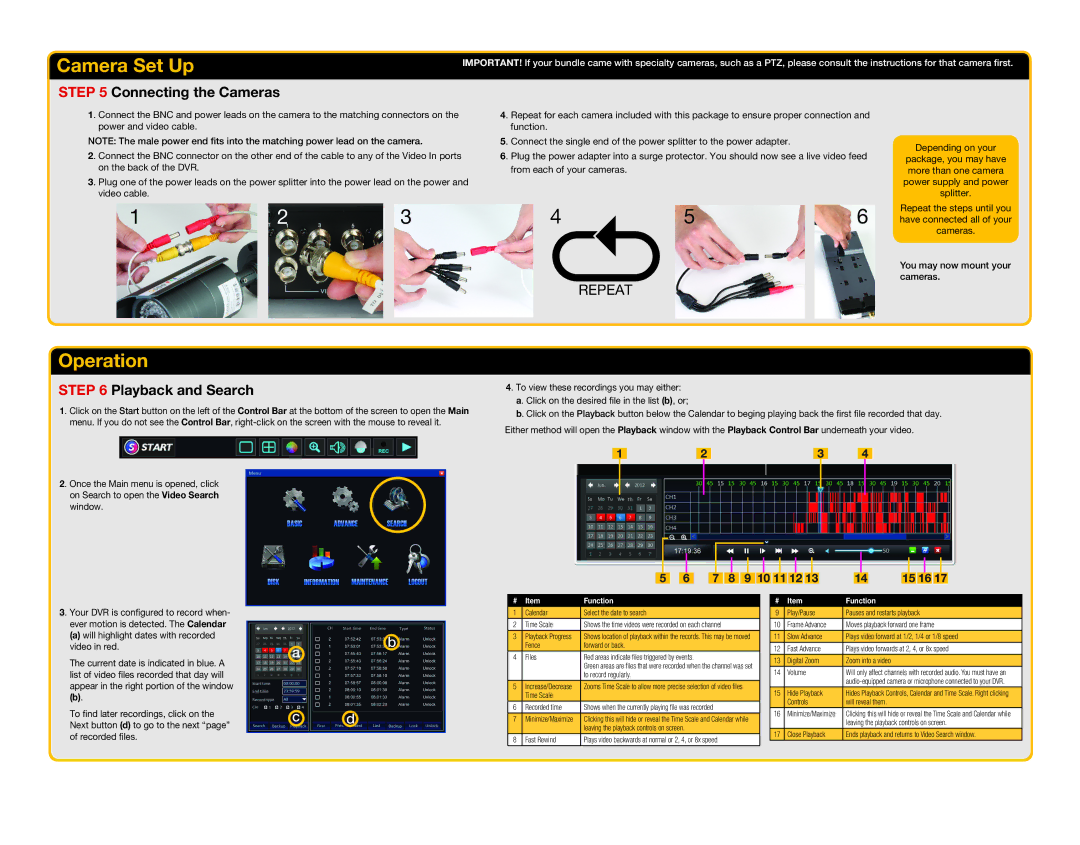
1. Connect the BNC and power leads on the camera to the matching connectors on the power and video cable.
NOTE: The male power end fits into the matching power lead on the camera.
2. Connect the BNC connector on the other end of the cable to any of the Video In ports on the back of the DVR.
3. Plug one of the power leads on the power splitter into the power lead on the power and video cable.
4. Repeat for each camera included with this package to ensure proper connection and function.
5. Connect the single end of the power splitter to the power adapter.
6. Plug the power adapter into a surge protector. You should now see a live video feed from each of your cameras.
Depending on your
package, you may have more than one camera power supply and power splitter.
12 3
4 | 5 | 6 | Repeat the steps until you |
have connected all of your |
cameras.
You may now mount your cameras.
REPEAT
RÉPÉTEZ
Operation
STEP 6 Playback and Search
1. Click on the Start button on the left of the Control Bar at the bottom of the screen to open the Main menu. If you do not see the Control Bar,
4. To view these recordings you may either:
a. Click on the desired file in the list (b), or;
b. Click on the Playback button below the Calendar to beging playing back the first file recorded that day. Either method will open the Playback window with the Playback Control Bar underneath your video.
|
|
|
|
|
|
|
1 | 2 | 3 | 4 |
2. Once the Main menu is opened, click on Search to open the Video Search window.
5 | 6 | 7 | 8 | 9 10 11 12 13 | 14 | 15 16 17 |
3. Your DVR is configured to record when- ever motion is detected. The Calendar
(a)will highlight dates with recorded video in red.
The current date is indicated in blue. A list of video files recorded that day will appear in the right portion of the window
(b).
a
b
# | Item | Function |
1 | Calendar | Select the date to search |
2 | Time Scale | Shows the time videos were recorded on each channel |
3 | Playback Progress | Shows location of playback within the records. This may be moved |
| Fence | forward or back. |
4 | Files | Red areas indicate files triggered by events. |
|
| Green areas are files that were recorded when the channel was set |
|
| to record regularly. |
5 | Increase/Decrease | Zooms Time Scale to allow more precise selection of video files |
| Time Scale |
|
6 | Recorded time | Shows when the currently playing file was recorded |
# | Item | Function |
9 | Play/Pause | Pauses and restarts playback |
10 | Frame Advance | Moves playback forward one frame |
11 | Slow Advance | Plays video forward at 1/2, 1/4 or 1/8 speed |
12 | Fast Advance | Plays video forwards at 2, 4, or 8x speed |
13 | Digital Zoom | Zoom into a video |
14 | Volume | Will only affect channels with recorded audio. You must have an |
|
| |
15 | Hide Playback | Hides Playback Controls, Calendar and Time Scale. Right clicking |
| Controls | will reveal them. |
To find later recordings, click on the Next button (d) to go to the next “page” of recorded files.
c d
7 | Minimize/Maximize | Clicking this will hide or reveal the Time Scale and Calendar while |
|
| leaving the playback controls on screen. |
8 | Fast Rewind | Plays video backwards at normal or 2, 4, or 8x speed |
16 | Minimize/Maximize | Clicking this will hide or reveal the Time Scale and Calendar while |
|
| leaving the playback controls on screen. |
17 | Close Playback | Ends playback and returns to Video Search window. |