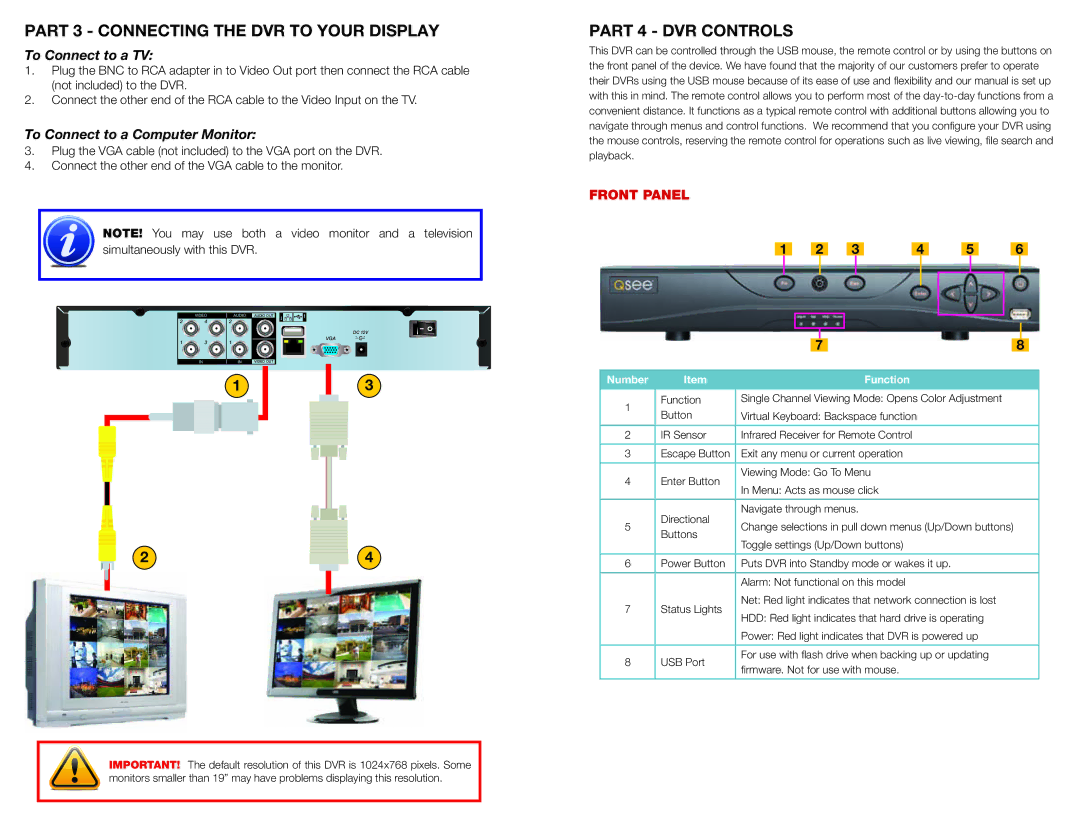
PART 3 - CONNECTING THE DVR TO YOUR DISPLAY
To Connect to a TV:
1.Plug the BNC to RCA adapter in to Video Out port then connect the RCA cable (not included) to the DVR.
2.Connect the other end of the RCA cable to the Video Input on the TV.
To Connect to a Computer Monitor:
3.Plug the VGA cable (not included) to the VGA port on the DVR.
4.Connect the other end of the VGA cable to the monitor.
NOTE! You may use both a video monitor and a television simultaneously with this DVR.
|
|
| AUDIO OUT |
2 | 4 | 2 |
|
|
|
| DC 12V |
1 | 3 | 1 | VGA |
| |||
|
|
| VIDEO OUT |
|
| 1 | 3 |
2 | 4 |
IMPORTANT! The default resolution of this DVR is 1024x768 pixels. Some monitors smaller than 19” may have problems displaying this resolution.
PART 4 - DVR CONTROLS
This DVR can be controlled through the USB mouse, the remote control or by using the buttons on the front panel of the device. We have found that the majority of our customers prefer to operate their DVRs using the USB mouse because of its ease of use and flexibility and our manual is set up with this in mind. The remote control allows you to perform most of the
FRONT PANEL
|
|
|
|
|
|
|
|
|
|
|
|
|
|
|
|
|
|
|
1 | 2 | 3 | 4 | 5 | 6 | |||||||||||||
|
|
|
|
|
|
|
|
|
|
|
|
|
|
|
|
|
|
|
|
|
|
|
|
|
|
|
|
|
|
|
|
|
|
|
|
|
|
|
|
|
|
|
|
|
|
|
|
|
|
|
|
|
|
|
|
|
|
|
|
|
|
|
|
|
|
|
|
|
|
|
|
|
|
|
|
|
|
|
|
|
|
| 7 |
|
| 8 |
| ||
|
|
|
|
|
|
|
|
|
|
|
Number | Item |
|
|
|
|
| Function |
|
|
|
|
|
|
|
|
| |||||
1 | Function | Single Channel Viewing Mode: Opens Color Adjustment |
|
|
| |||||
Button | Virtual Keyboard: Backspace function |
|
|
| ||||||
|
|
|
| |||||||
|
|
|
|
|
| |||||
2 | IR Sensor | Infrared Receiver for Remote Control |
|
|
| |||||
|
|
|
|
|
| |||||
3 | Escape Button | Exit any menu or current operation |
|
|
| |||||
|
|
|
|
|
| |||||
4 | Enter Button | Viewing Mode: Go To Menu |
|
|
| |||||
In Menu: Acts as mouse click |
|
|
| |||||||
|
|
|
|
| ||||||
|
|
|
|
|
| |||||
| Directional | Navigate through menus. |
|
|
| |||||
5 | Change selections in pull down menus (Up/Down buttons) |
|
|
| ||||||
Buttons |
|
|
| |||||||
| Toggle settings (Up/Down buttons) |
|
|
| ||||||
|
|
|
|
| ||||||
|
|
|
|
|
| |||||
6 | Power Button | Puts DVR into Standby mode or wakes it up. |
|
|
| |||||
|
|
|
|
|
| |||||
|
| Alarm: Not functional on this model |
|
|
| |||||
7 | Status Lights | Net: Red light indicates that network connection is lost |
|
|
| |||||
HDD: Red light indicates that hard drive is operating |
|
|
| |||||||
|
|
|
|
| ||||||
|
| Power: Red light indicates that DVR is powered up |
|
|
| |||||
|
|
|
|
|
| |||||
8 | USB Port | For use with flash drive when backing up or updating |
|
|
| |||||
firmware. Not for use with mouse. |
|
|
| |||||||
|
|
|
|
| ||||||
|
|
|
|
|
|
|
|
|
|
|