INTRODUCTION
Thank you for your purchase of the
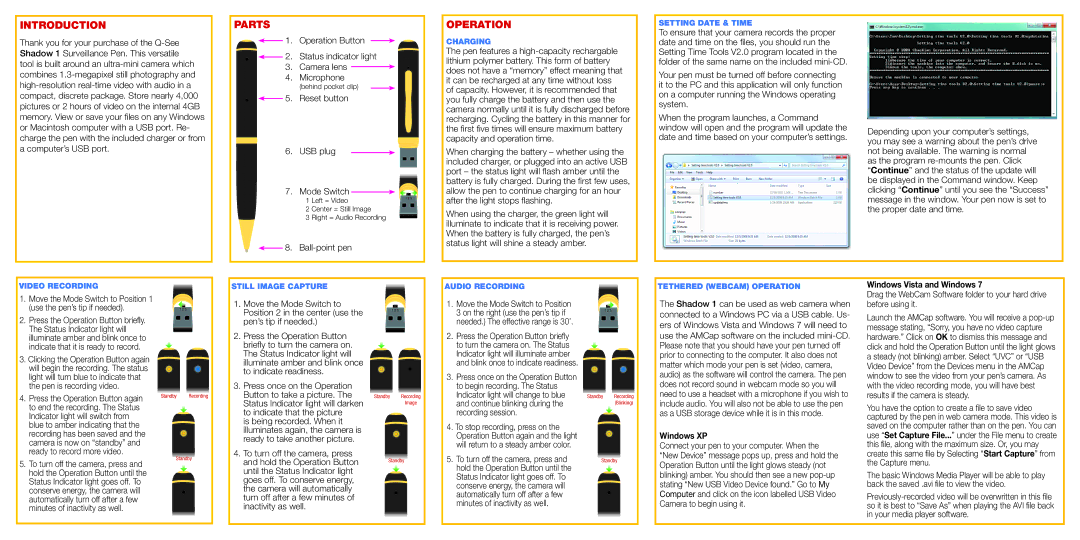
PARTS
1. Operation Button
2. Status indicator light
3. Camera lens ![]()
![]()
4. Microphone
(behind pocket clip)
5. Reset button
6. USB plug
7. Mode Switch ![]()
![]()
1 Left = Video
2 Center = Still Image
3 Right = Audio Recording
![]() 8.
8.
OPERATION
CHARGING
The pen features a
When charging the battery – whether using the included charger, or plugged into an active USB port – the status light will flash amber until the battery is fully charged. During the first few uses, allow the pen to continue charging for an hour after the light stops flashing.
When using the charger, the green light will illuminate to indicate that it is receiving power. When the battery is fully charged, the pen’s status light will shine a steady amber.
SETTING DATE & TIME
To ensure that your camera records the proper date and time on the files, you should run the Setting Time Tools V2.0 program located in the folder of the same name on the included
Your pen must be turned off before connecting it to the PC and this application will only function on a computer running the Windows operating system.
When the program launches, a Command window will open and the program will update the date and time based on your computer’s settings.
Depending upon your computer’s settings, you may see a warning about the pen’s drive not being available. The warning is normal as the program
VIDEO RECORDING
1. | Move the Mode Switch to Position 1 |
| (use the pen’s tip if needed). |
2. | Press the Operation Button briefly. |
| The Status Indicator light will |
| illuminate amber and blink once to |
| indicate that it is ready to record. |
3. Clicking the Operation Button again | |
| will begin the recording. The status |
STILL IMAGE CAPTURE
1. | Move the Mode Switch to |
| Position 2 in the center (use the |
| pen’s tip if needed.) |
2. | Press the Operation Button |
| briefly to turn the camera on. |
| The Status Indicator light will |
| illuminate amber and blink once |
| to indicate readiness. |
AUDIO RECORDING
1. Move the Mode Switch to Position
3 on the right (use the pen’s tip if needed.) The effective range is 30’.
2. Press the Operation Button briefly to turn the camera on. The Status ![]() Indicator light will illuminate amber
Indicator light will illuminate amber ![]() and blink once to indicate readiness.
and blink once to indicate readiness. ![]()
TETHERED (WEBCAM) OPERATION
The Shadow 1 can be used as web camera when connected to a Windows PC via a USB cable. Us- ers of Windows Vista and Windows 7 will need to
use the AMCap software on the included
Windows Vista and Windows 7
Drag the WebCam Software folder to your hard drive before using it.
Launch the AMCap software. You will receive a
light will turn blue to indicate that |
the pen is recording video. |
4. Press the Operation Button again |
to end the recording. The Status |
Indicator light will switch from |
blue to amber indicating that the |
recording has been saved and the |
camera is now on “standby” and |
ready to record more video. |
5. To turn off the camera, press and |
hold the Operation Button until the |
Status Indicator light goes off. To |
conserve energy, the camera will |
automatically turn off after a few |
minutes of inactivity as well. |
Standby Recording
Standby
3. Press once on the Operation |
Button to take a picture. The |
Status Indicator light will darken |
to indicate that the picture |
is being recorded. When it |
illuminates again, the camera is |
ready to take another picture. |
4. To turn off the camera, press |
and hold the Operation Button |
until the Status Indicator light |
goes off. To conserve energy, |
the camera will automatically |
turn off after a few minutes of |
inactivity as well. |
Standby Recording Image
Standby
3.Press once on the Operation Button to begin recording. The Status Indicator light will change to blue and continue blinking during the recording session.
4.To stop recording, press on the Operation Button again and the light will return to a steady amber color.
5.To turn off the camera, press and hold the Operation Button until the Status Indicator light goes off. To conserve energy, the camera will automatically turn off after a few minutes of inactivity as well.
Standby Recording (Blinking)
Standby
audio) as the software will control the camera. The pen does not record sound in webcam mode so you will need to use a headset with a microphone if you wish to include audio. You will also not be able to use the pen as a USB storage device while it is in this mode.
Windows XP
Connect your pen to your computer. When the “New Device” message pops up, press and hold the Operation Button until the light glows steady (not blinking) amber. You should then see a new
window to see the video from your pen’s camera. As with the video recording mode, you will have best results if the camera is steady.
You have the option to create a file to save video captured by the pen in web camera mode. This video is saved on the computer rather than on the pen. You can use “Set Capture File...” under the File menu to create this file, along with the maximum size. Or, you may create this same file by Selecting “Start Capture” from the Capture menu.
The basic Windows Media Player will be able to play back the saved .avi file to view the video.