StorNext
Copyright Statement
Contents
Chapter SNFS-Only GUI Overview
Chapter Backing Up StorNext
Chapter Managing Libraries 169
Chapter Managing Media 208
Chapter StorNext Reports 270
Chapter Customer Assistance 322
Appendix D RAS Messages 376
Figures
Complete Start/Stop Snfs Screen
Backup Policy Screen
Exclusive Stripe Group Screen
Move Options Screen 161
Match Devices with Slots Screen
Select Destination Library Screen 223
Complete Storage Policy Task Screen
Appendix Figures
Cleaning of Drive Failed RAS
Disk Space Allocation Failure RAS 399
StorNext User’s Guide
About StorNext Storage Manager
Introduction
About StorNext File System
About Distributed LAN Clients
Purpose of This Guide
How This Guide is Organized
Description Definition Consequences
Document Conventions
Conventions Examples
Accessing the StorNext GUI
StorNext GUI Overview
StorNext Login Window
Link to
StorNext Home
System Monitors
File System Monitor
File System Monitor
Library Monitor
Library Monitor
Storage Disk Monitor
Storage Disk Monitor
Config Menu Options
StorNext Home Page Drop-Down Menus
Admin Menu Options
Reports Menu Options
StorNext System Status
Service Menu Options
Help Menu Options
StorNext Admin Alerts
Service System Status screen
Service Admin Alerts Screen
StorNext Server Status Home and Help Links Application Link
Snfs and Snsm Home Pages
Snfs Home
Snfs Home Page Drop- Down Menus
Snfs Home
Snfs Config Menu
Snfs Admin Menu
Snfs Help Menu
Snsm Home Snsm Home Page Drop- Down Menus
Snfs Reports Menu
Snsm File Menu
Free Disk Blocks Truncate files
Snsm Admin Menu
Snsm Media Menu
Snsm Help Menu
Configuration Wizard
Snsm Reports Menu
StorNext Configuration Wizard
Add Media See Adding Media to a Configured Library on
Accessing the Snfs GUI
SNFS-Only GUI Overview
StorNext File System Login Window
Snfs Home
File System Monitor
Config Menu
Drop-down Menus and Options
Admin Menu
Reports Menu
Help Menu
Shortcut Menu Options
Home and Help Links StorNext Server Status
Start/Stop Snfs Screen SNFS-Only GUI Overview Snfs Home
Complete Start/Stop Snfs Screen
Snfs Configuration Wizard
Snfs Configuration Wizard Screen StorNext User’s Guide
SNFS-Only GUI Overview Snfs Configuration Wizard
Common StorNext Tasks
Entering the StorNext License
Common StorNext Tasks Entering the StorNext License
Enter License Introduction Screen
Quantum License Agreement StorNext User’s Guide
Enter License Strings Screen
Complete Enter License Screen Temporary
Common StorNext Tasks Entering the StorNext License
Entering a License String in the .dat File
Complete Enter License Screen Permanent
Controlling User Access
License String Example
Changing the Admin Password
Modify User Screen
Adding a New User
Common StorNext Tasks Controlling User Access
Modifying an Existing User
Starting and Stopping StorNext Components
Deleting an Existing User
Start/Stop StorNext Screen
Accessing StorNext Logs
Complete Start/Stop StorNext Task Screen
Select Log Screen StorNext User’s Guide
Select File Screen
Scheduling StorNext Events
Log File Example
Viewing a Schedule
Schedule Events Screen
Adding a New Schedule
Select either Days of Week or Days of Month
Modifying an Existing Schedule
Deleting an Existing Schedule
Select either Days of the Week or Days of the Month
Resetting a Schedule
From the StorNext Home Page , select Schedule Events from
Setting Up E-mail Notification
Configure E-mail Notification Screen StorNext User’s Guide
StorNext User’s Guide
Configure E-mail Addresses Screen
Complete E-mail Configuration Screen StorNext User’s Guide
Cancelling Snsm Requests
Cancel Request Screen StorNext User’s Guide
Setting up Alternate Retrieval Locations
Alternate Retrieval Location Screen
Modifying or Disabling This Feature
Types of StorNext Software Backups
Backing Up StorNext
Setting up Email Notification For Backup
Performing a StorNext Software Backup
Backup StorNext Screen StorNext User’s Guide
Managing the Backup Policy
Complete Backup Task Screen
Click Apply to save and apply the backup policy
Backing Up StorNext Managing the Backup Policy
Managing the File System
Working With File Systems
Adding a File System
Modifying a File System Deleting a File System
Add New File System Screen
Directory Browser Window
Disk Settings Screen StorNext User’s Guide
Managing the File System Working With File Systems
Customize Stripe Group Screen
StorNext Installation Guide
Managing the File System Working With File Systems
Creating a File System From Snfs
Complete File System Task Screen
Configure File System Screen
Modifying a File System
Modify File System Window
Deleting a File System
Managing File System Operations
Selecting a Device to Label, Unlabel, or Probe
From this screen, you can perform these tasks
Labeling a Device
Labeling Warning
Unlabeling a Device
Data Loss Warning
Probing a Device
Making Global Changes
Modify Global Settings Screen
StorNext User’s Guide 102
StorNext User’s Guide 103
Working with
Fsnameservers File
Making or Unmaking a File System
Conditions to Make or Re-Make a File System
Making a File System
Starting and Stopping the File System
Mounting or Unmounting a File System
Working With Disks
Adding Disks
Manage Disks Screen
Deleting Disks
Add Disk Screen
Making or Unmaking a File System on
Defragmenting a Disk
Working With Stripe Groups
Adding a Stripe Group
Add Stripe Group Screen
StorNext User’s Guide 116
Modifying a Stripe Group
Modify Stripe Group Screen
StorNext User’s Guide 119
Use this procedure to delete a stripe group
Deleting a Stripe Group
Working With Affinities
Adding an Affinity
Click Next to continue. The Add Affinity screen appears
Add Affinity Screen
Select Directory Screen
Assign Affinity Screen
Exclusive Stripe Group Screen
Adding an Affinity Through Snfs
Complete Add Affinity Task Screen
Add, Modify, or Delete Affinities Screen
Setting the Affinity in a Directory
Set Affinity Screen
Modifying an Affinity
Deleting an Affinity
Restrictions
File System Configuration
Performing a Metadata Dump
Using the Snsm File System Functions
Metadata Dump File System Screen
Storing Files
Optional Store Parameters Screen
Changing a File Version
Change File Version screen appears
Recovering a File
Recovering a Directory
Retrieving a Directory on
Recover Directory Screen
Retrieving a File
Retrieving a Directory
Retrieve Files Screen
Freeing Disk Blocks
Retrieve Directory Screen
Free Disk Blocks Screen
Moving Files to New Media
Modifying a File’s Attributes
Modify File Attributes Screen
Understanding Dynamic Resource Allocation
About File System Expansion
About Stripe Group Movement
Checking the File System
Expansion and Movement Steps
Check File System Screen
Performing File System Expansion
Check File System Status Screen
StorNext User’s Guide 151
File System Expansion Introduction Screen
Data Stripe Group Selection Screen
Metadump Warning
New Data Stripe Group Screen
Complete File System Task Screen StorNext User’s Guide 156
Performing Stripe Group Movement
Launching the Movement Wizard
Move Stripe Group Screen
Move Stripe Group Introduction Screen
Move Options Screen
Data Stripe Group Move Screen
Destination Stripe Group Too Small Warning
Metadata/Journal Move Screen
Complete Stripe Group Move Screen
Completing Metadata Stripe Group Movement
Process Initiated Status Screen
Reusing LUNs in a Data Stripe Group After a Move
Stripe Group Move Status Screen
After a Move
Reusing Luns in a
Metadata Stripe Group
Managing Libraries
Adding a Library
Starting the Add Library Wizard
Click Next. The Library Type screen appears
Library Type Screen
Adding a Scsi Library
Library Name Screen Managing Libraries Adding a Library
Media Types Screen
Scsi Device Screen StorNext User’s Guide 175
Complete Add Library Task Screen
Adding an Acsls Network Library
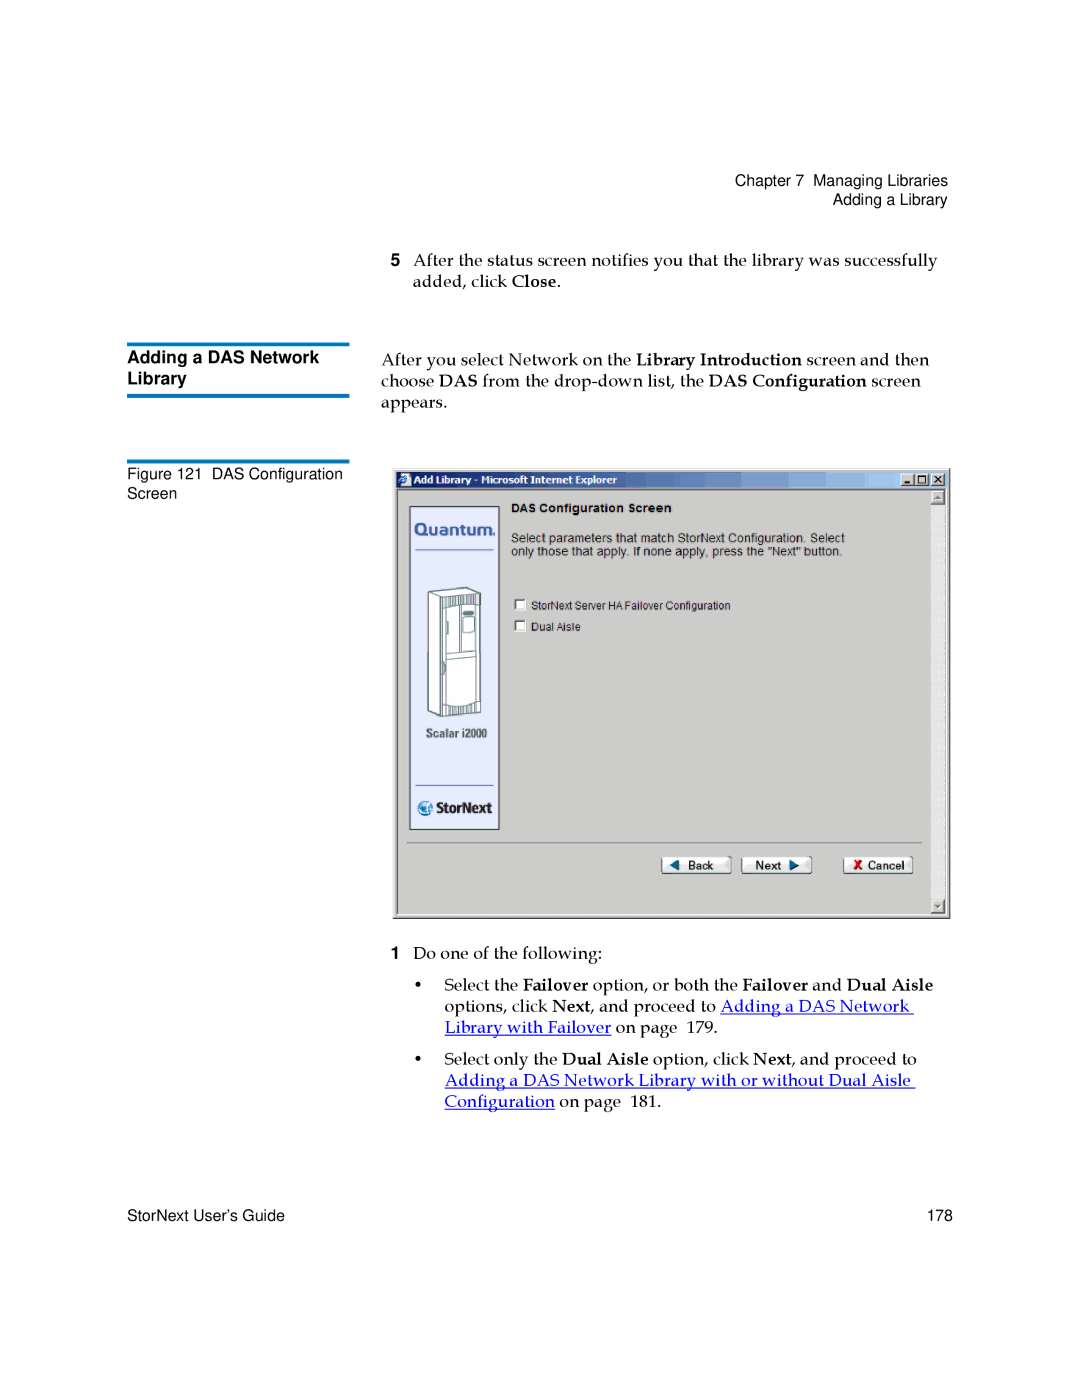
DAS Configuration Screen Managing Libraries Adding a Library
Adding a DAS Network Library
Adding a DAS Network Library with Failover
DAS Library Name Screen
DAS Media Types Screen
DAS 2 Library Name Screen
Adding a Vault Library
Vault Library Name Screen
Configure Library Screen
Modifying a Library
Deleting a Library
Modify Scsi Library Screen
Rescanning a Library
Auditing a Library
Audit Library Screen
Changing the Library State
Change Library State Screen
StorNext User’s Guide 188
8Managing Drives and Disks
Working with Tape Drives
Adding a Tape Drive
Associated Library Screen
Hardware Devices Screen
Complete Add Drive Task Screen
Matching Devices with Slots
Match Devices with Slots Screen StorNext User’s Guide 194
Tape Drive Mapping Help Screen
Modifying a Tape Drive
Deleting a Tape Drive
Modify Drive Screen
Changing a Drive State
Delete Warning Window
Cleaning a Tape Drive
Clean Drive Screen
Working with Drive Pools
Adding a Drive Pool
Configure Drive Pools Screen
Modifying a Drive Pool
Click OK to close the message window and proceed
Deleting a Drive Pool
Managing Disk Space
Manage Disk Space Screen
Changing Watermark Parameters
Change Watermark Parameters Screen
Adding Media to a Configured Library
Managing Media
Add Media Introduction Screen StorNext User’s Guide 209
Associated Library Screen StorNext User’s Guide 210
StorNext User’s Guide 211
Select a mailbox and click Next
Complete Add Media Task Screen
Adding a Vault
Add Media IDs Screen
Create New Media ID Screen
Removing and Moving Media
Removing Media
Select Media Screen
StorNext Media Browser Screen
Select from the click Next. The appears
Library Operator Interface Screen
Media list
Moving Media
Select Destination Library Screen
StorNext User’s Guide 224
Using the Snsm Media Functions
LOI Enter Screen
Moving Media Manually
Library State on
Manually Move Media Screen
Mounting and Dismounting Media
Mounting Media
Dismounting Media
Mount Media Screen
Removing Media From the Storage Manager
Dismount Media Screen
Assigning Blank Media to a Policy Class
Remove Media From Snsm Screen
Transcribing Media
Assign Policy Screen
Transcribe Media Screen
Changing Media Attributes
Reclassifying a Media Class Grouping
Source F03590DATA Destination F03590CLEAN
Cleaning Media
Cancelling the Eject Media Process
Managing Storage Disks
Storage Disk Deduplication
Configure Storage Disk Screen StorNext User’s Guide 241
Adding a Storage Disk
Managing Storage Disks Adding a Storage Disk
Click Next. The Add Storage Disk screen appears
Click Next. The Complete Storage Disk screen appears
Modifying a Storage Disk
Modify Storage Disk Screen
Deleting a Storage Disk
Changing a Storage Disk State
Delete Warning Message
Change Storage Disk State Screen
Cleaning a Storage Disk
Clean Storage Disk Screen
Page
11Data Migration Management
Policy Classes and Relationships
Stub Files
Adding a Storage Policy
For more information, see the man page for fsaddrelation
Policy Class Directory Screen
Click Browse. The Directory Browser window appears
Relocation Policy Selection Screen
Store, Truncate Relocate Times Screen
Copies and Media Type screen appears
Relation Point
Adding a Policy Class
Through Snsm Without a
Click Add to continue. The Add Policy Class screen appears
Modify Parameters Screen StorNext User’s Guide 262
StorNext User’s Guide 263
StorNext User’s Guide 264
Adding a Relation Point to a Policy Class
Manage Policy Class Relationships Screen
Add Relationship Screen
Modifying a Policy Class
Deleting a Policy Class
Remove Relationships Screen
Applying a Policy Class
StorNext Reports
Backup Information Report
Snfs Reports
Drive State Information Report
StorNext User’s Guide 273
Drive States Report Screen StorNext User’s Guide 274
File Information Report
Files Report Screen
StorNext File Browser Screen
Library Information Report
Libraries Report Screen StorNext User’s Guide 279
Library Space Used Report
Media Information Report
StorNext User’s Guide 282
Media Report Screen
Media Browser screen
Media Information Report StorNext User’s Guide 285
Policy Class Information Report
Detailed Media Information Report
StorNext User’s Guide 287
StorNext User’s Guide 288
Use the following procedure to run the Policy Classes report
Relation Information Report
Directory/Policy Class Relationships Report Screen
Request Information Report
Scheduler Information Report
Request Report Screen
Scheduler Report Screen StorNext User’s Guide 294
Storage Disk Information Report
ONLINE-PENDING
Storage Disk Report Screen
Directory Affinity Report
Affinities Report Screen
Directory Browser Screen
File System Statistics Report
Use the following procedure to run the File System report
Stripe Group Statistics Report
Stripe Groups Report Screen
File System Client Report
StorNext User’s Guide 306
File System Client Report Screen
File System LAN Client Report
File System Distributed LAN Client Statistics Report Screen
StorNext User’s Guide 310
Service Management
Using Health Check
History
Running a Health Check
Viewing the Health Check
Click History. The Health Check History screen appears
Viewing the Health Check Results
Health Check Results Screen
Using State Capture
Capturing the Current System State
Downloading a Previous System Capture
Click Download. The Download Capture File screen appears
Using the System Status Tool
Deleting a Previous System Capture
StorNext User’s Guide 318
Refresh Click this button to refresh the display window
StorNext User’s Guide 320
Recommended Actions Screen
Quantum Technical Assistance Center
Online Service Support
Customer Assistance
Glossary
Quantum Technical Assistance Center The Quantum customer
Red Hat Advanced Server
326
Operating Guidelines
Reserved Space Parameter
Reserved Space Parameter
Distributed LAN Server/Client Network and Memory Tuning
Tuning
Distributed LAN Server
Client Network
Distributed LAN Server Memory Tuning
Required memory = 1GB + 4 * 2 * 64 * 16 * 256K = 3GB
Changes to Nobody mapping
Configuring Ldap
Using Ldap
UnixDirectoryCreationModeOnWindows
Setting Up Restrictive ACLs
Default Single-Path I/O Retry Behavior
FSBlockSize, Metadata Disk Size, and JournalSize Settings
Event Handles for fsm.exe on a Windows Metadata Server
FSB 16KB FSB 64KB
FsBlockSize JournalSize
JournalSize Setting
Allowance for Special Characters
Disk Naming Requirements
General Operating Guidelines and Limitations
Operating System Affected Component Description
Irix
RedHat Enterprise Linux 4
Two issues
StorNext User’s Guide 342
For Windows 2003 or Windows XP
Repeat this procedure for all file systems
StorNext User’s Guide 345
Supported
Nearline space used
File system, and using show long
HA Failover
StorNext User’s Guide 350
Using The Command Line Interface
Labeling Disk Devices
Modifying Global Settings
InodeCacheSize
Making a File System
Starting and Stopping Snfs
Stop the system by typing the following
Unmounting or Mounting a File System
Creating a File System Server
Label the FC drives by typing the following
Adding a File System Client
Configuring a Stripe Group
Adding an Affinity
Affinity affinityname
Creating a Disk-to-Disk Policy Class
Affinity data1aff
Defaultaffinity destinationaffinity -i relocationtimeindays
Enabling Stub File Support
Managing Storage Disks with Deduplication Enabled
Obtaining Dedup Sdisk Information
Proxy Command
Obtaining Distributed LAN Client Information
Using the Dynamic Resource Allocation Feature
Proxy who Command
Checking the File System
Adding a Stripe Group Without Moving
Adding and Moving a Data Stripe Group
Moving a Metadata/ Journal Stripe Group
StorNext User’s Guide 374
Specifying an Alternate Retrieval Location
RAS Messages
Media and Drive RAS Messages
No Media Found RAS StorNext User’s Guide 377
Media and Drive RAS Messages
Tape Drive Alerts RAS part StorNext User’s Guide 379
Tape Drive Alerts RAS part StorNext User’s Guide 380
Tape Drive Alerts RAS part StorNext User’s Guide 381
Drive Reported Drive Error RAS StorNext User’s Guide 382
Cleaning of Drive Failed RAS
Drive Removed RAS
Tape Drive Reported Media Error RAS
RAS
Media Format Failure RAS StorNext User’s Guide 387
Invalid Media Label Detected RAS StorNext User’s Guide 388
Media Not Found
Snfs RAS Messages
Storage Disk Taken Offline RAS
Configuration Not Supported RAS
Connection Rejected
O Error RAS
Snfs License Required RAS
LUN Mapping Changed RAS
Metadata Inconsistency Detected RAS
Metadata Dump Failure RAS
File Processing Failure RAS
Disk Space Allocation Failure RAS
Snfs RAS Messages
Quota Limit or Fragmentation Warnings RAS
Other RAS Messages
Initialization Failure
Checksum Error
Other RAS Messages
Software Resource Violations RAS StorNext User’s Guide 405
Closing Service Tickets RAS StorNext User’s Guide 406
Analyzing Service Tickets RAS StorNext User’s Guide 407
Viewing Service Tickets RAS
Robotics Not Ready RAS StorNext User’s Guide 409
Robotics Move Failure RAS StorNext User’s Guide 410
Other RAS Messages
Backup Failed RAS StorNext User’s Guide 412
Backup Errors RAS StorNext User’s Guide 413
Configuration Violations RAS StorNext User’s Guide 414
Invalid Configuration RAS part StorNext User’s Guide 415
Invalid Configuration RAS part
Capturing a System State RAS StorNext User’s Guide 417