Fit the Handles

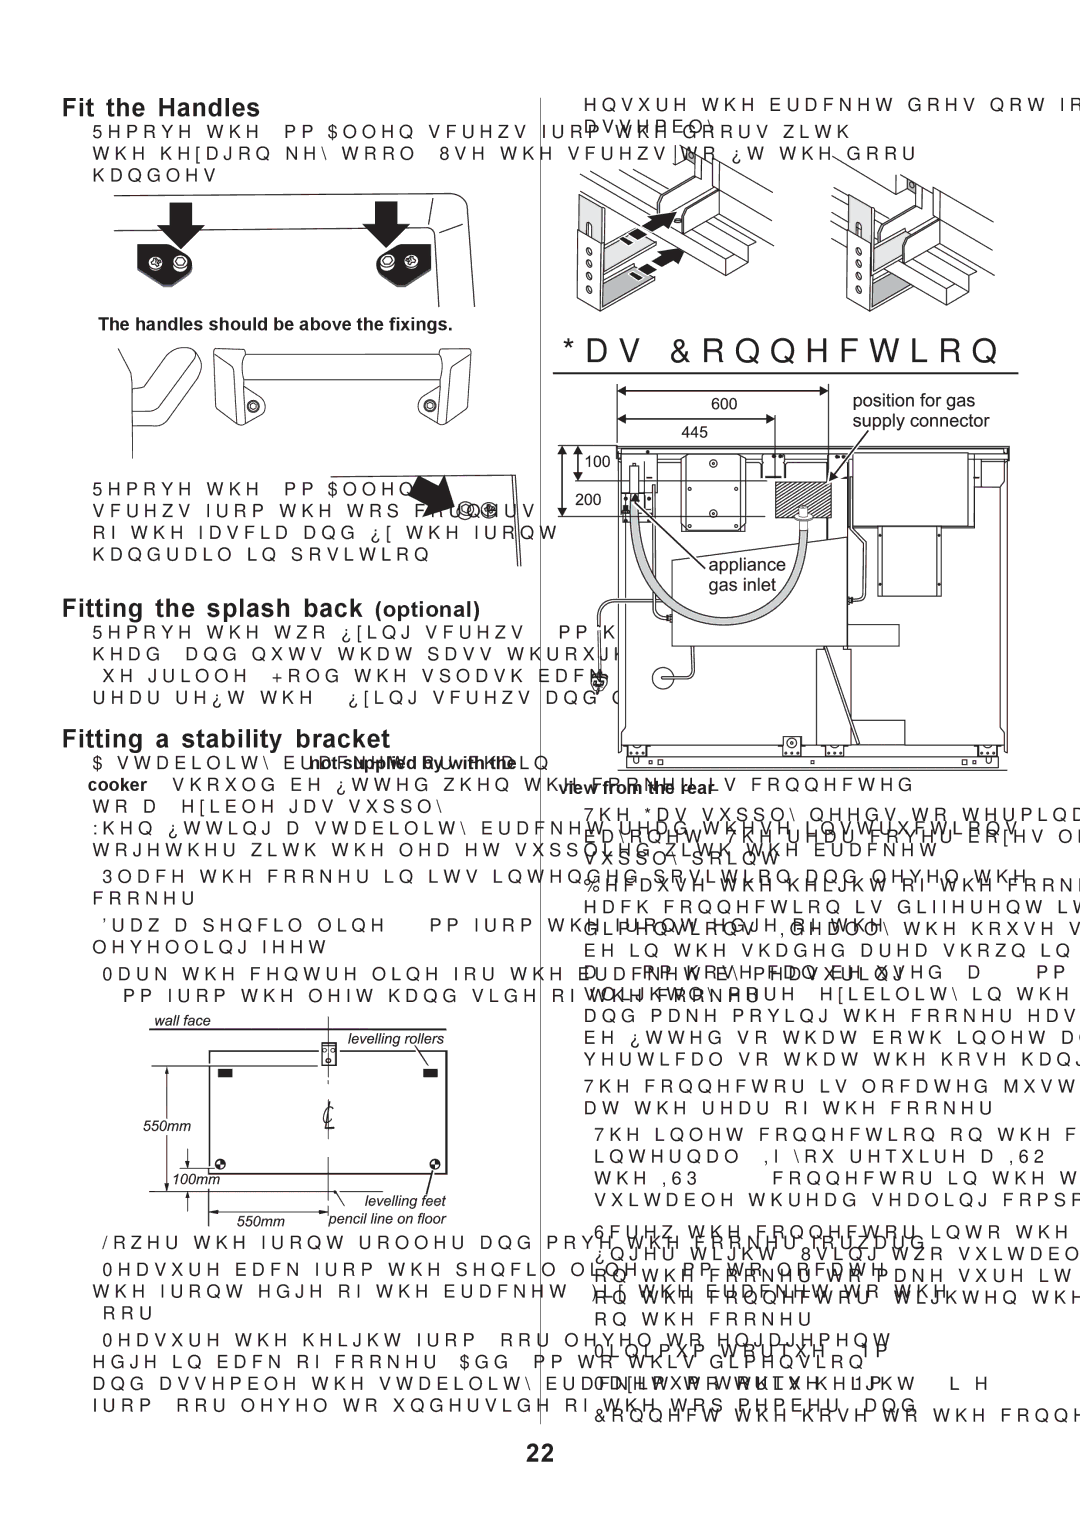
Remove the 4mm Allen screws from the doors with the hexagon key tool. Use the screws to fit the door handles.

The handles should be above the fixings.

Remove the 4mm Allen screws from the top corners of the fascia and fix the front handrail in position.

Fitting the splash back (optional)

Remove the two fixing screws (3mm hexagonal socket head) and nuts that pass through the top of the rear flue grille. Hold the splash back in position. From the rear refit the 2 fixing screws and nuts.

Fitting a stability bracket

A stability bracket or chain (not supplied by with the cooker) should be fitted when the cooker is connected to a flexible gas supply.

When fitting a stability bracket read these instructions together with the leaflet supplied with the bracket.

1.Place the cooker in its intended position and level the cooker.

2.Draw a pencil line 100mm from the front edge of the levelling feet.

3.Mark the centre line for the bracket by measuring 550mm from the left hand side of the cooker.

4.Lower the front roller and move the cooker forward.

5.Measure back from the pencil line 550mm to locate the front edge of the bracket. Fix the bracket to the floor.

6.Measure the height from floor level to engagement edge in back of cooker. Add 3mm to this dimension and assemble the stability bracket to this height. (i.e. from floor level to underside of the top member) and

ensure the bracket does not foul the oven burner assembly.

Gas Connection

view from the rear

The Gas supply needs to terminate with a down facing bayonet. The rear cover boxes limit the position of the supply point.

Because the height of the cooker can be adjusted and each connection is different it is difficult to give precise dimensions. Ideally the house supply bayonet should be in the shaded area shown in the diagram. Although a 900mm hose can be used, a 1250mm hose will allow slightly more flexibility in the positioning of the bayonet and make moving the cooker easier. The hose should be fitted so that both inlet and outlet connections are vertical so that the hose hangs downwards.

The connector is located just below the hotplate level at the rear of the cooker.

The inlet connection on the cooker is ISO 7-1 internal. If you require a ISO 228-1 connection, find the ISP 228-1 connector in the top pack. Apply a suitable thread sealing compound to the ISO 7-1 end.

Screw the connector into the cooker inlet until it is finger tight. Using two suitable tools, one on the inlet on the cooker to make sure it is held steady and one on the connector, tighten the connector into the inlet on the cooker.

Minimum torque 12Nm. Maximum torque 20Nm.

Connect the hose to the connector.

22

Page 22
Image 22
Rangemaster 110 GAS FSD Gas Connection, Fit the Handles, Fitting the splash back optional, Fitting a stability bracket

110 GAS FSD specifications

The Rangemaster 110 GAS FSD is a high-performance cooking appliance that brings both style and functionality to any kitchen. Renowned for its robust construction and contemporary design, the Rangemaster 110 GAS FSD is ideal for both home cooks and culinary enthusiasts seeking precision and reliability.

One of the standout features of the Rangemaster 110 GAS FSD is its impressive cooking capacity. With a generous 110cm width, the cooker boasts a spacious oven area, making it suitable for large families or entertaining guests. The dual oven design allows for versatile cooking options, enabling users to prepare multiple dishes simultaneously. The main fan oven ensures even heat distribution, while the secondary conventional oven provides additional cooking versatility.

The Rangemaster 110 GAS FSD offers powerful gas burners, including a high-output wok burner, which is perfect for stir-frying and rapid cooking. The burners are designed for precise temperature control, allowing cooks to achieve the perfect simmer or boil as needed. The presence of a gas hob also offers instant heat which is favored by many chefs for its responsiveness.

Technology is at the forefront of the Rangemaster 110 GAS FSD with its easy-to-use controls and integrated timer features. The cooker's programmable electronic clock and minute minder make meal preparation seamless, ensuring that dishes are cooked to perfection without constant supervision.

In terms of ease of maintenance, the Rangemaster 110 GAS FSD boasts a sleek surface that allows for effortless cleaning. The oven interiors are coated with a high-quality enamel that facilitates easy wipe-downs and keeps the appliance looking immaculate. Additionally, the removable burners and grates simplify the cleaning process, making it convenient for users.

Safety is paramount, and the Rangemaster 110 GAS FSD incorporates features such as flame failure devices, which cut off the gas supply if a flame goes out, ensuring peace of mind while cooking. The cooker also comes equipped with sturdy and stylish handles that remain cool to the touch, further enhancing its user-friendly design.

In conclusion, the Rangemaster 110 GAS FSD is not just a cooking appliance; it is a centerpiece that combines elegance with advanced cooking technologies. Its spacious design, powerful gas burners, and convenient features make it an indispensable tool for any kitchen, meeting the demands of both everyday cooking and elaborate culinary creations. For those looking to elevate their cooking experience, the Rangemaster 110 GAS FSD delivers in every aspect, ensuring superior cooking results.