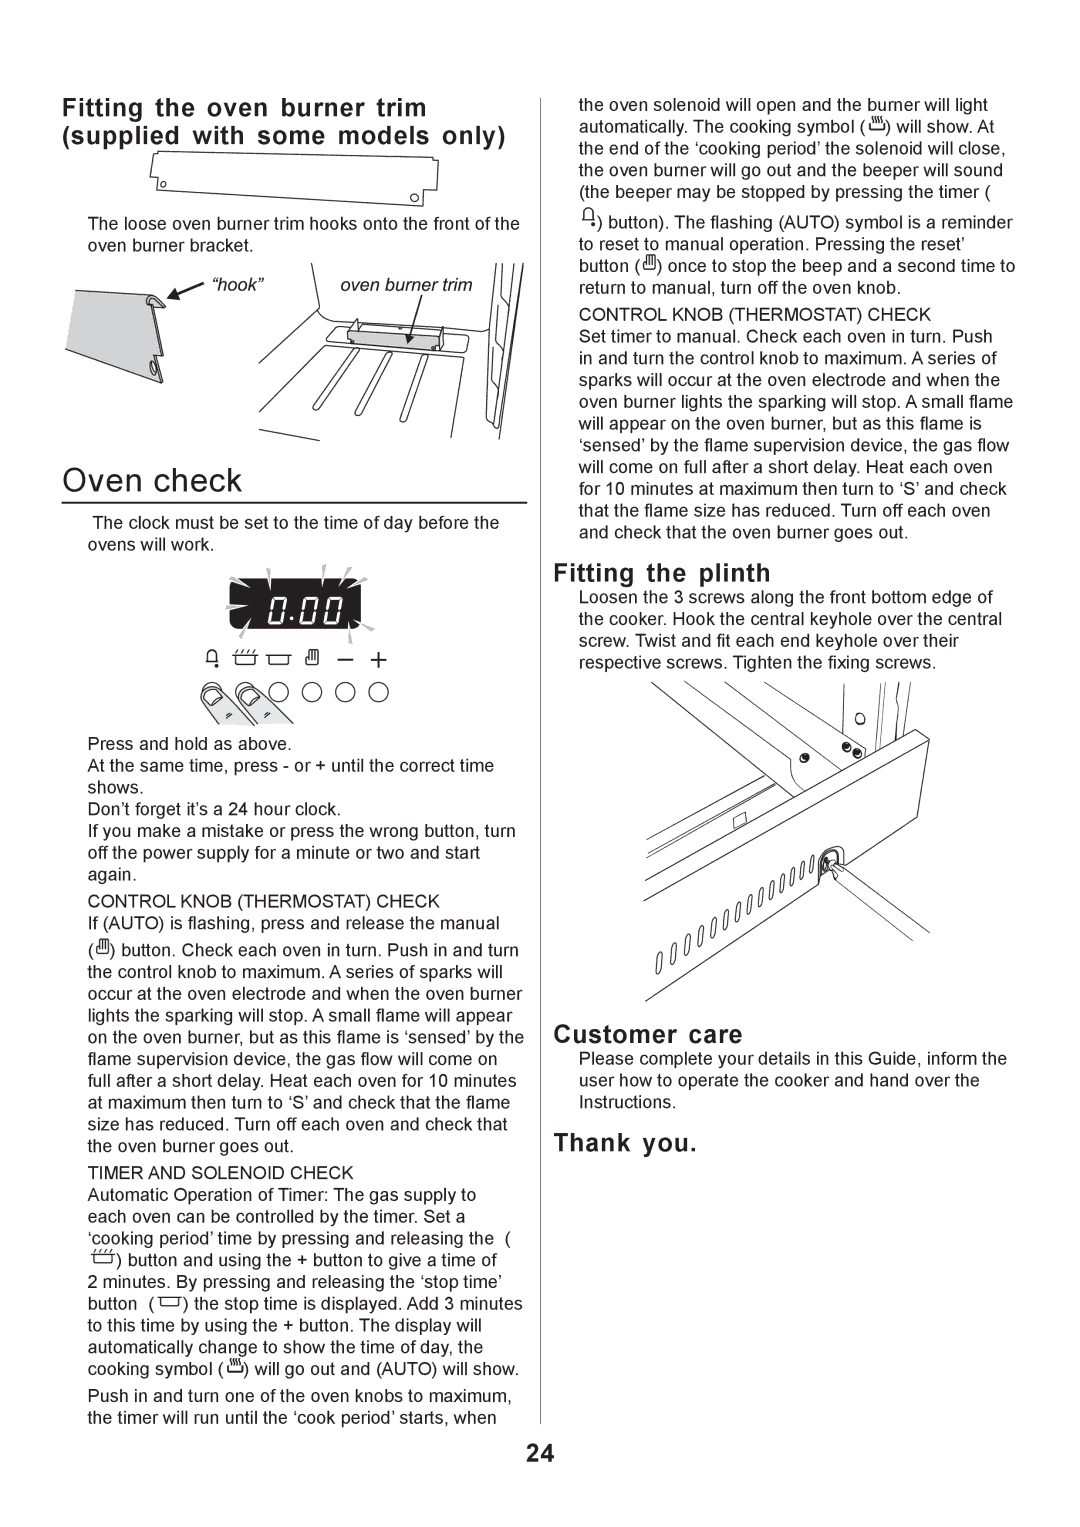
Fitting the oven burner trim (supplied with some models only)

The loose oven burner trim hooks onto the front of the oven burner bracket.

Oven check

The clock must be set to the time of day before the ovens will work.

Press and hold as above.

At the same time, press - or + until the correct time shows.

Don’t forget it’s a 24 hour clock.

If you make a mistake or press the wrong button, turn off the power supply for a minute or two and start again.

CONTROL KNOB (THERMOSTAT) CHECK

If (AUTO) is flashing, press and release the manual

() button. Check each oven in turn. Push in and turn the control knob to maximum. A series of sparks will occur at the oven electrode and when the oven burner lights the sparking will stop. A small flame will appear on the oven burner, but as this flame is ‘sensed’ by the flame supervision device, the gas flow will come on full after a short delay. Heat each oven for 10 minutes at maximum then turn to ‘S’ and check that the flame size has reduced. Turn off each oven and check that the oven burner goes out.

TIMER AND SOLENOID CHECK

Automatic Operation of Timer: The gas supply to each oven can be controlled by the timer. Set a ‘cooking period’ time by pressing and releasing the ( ) button and using the + button to give a time of 2 minutes. By pressing and releasing the ‘stop time’ button () the stop time is displayed. Add 3 minutes to this time by using the + button. The display will automatically change to show the time of day, the cooking symbol () will go out and (AUTO) will show.

Push in and turn one of the oven knobs to maximum, the timer will run until the ‘cook period’ starts, when

the oven solenoid will open and the burner will light automatically. The cooking symbol () will show. At the end of the ‘cooking period’ the solenoid will close, the oven burner will go out and the beeper will sound (the beeper may be stopped by pressing the timer (

) button). The flashing (AUTO) symbol is a reminder to reset to manual operation. Pressing the reset’ button () once to stop the beep and a second time to return to manual, turn off the oven knob.

CONTROL KNOB (THERMOSTAT) CHECK

Set timer to manual. Check each oven in turn. Push in and turn the control knob to maximum. A series of sparks will occur at the oven electrode and when the oven burner lights the sparking will stop. A small flame will appear on the oven burner, but as this flame is ‘sensed’ by the flame supervision device, the gas flow will come on full after a short delay. Heat each oven for 10 minutes at maximum then turn to ‘S’ and check that the flame size has reduced. Turn off each oven and check that the oven burner goes out.

Fitting the plinth

Loosen the 3 screws along the front bottom edge of the cooker. Hook the central keyhole over the central screw. Twist and fit each end keyhole over their respective screws. Tighten the fixing screws.

Customer care

Please complete your details in this Guide, inform the user how to operate the cooker and hand over the Instructions.

Thank you.

24

Page 24
Image 24
Rangemaster 110 GAS FSD manual Oven check, Fitting the oven burner trim supplied with some models only, Fitting the plinth

110 GAS FSD specifications

The Rangemaster 110 GAS FSD is a high-performance cooking appliance that brings both style and functionality to any kitchen. Renowned for its robust construction and contemporary design, the Rangemaster 110 GAS FSD is ideal for both home cooks and culinary enthusiasts seeking precision and reliability.

One of the standout features of the Rangemaster 110 GAS FSD is its impressive cooking capacity. With a generous 110cm width, the cooker boasts a spacious oven area, making it suitable for large families or entertaining guests. The dual oven design allows for versatile cooking options, enabling users to prepare multiple dishes simultaneously. The main fan oven ensures even heat distribution, while the secondary conventional oven provides additional cooking versatility.

The Rangemaster 110 GAS FSD offers powerful gas burners, including a high-output wok burner, which is perfect for stir-frying and rapid cooking. The burners are designed for precise temperature control, allowing cooks to achieve the perfect simmer or boil as needed. The presence of a gas hob also offers instant heat which is favored by many chefs for its responsiveness.

Technology is at the forefront of the Rangemaster 110 GAS FSD with its easy-to-use controls and integrated timer features. The cooker's programmable electronic clock and minute minder make meal preparation seamless, ensuring that dishes are cooked to perfection without constant supervision.

In terms of ease of maintenance, the Rangemaster 110 GAS FSD boasts a sleek surface that allows for effortless cleaning. The oven interiors are coated with a high-quality enamel that facilitates easy wipe-downs and keeps the appliance looking immaculate. Additionally, the removable burners and grates simplify the cleaning process, making it convenient for users.

Safety is paramount, and the Rangemaster 110 GAS FSD incorporates features such as flame failure devices, which cut off the gas supply if a flame goes out, ensuring peace of mind while cooking. The cooker also comes equipped with sturdy and stylish handles that remain cool to the touch, further enhancing its user-friendly design.

In conclusion, the Rangemaster 110 GAS FSD is not just a cooking appliance; it is a centerpiece that combines elegance with advanced cooking technologies. Its spacious design, powerful gas burners, and convenient features make it an indispensable tool for any kitchen, meeting the demands of both everyday cooking and elaborate culinary creations. For those looking to elevate their cooking experience, the Rangemaster 110 GAS FSD delivers in every aspect, ensuring superior cooking results.