Connections & Setup

Plug in the TV

Plug the flat end of the cable into the power jack on the back of the TV. Then plug the other end of the power cord into an appropriate wall outlet. Be sure to insert the plug completely. Do not plug the TV into an outlet controlled by a light switch.

Note: When you first plug your TV into an outlet, the Power indicator on the front panel will light and blink for approximately 30 seconds and then go off during the initialization of the TV. The TV can only be turned on after the Power indicator goes off. This happens every time the TV is unplugged and plugged back in.

Tip

When remote batteries are low, the component button corresponding to the mode you’re in flashes when you press a button. Also, a message might appear on the TV screen and disappear within a few seconds. Press CLEAR and replace the batteries to remove the message.

Put Batteries in the Remote

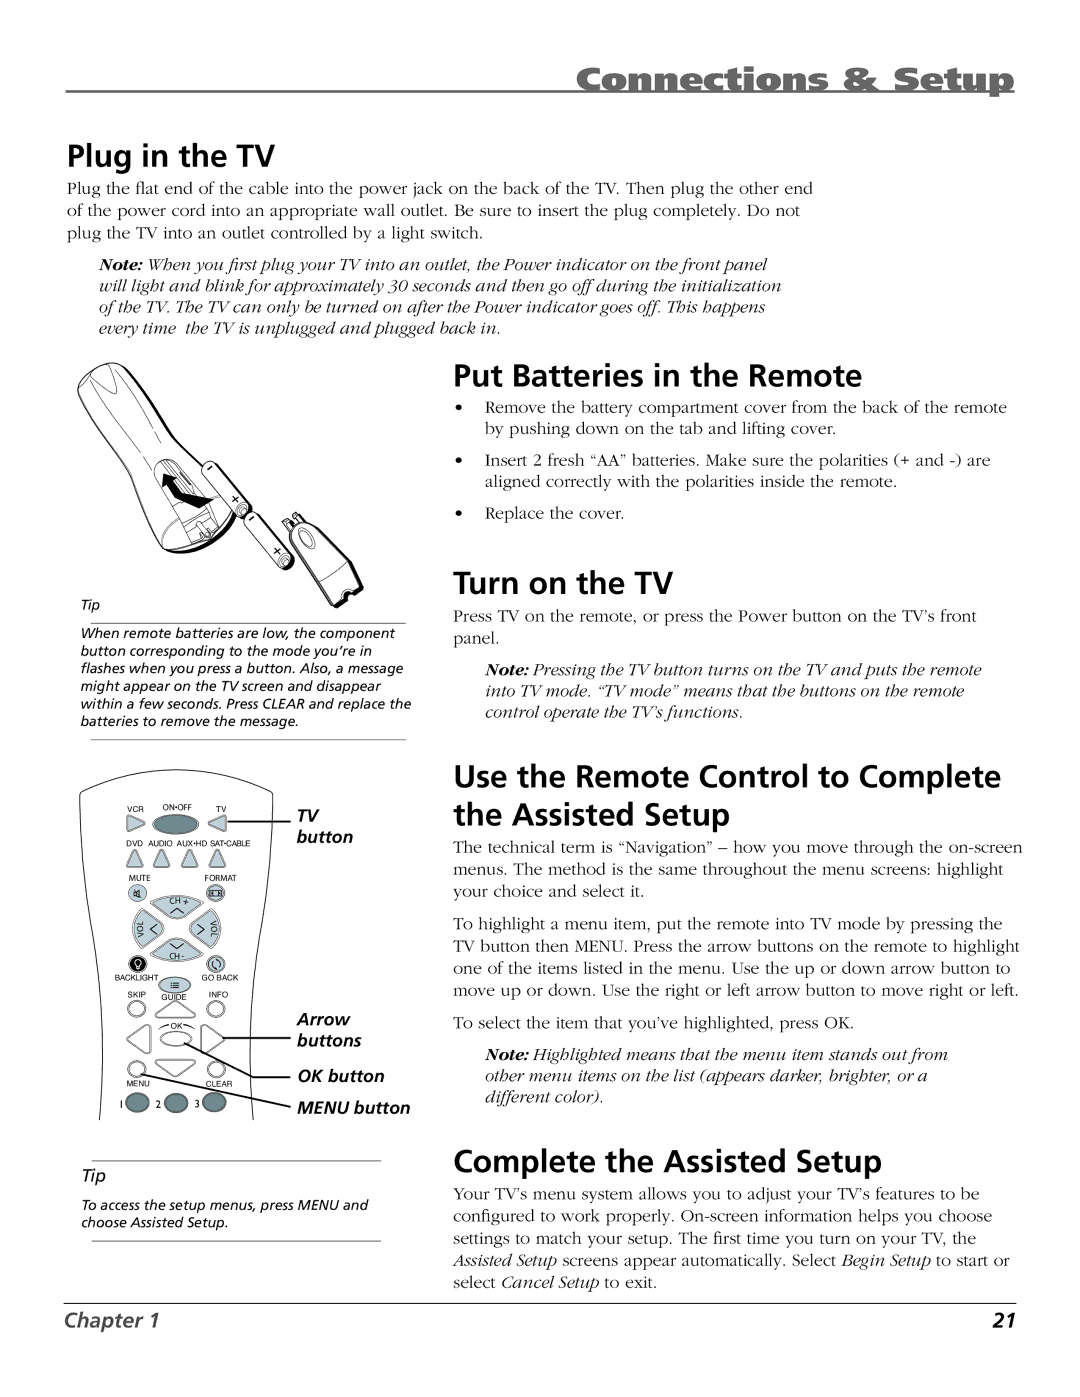
Remove the battery compartment cover from the back of the remote by pushing down on the tab and lifting cover.

Insert 2 fresh “AA” batteries. Make sure the polarities (+ and -) are aligned correctly with the polarities inside the remote.

Replace the cover.

Turn on the TV

Press TV on the remote, or press the Power button on the TV’s front panel.

Note: Pressing the TV button turns on the TV and puts the remote into TV mode. “TV mode” means that the buttons on the remote control operate the TV’s functions.

VCR

ON•OFF

TV

TV


DVD AUDIO AUX•HD SAT•CABLE

button

MUTE


FORMAT


CH +


L


V


O


O


V


L


CH-


BACKLIGHT

GO BACK


SKIP

GUIDE

INFO


OK


Arrow


buttons

MENU


CLEAR

OK button

1

2

3

MENU button


Tip

To access the setup menus, press MENU and choose Assisted Setup.

Use the Remote Control to Complete the Assisted Setup

The technical term is “Navigation” – how you move through the on-screen menus. The method is the same throughout the menu screens: highlight your choice and select it.

To highlight a menu item, put the remote into TV mode by pressing the TV button then MENU. Press the arrow buttons on the remote to highlight one of the items listed in the menu. Use the up or down arrow button to move up or down. Use the right or left arrow button to move right or left.

To select the item that you’ve highlighted, press OK.

Note: Highlighted means that the menu item stands out from other menu items on the list (appears darker, brighter, or a different color).

Complete the Assisted Setup

Your TV’s menu system allows you to adjust your TV’s features to be configured to work properly. On-screen information helps you choose settings to match your setup. The first time you turn on your TV, the Assisted Setup screens appear automatically. Select Begin Setup to start or select Cancel Setup to exit.

Chapter 1

21

Page 23
Image 23
RCA HDTV manual Plug in the TV, Put Batteries in the Remote, Turn on the TV, Complete the Assisted Setup

HDTV specifications

RCA HDTVs have established themselves as reliable and affordable options in the realm of high-definition televisions. With a variety of models available, they cater to different consumer needs while delivering impressive performance and features.

One of the standout characteristics of RCA HDTVs is their commitment to delivering high-quality visuals. Most models come equipped with Full HD (1080p) resolution, ensuring that viewers enjoy vibrant colors and sharp details. This resolution significantly enhances the viewing experience, especially when watching movies or sporting events. Some RCA models even embrace 4K Ultra HD, offering four times the pixel resolution of standard Full HD, bringing enhanced clarity and a more immersive experience.

In terms of technology, RCA HDTVs utilize LED backlighting, which improves contrast and brightness while maintaining energy efficiency. This lighting technology allows for thinner screens, making RCA TVs both sleek and modern, while providing a broad color spectrum that contributes to stunning picture quality. Many RCA models also support HDR (High Dynamic Range), enabling deeper contrasts between light and dark, which amplifies the realism of the images displayed.

RCA HDTVs often come with multiple connectivity options, including several HDMI ports, USB inputs, VGA, and Ethernet, facilitating easy integration with a range of external devices. This compatibility allows users to connect gaming consoles, streaming devices, and sound systems effortlessly. Additionally, many RCA TVs feature built-in Wi-Fi, enabling access to popular streaming services such as Netflix, Hulu, and Amazon Prime, effectively turning the TV into an entertainment hub.

For enhanced user experience, RCA incorporates smart TV features in many of its models. The intuitive user interface provides easy navigation through applications and settings. Voice control compatibility with smart home devices is an emerging feature in newer RCA HDTVs, allowing for convenient voice commands.

RCA’s focus on affordability ensures that consumers get quality technology without breaking the bank. The reliability and performance of RCA HDTVs have made them a popular choice not only for budget-conscious buyers but also for those looking to upgrade their home entertainment systems.

In summary, RCA HDTVs combine an array of impressive features including Full HD and 4K resolution, LED backlighting, HDR technology, multiple connectivity options, and smart capabilities. Their affordability and quality make them a noteworthy option for anyone in the market for a new television.