LCD TV Wall Mount
Installation Manual
Fits TVs 13"- 27"
Maximum Load Capacity – 55 lbs. (25 kg)
MAF10BK
Thank you for choosing the RCA MAF10BK Universal Flat Panel TV Wall Mount. This mount can be used for all major brands of 13" - 27" flat panel TVs, 55 lbs (25 kg) or under. Before attempting to mount your television set, please remove all parts from this package and read the installation instructions carefully.
WARNING: Use of this mount with a TV weighing over 55 lbs. or with a screen larger than 27" could cause the mount to fail causing property damage and/or personal injury.
Limited Lifetime Warranty
Audiovox Electronics Corporation (the “Company”) warrants to you the original retail purchaser of this product that should it, under normal use and conditions, be proven defective in material or workmanship during its lifetime while you own it, such defect(s) will be repaired or replaced (at the Company’s option) without charge for parts and repair labor.
To obtain repair or replacement within the terms of this Warranty, the product is to be delivered with proof of warranty coverage (e.g. dated bill of sale), specification of defect(s), transportation prepaid, to the Company at the address shown below. Do not return this product to the Retailer.
This Warranty does not cover product purchased, serviced or used outside the United States or Canada.
This Warranty is not transferable and does not extend to costs incurred for installation, removal or reinstallation of the product. This Warranty does not apply if in the Company’s opinion, the product has been damaged through alteration, improper installation, mishandling, misuse, neglect, or accident.
THE EXTENT OF THE COMPANY’S LIABILITY UNDER THIS WARRANTY IS LIMITED TO THE REPAIR OR REPLACEMENT PROVIDED ABOVE AND, IN NO EVENT, SHALL THE COMPANY’S LIABILITY EXCEED THE PURCHASE PRICE PAID BY PURCHASER FOR THE PRODUCT.
This Warranty is in lieu of all other express warranties or liabilities. ANY IMPLIED WARRANTIES, INCLUDING ANY IMPLIED WARRANTY OF MERCHANTABILITY OR FITNESS FOR A PARTICULAR PURPOSE SHALL BE LIMITED TO DURATION OF THIS WARRANTY. IN NO CASE SHALL THE COMPANY BE LIABLE FOR ANY CONSEQUENTIAL OR INCIDENTAL DAMAGES WHATSOEVER. No person or representative is authorized to assume for the Company any liability other than expressed herein in connection with the sale of this product.
Some states/provinces do not allow limitations on how long an implied warranty lasts or the exclusion or limitation of incidental or consequential damage so the above limitations or exclusions may not apply to you. This Warranty gives you specific legal rights and you may also have other rights which vary from state/province to state/province.
U.S.A.: Audiovox Electronics Corporation, 150 Marcus Blvd., Hauppauge, New York 11788
CANADA: Audiovox Return Center, c/o Genco, 6685 Kennedy Road, Unit 3, Door 16, Mississauga, Ontario L5T 3A5
Trademark(s) Registered, Marques Deposee, Marcas Registradas. All other brands and product names are trademarks or registered trademarks of their respective owners.
©2008 Audiovox Accessories Corporation
111 Congressional Blvd., Suite 350 Carmel, IN 46032
www.rca.comMAF10BK_NA_IB_01
Preparing to install
Before beginning the installation process, verify that you have all the necessary tools on hand. The following tools are required for proper installation:
Tools
![]()
![]() #3 bit Phillips screwdriver
#3 bit Phillips screwdriver
![]()
![]() Stud finder
Stud finder
![]()
![]() Electric drill
Electric drill
![]()
![]() Drill bit (included)
Drill bit (included)
5/16" (8mm) masonry drill bit for concrete/ brick installation
![]()
![]() Level (integrated level on product)
Level (integrated level on product)
![]()
![]() Allen Wrench (included)
Allen Wrench (included)
![]()
![]() Hammer (for concrete installations)
Hammer (for concrete installations)
Package Contents
Make sure all the hardware has been included with your mount.
![]()
![]() (1) Drill Bit
(1) Drill Bit
![]()
![]() (3)
(3)
![]()
![]() (3) Concrete Anchors
(3) Concrete Anchors
![]()
![]() (1) Allen Wrench
(1) Allen Wrench
![]()
![]() (4) M4x12mm Bolts
(4) M4x12mm Bolts
![]()
![]() (4) M4x30mm Bolts
(4) M4x30mm Bolts
![]()
![]() (4) 1/2" Spacers
(4) 1/2" Spacers
![]()
![]() (1)
(1)
Safety precautions
Follow these precautions to ensure safe installation and mounting of your flat panel TV.
1. Be sure you have purchased the correct wall mount for your TV. Recheck the size and weight constraints.
2. Gather all necessary tools before you begin installation. You will need a #3 bit Phillips screwdriver, electric drill, drill bit (included), level (integrated level on product), stud finder, and hammer (for brick and concrete installations).
It is essential for the wall mount plate to be attached to wall studs. (Use a stud finder.)
Use the included hardware for mounting purposes. This hardware has been provided to ensure a safe and secure mount.
Hire a licensed electrician to relocate an electrical outlet, if needed.
Be sure to purchase wires long enough to connect the TV to the audio and video components in your installation.
We recommend you hire a professional installer, if you have any concerns about installing the TV wall mount yourself.
Keep your sales receipt to obtain warranty parts and service and for proof of purchase. Attach it here and record the model number. This number is located on the product.
Model No.___________________________________________
Purchase Date:_______________________________________
Dealer/Address/Phone_ ______________________________
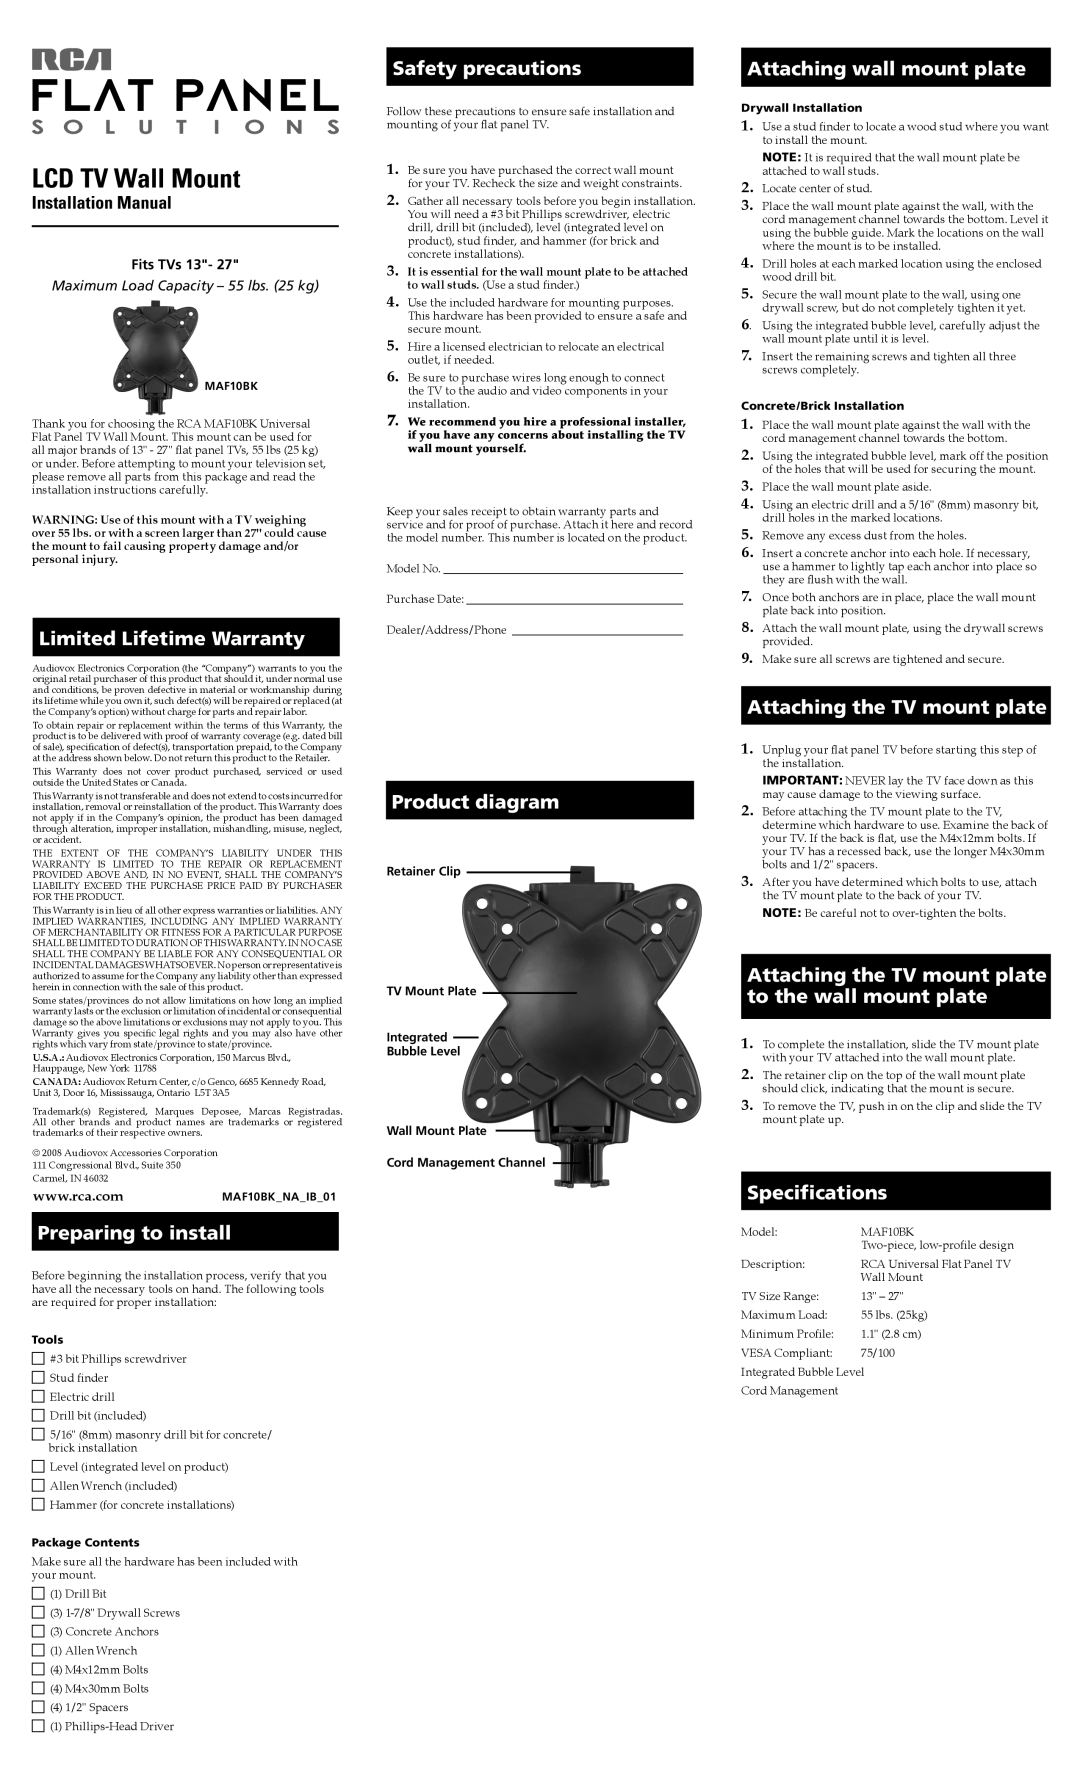
Product diagram
Retainer Clip
TV Mount Plate
Integrated
Bubble Level
Wall Mount Plate
Cord Management Channel
Attaching wall mount plate
Drywall Installation
1. Use a stud finder to locate a wood stud where you want to install the mount.
NOTE: It is required that the wall mount plate be attached to wall studs.
2. Locate center of stud.
3. Place the wall mount plate against the wall, with the cord management channel towards the bottom. Level it using the bubble guide. Mark the locations on the wall where the mount is to be installed.
4. Drill holes at each marked location using the enclosed wood drill bit.
5. Secure the wall mount plate to the wall, using one drywall screw, but do not completely tighten it yet.
6. Using the integrated bubble level, carefully adjust the wall mount plate until it is level.
7.Insert the remaining screws and tighten all three screws completely.
Concrete/Brick Installation
1.Place the wall mount plate against the wall with the cord management channel towards the bottom.
2.Using the integrated bubble level, mark off the position of the holes that will be used for securing the mount.
3.Place the wall mount plate aside.
4.Using an electric drill and a 5/16" (8mm) masonry bit, drill holes in the marked locations.
5.Remove any excess dust from the holes.
6.Insert a concrete anchor into each hole. If necessary, use a hammer to lightly tap each anchor into place so they are flush with the wall.
7.Once both anchors are in place, place the wall mount plate back into position.
8.Attach the wall mount plate, using the drywall screws provided.
9.Make sure all screws are tightened and secure.
Attaching the TV mount plate
1.Unplug your flat panel TV before starting this step of the installation.
IMPORTANT: NEVER lay the TV face down as this may cause damage to the viewing surface.
2.Before attaching the TV mount plate to the TV, determine which hardware to use. Examine the back of your TV. If the back is flat, use the M4x12mm bolts. If your TV has a recessed back, use the longer M4x30mm bolts and 1/2" spacers.
3.After you have determined which bolts to use, attach the TV mount plate to the back of your TV.
NOTE: Be careful not to
Attaching the TV mount plate to the wall mount plate
1.To complete the installation, slide the TV mount plate with your TV attached into the wall mount plate.
2.The retainer clip on the top of the wall mount plate should click, indicating that the mount is secure.
3.To remove the TV, push in on the clip and slide the TV mount plate up.
Specifications
Model: | MAF10BK |
| |
Description: | RCA Universal Flat Panel TV |
| Wall Mount |
TV Size Range: | 13" – 27" |
Maximum Load: | 55 lbs. (25kg) |
Minimum Profile: | 1.1" (2.8 cm) |
VESA Compliant: | 75/100 |
Integrated Bubble Level
Cord Management