USER‘S Guide
Model No ProV800C Serial No Purchase Date Purchased From
Product Registration
Assistance
Table of Contents
Care and Maintenance
Optional Accessories
Customer Assistance and Service
Playback
First-Time Operation
Unpack the camcorder and accessories
Attach the adapter/charger
Adjust the handstrap to fit your hand
Slide Lens Cover control to open lens cover
Insert a tape
Place Power CAMERA/OFF/VCR switch in Camera
Select a recording speed
Spep Switch
LCD Monitor Focus
Use the LCD Monitor Use the Viewfinder
Start and stop recording
Place the Power switch in OFF to turn off the camcorder
Play back what you have recorded
Details on viewfinder and LCD monitor playback are on
PUSH/OPEN
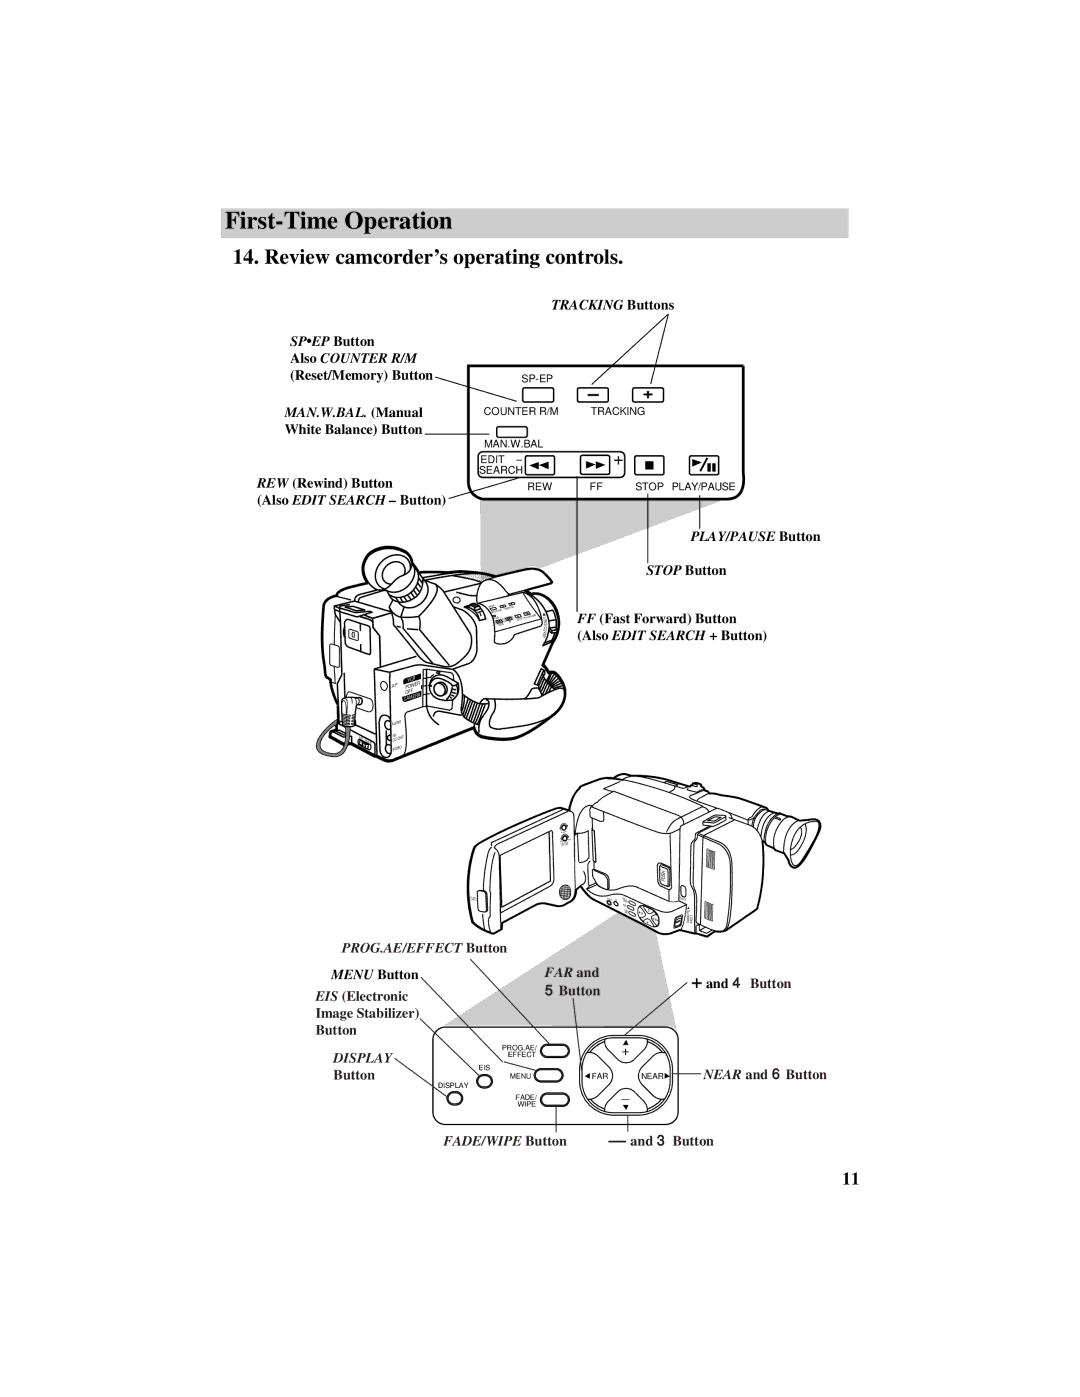
Review camcorder’s operating controls
BATT. Release Button AUDIO, RF DC OUT,
Display
Using the Adapter/Charger to Power Your Camcorder
Powering Your Camcorder
Using an Optional Plug Adapter
Attach Adapter/Charger
Battery Safety Precautions
Using the Battery to Power Your Camcorder
Attach the Charged Battery
Remove the Battery
Charge the Battery
Using the Battery to Power Your Camcorder
Use the Refresh Button
Battery Care and Storage
Battery Level Indicator
Optional Car Cord Adapter
Using the DCC08 Car Cord Adapter
Recording Tips
Video Cassettes
Erase Protection Safety Tab
Recording and Playback Speeds and Times
Cassette Recording Time
Cassette Care and Storage
Inserting and Removing Cassettes
Making a Recording
Recording
Insert a tape
Attach a power supply
Use the Viewfinder
Select a recording speed and tape length
Edit Search Button Edit Search + Button
Add fades and wipes
Details are on pages
Start and stop recording
Zoom in and out
Bright Dial
Use the LCD Monitor
Use the Viewfinder
Adjust Viewfinder for Convenient Viewing
Eyepiece Focus Control
Details on
LCD Monitor or Viewfinder Displays
Status Displays
Change Indicator
Fade and Wipe Indicators
Battery Level Indicator
Zoom Indicator
Time Remaining Display
Self-Timer, Animation, and Time- Lapse Indicators
58-59
See page 38 for details
White Balance Indicators
Exposure Indicator
Index Indicator
Tape Length
Microphone Tally Light
Auto Head Cleaner
Flying Erase Head
Quick Record
Camera Edit Feature
Quick Review Feature
Tape Positioning
Place the Full AUTO/PRESET switch in Full Auto
Full Auto Mode
Electronic Indexing
Exposure Control
Place the Full AUTO/PRESET switch in Preset
Manual Exposure
To Turn Off Manual Exposure
White Balance
Place the Full AUTO/PRESET
Auto White Balance
Manual White Balance
Auto White Balance Manual White Balance Outdoors Sunny
Auto Focus Focus Lock Feature
Focusing
Manual Focus
Set the Full AUTO/PRESET switch to Preset
Conditions Requiring Manual Focus
To Turn On EIS
Electronic Image Stabilizer EIS
To Turn Off EIS
To Zoom In and Out
Zooming
Digital Zooming
Recording Menu
Make sure the Full AUTO/PRESET switch is in Preset
To Display the Recording Menu
To Turn on Tele Macro
Recording Menu Tele Macro Zooming Feature
To Set Gain Up
Recording Menu Gain Up
Filter
Recording Menu Color Filter
Set the Tape Length
Recording Menu Tape Time-Remaining Display
Length
Recording Menu Title
To Add a Preset Title to Your Recordings
Press To highlight Title
To Create Your Own Title
Character
To Turn Off a Title
Press to display the set character menu
To Remove Battery
Date/Time Display Install the Clock Lithium Cell
To Set the Date and Time
Recording Menu Date/Time Display
Date/Time Display
Mode selected will be recorded
Press Display to select mode
Date/Time Display Viewfinder or LCD Monitor Displays
To Record the Date, Time, or Date and Time on Your Tape
Recording Menu Sub Menu
To Change a Feature in the Sub Menu
To Turn the Tally Light on or OFF
Sub Menu Tally Light and Jlip ID no
Press To highlight Tally
To Select a Jlip ID no
To Set the Self-Timer
Sub Menu Self-Timer
Place Full AUTO/PRESET switch
OFF in the Sub Menu
Press
Sub Menu Animation Recording
To Record Using Animation
Press or To select the amount
Sub Menu Time-Lapse Recording
To Record Using Time Lapse
To start Interval Timer
To highlight Interval Timer
Fading or Wiping In and Out
Indicator Menu Function
To Fade or Wipe
Place Full AUTO/PRESET switch in Full Auto or Preset
To Turn Off Fade or Wipe
Production Effects
Indicator Menu Function
To Use a Production Effect
When Full AUTO/PRESET switch is in Full AUTO, press PROG.AE
To Turn Off a Production Effect
To Attach the Shoulder Strap
Attaching the Shoulder Strap
Traveling Tips
Install Cassette Adapter’s Battery
Using the Cassette Adapter
Playback
Insert Cassette into Cassette Adapter
Remove Cassette from Cassette Adapter
To Play Back a Tape Attach a power supply
Playback Using the LCD Monitor or Viewfinder
Press Stop when you are finished
Press PLAY/PAUSE to begin playback
Visual Searching
Playback Features
Stop-Action Pause Tape Positioning
Time Counter
To Use the Memory-Stop Feature
Tracking Buttons
Tracking
Playback on TV or VCR with AUDIO/VIDEO in Jacks
Installation
Press PLAY/PAUSE
Playback Operation and How to Copy Tapes on the VCR
Viewing What the Camcorder is Seeing or Recording
Playback on a TV Without Audio/Video Inputs
Installation
Viewing What the Camcorder Is Recording
Playback Operation
Normal TV Viewing
To order accessories, contact your local Dealer
Optional Accessories
AC201A Soft Carrying Case DCC08 Car Cord Adapter
CPS91 AC Battery Charger
Using the Optional AC088 Tripod
FB1260 and FB120 Rechargeable Batteries
Coaxial RF Cables VH82 6-ft VH90 12-ft
1CVA147C RF Output Adapter VH54 Cable Transformer
VH83 Audio/Video Cable
AH25 Y-Adapter
Please complete other side also
Accessory Order Form
Order Form for Camcorder Model ProV800C
Authorized Signature
800 338
To order accessories, contact your local Dealer
United States and Canada Orders
Cleaning the Camcorder
Care and Maintenance
Cleaning the Camcorder’s Lens
Cleaning the Camcorder’s LCD Monitor
Things to Avoid
Proper Care and Storage
Trouble Checks
Trouble Checks and Adjustments
See pages
AUTO/PRESET switch in Full Auto . See
PROG.AE/EFFECT to turn off Sepia. See
Turn the Tally Light feature on. See
PROG.AE/EFFECT to turn off Cinema. See pages
Recording. See pages
E01, E02, etc
Information to User
Specifications
Returning equipment to Thomson for repair or exchange
Customer Assistance and Service
Limited Warranty
How State Law relates to warranty
What your warranty does not cover
Product Registration
If you purchased your camcorder outside the USA
+ 4 and 3 Buttons
Index
10,13,15,16,20-23,29,31
Canadian Consumers
Consumers
Meridian Street Indianapolis,
Part Number 96-ProV800C-1