Important Safety Instructions
1.Read these instructions.
2.Keep these instructions.
3.Heed all warnings.
4.Follow all instructions.
5.Do not use this apparatus near water.
6.Clean only with a dry cloth.
7.Do not block the ventilation openings. Install in accordance with the manufacturer's instructions.
8.Do not install near any heat sources such as radiators, heat registers, stoves, or other apparatus (including amplifiers) that produce heat.
9.Do not defeat the safety purpose of the polarized or grounding - type plug. A polarized plug has two blades with one wider than the other. A grounding type plug has two blades and a third grounding prong. The wide blade or the third prong are provided for your safety. If the provided plug does not fit into your outlet, consult an electrician for replacement of the obsolete outlet.
10.Protect the power cord from being walked on or pinched particularly at plugs, convenience receptacles, and the point where they exit from the apparatus.
11.Only use attachments/accessories specified by the manufacturer.
12.Use only with a cart, stand, tripod, bracket, or table specified by the manufacturer, or sold with
the apparatus. When a cart is used, use caution when moving the cart/apparatus combination to avoid injury from
13. | Unplug this apparatus during lightning storms or when unused for long periods of time. |
14. | Refer all servicing to qualified service personnel. Servicing is required when the apparatus has been damaged |
| in any way, such as |
remote control
Using the Remote Control
•Point the remote control at the REMOTE SENSOR located on the
| unit. |
| Remove the PLASTIC |
• | When using this unit in very bright light, the infrared REMOTE | sheet before using the | |
| SENSOR may not work properly. |
| Remote Control. |
• | The maximum effective distance for remote operation is about 16 |
| |
| feet (5 meters). |
|
|
TO CHANGE REMOTE BATTERY |
|
| |
1. | Open the battery door. | 2. Insert one CR2025 (3V) size battery. |
|
BATTERY REPLACEMENT
When the battery becomes weak, the operating distance of the remote control will be greatly reduced and you will need to replace the battery.
Note: If the remote control is not going to be used for a long time, remove the battery.
WARNING: Do not dispose of the battery in a fire or it may leak and/or explode.
WARNING: Batteries shall not be exposed to excessive heat such as sunshine, fire or the like.
CAUTION: Danger of explosion if battery is incorrectly replaced. Replace only with the same or equivalent type.
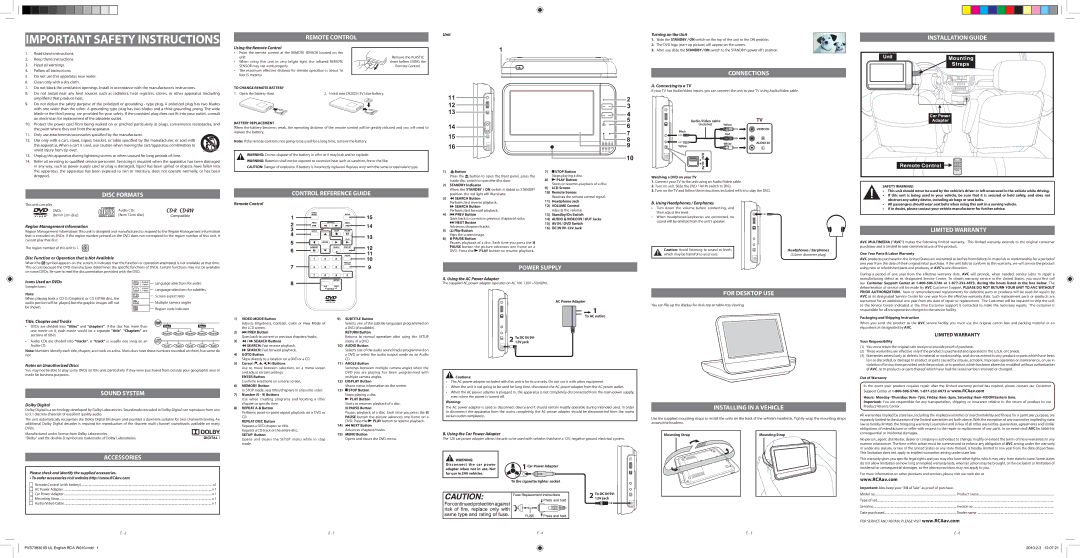
Unit
1
11
12
13
14
15
16
Turning on the unit
1.Slide the STANDBY / ON switch on the top of the unit to the ON position.
2.The DVD logo
3.After use, slide the STANDBY / ON switch to the STANDBY (power off) position.
CONNECTIONS
A. Connecting to a TV
If your TV has Audio/Video inputs, you can connect the unit to your TV using Audio/Video cable.
Audio/Video cable
[included] | Yellow |
Black | Red |
| |
Yellow | White |
|
INSTALLATION GUIDE
the apparatus, the apparatus has been exposed to rain or moisture, does not operate normally, or has been |
dropped. |
1) Button
Press the ![]() button to open the front panel, press the inside disc switch to open the disc door.
button to open the front panel, press the inside disc switch to open the disc door.
2) STANDBY Indicator |
7) |
| STOP Button |
| ||
| ||
| Stops playing a disc. | |
8) |
| PLAY Button |
| Starts or resumes playback of a disc. | |
9) | LCD Screen | |
Watching a DVD on your TV
1. Connect your TV to the unit using an Audio/Video cable. |
2. Turn on unit. Slide the DVD / AV IN switch to DVD. |
SAFETY WARNING!
Disc Formats
This unit can play
DVDs |
| Audio CDs |
|
|
| ||
[8cm/12cm disc] |
| [8cm/12cm disc] | Compatible |
|
Region Management Information
Region Management Information: This unit is designed and manufactured to respond to the Region Management Information that is encoded on DVDs. If the region number printed on the DVD does not correspond to the region number of this unit, it cannot play that disc.
The region number of this unit is 1.
Disc Function or Operation that is Not Available
control REFERENCE GUIDE
Remote Control
| When the STANDBY / ON switch is slided to STANDBY |
| position, the red light will illuminate. |
3) | SEARCH Button |
| Performs fast reverse playback. |
| SEARCH Button |
| Performs fast forward playback. |
4) | PREV Button |
| Goes back to current or previous chapters/tracks. |
| NEXT Button |
| Advances chapters/tracks. |
5) | Flip Button |
| Flips the screen image. |
6) | PAUSE Button |
| Pauses playback of a disc. Each time you press the |
| PAUSE button the picture advances one frame on a |
| DVD. Press the PLAY button to resume playback. |
10) | Remote Sensor |
| Receives the remote control signal. |
11) | Headphone Jack |
12) | VOLUME Control |
| Adjusts the volume. |
13) | Standby/On Switch |
14) | AUDIO & VIDEO IN / OUT Jacks |
15) | AV IN / DVD Switch |
16) | DC IN |
3. Turn on the TV and follow the instructions included with it to play the DVD. |
B. Using Headphones / Earphones
•Turn down the volume before connecting, and then adjust the level.
•When headphones/earphones are connected, no sound will be emitted from the unit's speaker.
Caution: Avoid listening to sound at levels | Headphones / Earphones |
which may be harmful to your ears. | (3.5mm diameter plug) |
|
|
•This unit should never be used by the vehicle's driver or left unsecured in the vehicle while driving.
•If this unit is being used in your vehicle, be sure that it is secured or held safely, and does not
obstruct any safety device, including air bags or seat belts.
•All passengers should wear seat belts when using this unit in a moving vehicle.
•If in doubt, please contact your vehicle manufacturer for further advice.
Limited Warranty
AVC MULTIMEDIA (“AVC”) makes the following limited warranty. This limited warranty extends to the original consumer purchaser and is limited to
One Year Parts & Labor Warranty
AVC products purchased in the United States are warranted to be free from defects in materials or workmanship for a period of
When the ![]() symbol appears on the screen, it indicates that the function or operation attempted is not available at that time. This occurs because the DVD manufacturer determines the specific functions of DVDs. Certain functions may not be available on some DVDs. Be sure to read the documentation provided with the DVD.
symbol appears on the screen, it indicates that the function or operation attempted is not available at that time. This occurs because the DVD manufacturer determines the specific functions of DVDs. Certain functions may not be available on some DVDs. Be sure to read the documentation provided with the DVD.
power supply
one year from the date of their original retail purchase. If the unit fails to conform to this warranty, we will service the product using new or refurbished parts and products, at AVC’s sole discretion.
During a period of one year from the effective warranty date, AVC will provide, when needed, service labor to repair a
Icons Used on DVDs |
|
|
|
|
| Language selections for audio |
|
| |||||||||||||
|
|
|
|
|
|
| |||||||||||||||
Sample lcons |
|
|
|
|
|
|
| ||||||||||||||
|
|
|
|
| Language selections for subtitles |
|
| ||||||||||||||
|
|
|
|
|
|
| |||||||||||||||
Note: |
|
|
|
|
|
|
| ||||||||||||||
|
|
|
|
|
|
| |||||||||||||||
|
|
|
|
| Screen aspect ratio |
|
|
|
|
|
|
|
| ||||||||
|
|
|
|
|
|
|
|
|
|
|
|
| |||||||||
When playing back a |
|
|
|
|
|
|
|
|
|
|
|
|
| ||||||||
|
|
|
|
|
|
|
|
|
|
|
| ||||||||||
|
|
|
|
| Multiple camera angles |
|
|
|
|
|
| ||||||||||
audio portion will be played, but the graphic images will not |
|
|
|
|
|
|
|
|
|
|
| ||||||||||
|
|
|
|
|
|
|
|
|
| ||||||||||||
|
|
|
|
|
|
|
|
|
|
| |||||||||||
|
|
|
|
|
|
|
|
|
| ||||||||||||
be shown. |
|
|
|
|
| Region code indicator |
|
|
|
|
|
| |||||||||
|
|
|
|
|
|
|
|
|
|
|
| ||||||||||
Title, Chapter and Tracks |
|
|
|
|
|
|
|
|
|
|
|
|
|
|
|
|
| ||||
• DVDs are divided into “titles” and “chapters”. If the disc has more than |
|
|
|
|
|
|
|
|
|
|
|
|
|
|
|
| |||||
|
|
| Title1 |
|
|
|
|
| Title2 |
|
| ||||||||||
one movie on it, each movie would be a separate “title”. “Chapters” are |
|
|
|
|
|
|
|
|
|
|
|
|
|
|
|
|
| ||||
|
|
|
|
|
|
|
|
|
|
|
|
|
|
|
|
| |||||
|
| Chapter1 | Chapter2 | Chapter3 | Chapter1 | Chapter2 | |||||||||||||||
sections of titles. |
|
| |||||||||||||||||||
|
|
|
|
|
|
|
|
|
|
|
|
|
|
|
|
| |||||
• Audio CDs are divided into “tracks”. A “track” is usually one song on an |
|
|
|
|
|
|
|
|
|
|
|
|
|
|
|
|
| ||||
Audio CD. |
|
|
| Track1 | Track2 | Track3 | Track4 | Track5 | |||||||||||||
Note: Numbers identify each title, chapter, and track on a disc. Most discs have these numbers recorded on them, but some do not.
Notes on Unauthorized Discs
You may not be able to play some DVDs on this unit, particularly if they were purchased from outside your geographic area or made for business purposes.
SOUND SYSTEM
Dolby Digital
Dolby Digital is a technology developed by Dolby Laboratories. Soundtracks encoded in Dolby Digital can reproduce from one to 5.1 discrete channels of excellent quality audio.
The unit automatically recognizes the Dolby Digital bitstream and provides a downmix suitable for
Manufactured under license from Dolby Laboratories. "Dolby" and the
ACCESSORIES |
|
|
|
Please check and identify the supplied accessories. |
|
• To order accessories visit website http://www.RCAav.com |
|
Remote Control (with battery) | x1 |
AC Power Adapter | x 1 |
Car Power Adapter | x 1 |
Mounting Strap | x 1 |
Audio/Video Cable | x 1 |
|
|
1)VIDEO MODE Button
Adjusts Brigntness, Contrast, Color or View Mode of the LCD screen.
2)![]() PREV Button
PREV Button
Goes back to current or previous chapters/tracks.
3)![]() /
/ ![]() SEARCH Buttons
SEARCH Buttons
![]() SEARCH: Fast reverse playback.
SEARCH: Fast reverse playback.
![]() SEARCH: Fast forward playback.
SEARCH: Fast forward playback.
4)GOTO Button
Skips directly to a location on a DVD or a CD.
5)Cursor (![]() ,
,![]() ,
,![]() ,
,![]() ) Buttons
) Buttons
Use to move between selections on a menu screen and adjust certain settings.
ENTER Button
Confirms selections on a menu screen.
6)MEMORY Button
In STOP mode, sets titles/chapters in a favorite order.
7)Number (0 - 9) Buttons
Use when creating programs and locating a title/ chapter or specific time.
8)REPEAT
Performs
REPEAT DISC Button Repeats a DVD chapter or title. Repeats a CD track or the entire disc.
SETUP Button
Opens and closes the SETUP menu while in stop mode.
9)SUBTITLE Button
Selects one of the subtitle languages programmed on a DVD (if available).
RETURN Button
Returns to normal operation after using the SETUP menu of a DVD.
10)AUDIO Button
Selects one of the audio sound tracks programmed on a DVD or select the audio output mode on an Audio CD.
11)ANGLE Button
Switches between multiple camera angles when the DVD you are playing has been programmed with multiple camera angles.
12)DISPLAY Button
Shows status information on the screen.
13)![]() STOP Button Stops playing a disc.
STOP Button Stops playing a disc.
![]() PLAY Button
PLAY Button
Starts or resumes playback of a disc.
![]() PAUSE Button
PAUSE Button
Pauses playback of a disc. Each time you press the ![]() PAUSE button the picture advances one frame on a DVD. Press the
PAUSE button the picture advances one frame on a DVD. Press the![]() PLAY button to resume playback.
PLAY button to resume playback.
14)![]() NEXT Button Advances chapters/tracks.
NEXT Button Advances chapters/tracks.
15)MENU Button
Opens and closes the DVD menu.
A. Using the AC Power Adapter
The supplied AC power adapter operates on AC
AC Power Adapter
1
To AC outlet
2 To DC IN 9V-
12V jack
![]() Cautions:
Cautions:
•The AC power adapter included with this unit is for its use only. Do not use it with other equipment.
•When the unit is not going to be used for long time, disconnect the AC power adapter from the AC power outlet.
•When the AC power adapter is plugged in, the apparatus is not completely disconnected from the main power supply, even when the power is turned off.
Warning:
The AC power adapter is used as disconnect device and it should remain readily operable during intended used. In order to disconnect the apparatus from the mains completely, the AC power adapter should be disconnected from the mains socket outlet completely.
B. Using the Car Power Adapter
The 12V car power adapter allows the unit to be used with vehicles that have a 12V, negative ground electrical system.
WARNING: | 1 Car Power Adapter |
Disconnect the car power | |
adapter when not in use. Not | |
for use in 24V vehicles. |
|
| To the cigarette lighter socket |
2 To DC IN 9V-
12V jack
FOR DESKTOP USE
You can flip up the display for
INSTALLING IN A VEHICLE
Use the supplied mounting straps to install the units on the back of the vehicle's headrests. Tightly wrap the mounting straps around the headrest.
Mounting Strap | Mounting Strap |
manufacturing defect at its designated Service Center. To obtain warranty service in the United States, you must first call our Customer Support Center at
Packaging and Shipping Instruction
When you send the product to the AVC service facility you must use the original carton box and packing material or an equivalent as designated by AVC.
LIMITED WARRANTY
Your Responsibility
(1) You must retain the original sale receipt to provide proof of purchase.
(2) These warranties are effective only if the product is purchased and operated in the U.S.A. or Canada.
(3)Warranties extend only to defects in material or workmanship, and do not extend to any product or parts which have been lost or discarded, or damage to product or parts caused by misuse, accident, improper operation or maintenance, or use in violation of instructions provided with the product, or to product which has been altered or modified without authorization of AVC, or to products or parts thereof which have had the serial number removed or changed.
Out of Warranty
In the event your product requires repair after the limited warranty period has expired, please contact our Customer
Support Center at
Hours:
Important: You are responsible for any transportation, shipping or insurance relative to the return of product to our Product Returns Center.
All warranties implied by state law, including the implied warranties of merchantability and fitness for a particular purpose, are expressly limited to the duration of the limited warranties set forth above. With the exception of any warranties implied by state law as hereby limited, the foregoing warranty is exclusive and in lieu of all other warranties, guarantees, agreements and similar obligations of manufacturer or seller with respect to the repair or replacement of any parts. In no event shall AVC be liable for consequential or incidental damages.
No person, agent, distributor, dealer or company is authorized to change, modify or extend the terms of these warranties in any manner whatsoever. The time within action must be commenced to enforce any obligation of AVC arising under the warranty or under any statute, or law of the United States or any state thereof, is hereby limited to one year from the date of purchase. This limitation does not apply to implied warranties arising under state law.
This warranty gives you specific legal rights and you may also have other rights, which may vary, from state to state. Some states do not allow limitation on how long an implied warranty lasts, when an action may be brought, or the exclusion or limitation of incidental or consequential damages, so the above provisions may not apply to you.
For more information on other products and services, please visit our web site at
www.RCAav.com
Important: Also keep your “Bill of Sale” as proof of purchase.
Model no | Product name |
Type of set | |
Serial no | Invoice no |
Date purchased | Dealer name |
E - 2
PVS73830 IB UL English RCA W010.indd 1
E - 3
E - 4
E - 5
FOR SERVICE AND REPAIR, PLEASE VISIT www.RCAav.com
E - 6