V O L U M E S E N S I N G B A S S R E S T O R AT I O N D E V I C E![]()
but when the volume is turned down, |
|
| 3 | 5 | 7 | 9 | |
there is too much bass for the midrange |
| ||||||
2 | 4 |
| 6 | 8 | |||
and highs. |
|
| |||||
|
|
|
|
|
| ||
|
|
|
|
| |||
the input from the head unit to add more |
| GAIN |
|
|
| ||
bass at high volume levels, and balances |
|
|
|
|
| ||
the bass response at lower volume levels. 1 |
|
|
|
| 10 | ||
You get the bass you want with added |
|
|
|
|
|
| |
performance while keeping your factory |
|
|
|
| 11 | ||
radio and your steering wheel controls. |
|
|
|
|
|
| |
|
|
| 16 | 14 |
| 12 |
|
|
|
| 15 | 13 |
|
| |
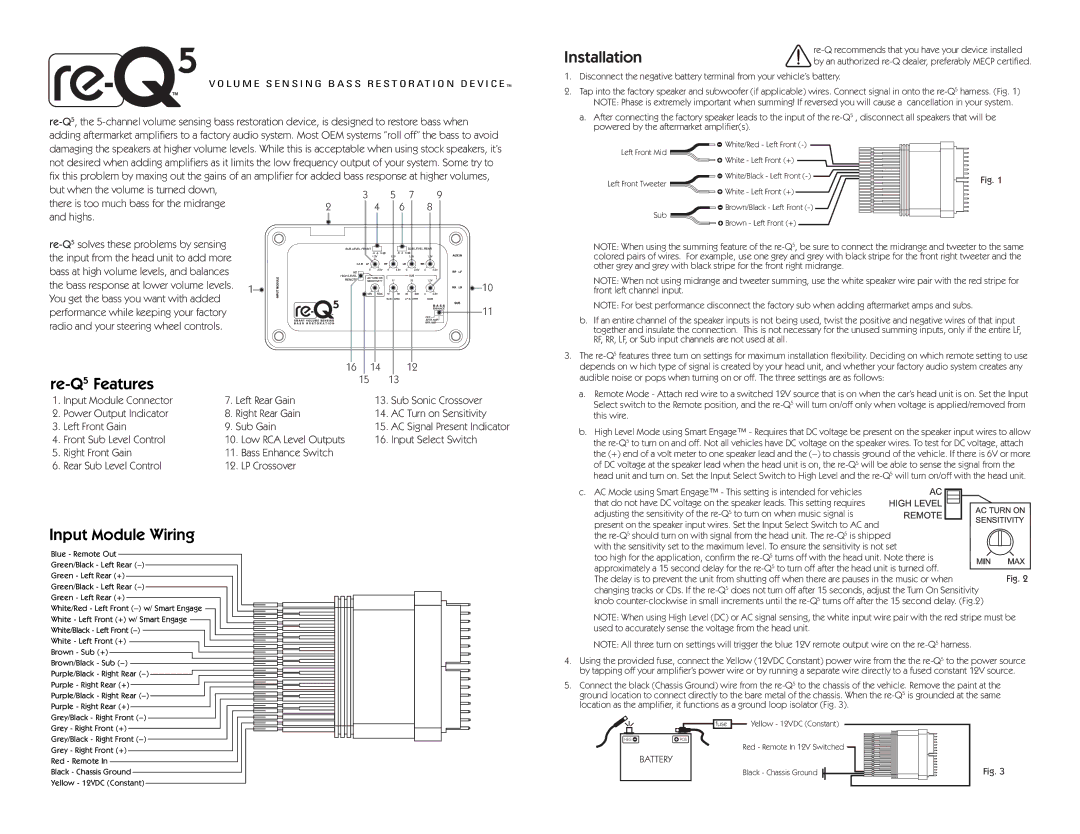
1. | Input Module Connector | 7. Left Rear Gain |
| 13. Sub Sonic Crossover | |||
2. | Power Output Indicator | 8. Right Rear Gain |
| 14. AC Turn on Sensitivity | |||
3. | Left Front Gain | 9. Sub Gain |
| 15. AC Signal Present Indicator | |||
4. | Front Sub Level Control | 10. Low RCA Level Outputs | 16. Input Select Switch | ||||
5. | Right Front Gain | 11. Bass Enhance Switch |
|
|
|
| |
6. | Rear Sub Level Control | 12. LP Crossover |
|
|
|
|
|
Input Module Wiring
Blue - Remote Out Green/Black - Left Rear
White/Red - Left Front ![]()
![]()
![]()
![]() White - Left Front (+) w/ Smart Engage
White - Left Front (+) w/ Smart Engage![]()
![]()
![]() White/Black - Left Front
White/Black - Left Front ![]()
![]()
![]() White - Left Front (+)
White - Left Front (+)![]()
![]()
![]() Brown - Sub (+)
Brown - Sub (+)![]()
![]()
![]() Brown/Black - Sub
Brown/Black - Sub ![]()
![]()
![]() Purple/Black - Right Rear
Purple/Black - Right Rear ![]()
![]()
![]()
![]()
![]()
![]() Purple/Black - Right Rear
Purple/Black - Right Rear ![]()
![]()
![]() Purple - Right Rear (+)
Purple - Right Rear (+)![]()
![]()
![]() Grey/Black - Right Front
Grey/Black - Right Front ![]()
![]()
![]() Grey - Right Front (+)
Grey - Right Front (+)![]()
![]()
![]()
![]() Grey/Black - Right Front
Grey/Black - Right Front
Grey - Right Front (+) Red - Remote In Black - Chassis Ground Yellow - 12VDC (Constant)
Installation | |
by an authorized |
1.Disconnect the negative battery terminal from your vehicle’s battery.
2.Tap into the factory speaker and subwoofer (if applicable) wires. Connect signal in onto the
a.After connecting the factory speaker leads to the input of the
![]()
![]() White/Red - Left Front
White/Red - Left Front
Left Front Mid
| White - Left Front (+) |
|
Left Front Tweeter | White/Black - Left Front | Fig. 1 |
| ||
White - Left Front (+) |
| |
|
| |
Sub | Brown/Black - Left Front |
|
Brown - Left Front (+) |
| |
|
|
NOTE: When using the summing feature of the
NOTE: When not using midrange and tweeter summing, use the white speaker wire pair with the red stripe for front left channel input.
NOTE: For best performance disconnect the factory sub when adding aftermarket amps and subs.
b.If an entire channel of the speaker inputs is not being used, twist the positive and negative wires of that input together and insulate the connection. This is not necessary for the unused summing inputs, only if the entire LF, RF, RR, LF, or Sub input channels are not used at all.
3.The
a.Remote Mode - Attach red wire to a switched 12V source that is on when the car’s head unit is on. Set the Input Select switch to the Remote position, and the
b.High Level Mode using Smart Engage™ - Requires that DC voltage be present on the speaker input wires to allow the
c. AC Mode using Smart Engage™ - This setting is intended for vehicles |
|
that do not have DC voltage on the speaker leads. This setting requires |
|
adjusting the sensitivity of the |
|
present on the speaker input wires. Set the Input Select Switch to AC and |
|
the |
|
with the sensitivity set to the maximum level. To ensure the sensitivity is not set |
|
too high for the application, confirm the |
|
approximately a 15 second delay for the | Fig. 2 |
The delay is to prevent the unit from shutting off when there are pauses in the music or when | |
changing tracks or CDs. If the |
|
knob |
|
NOTE: When using High Level (DC) or AC signal sensing, the white input wire pair with the red stripe must be used to accurately sense the voltage from the head unit.
NOTE: All three turn on settings will trigger the blue 12V remote output wire on the
4.Using the provided fuse, connect the Yellow (12VDC Constant) power wire from the the
5.Connect the black (Chassis Ground) wire from the
| fuse | Yellow - 12VDC (Constant) |
NEG | POS |
|
|
| Red - Remote In 12V Switched |
BATTERY
Black - Chassis Ground | Fig. 3 |