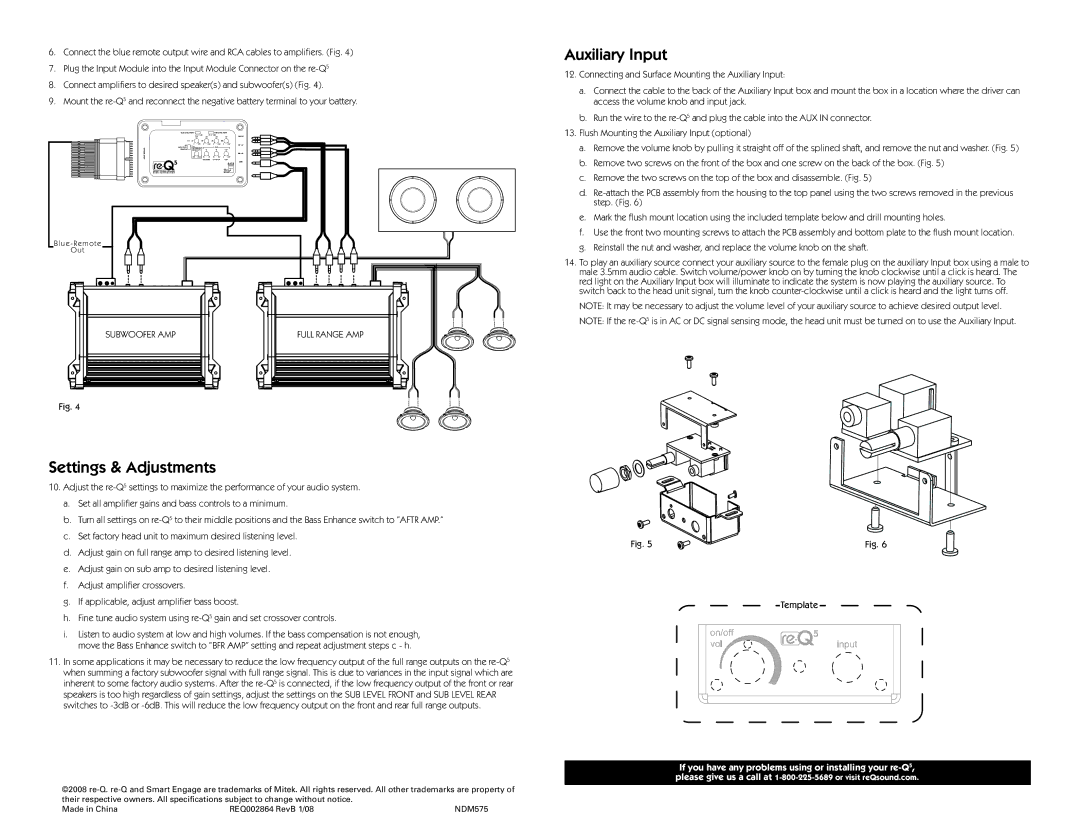
6.Connect the blue remote output wire and RCA cables to amplifiers. (Fig. 4)
7.Plug the Input Module into the Input Module Connector on the
8.Connect amplifiers to desired speaker(s) and subwoofer(s) (Fig. 4).
9.Mount the
B l u e - R e m o t e
O u t
SUBWOOFER AMP | FULL RANGE AMP |
Fig. 4
Auxiliary Input
12.Connecting and Surface Mounting the Auxiliary Input:
a.Connect the cable to the back of the Auxiliary Input box and mount the box in a location where the driver can access the volume knob and input jack.
b.Run the wire to the
13.Flush Mounting the Auxiliary Input (optional)
a.Remove the volume knob by pulling it straight off of the splined shaft, and remove the nut and washer. (Fig. 5)
b.Remove two screws on the front of the box and one screw on the back of the box. (Fig. 5)
c.Remove the two screws on the top of the box and disassemble. (Fig. 5)
d.
e.Mark the flush mount location using the included template below and drill mounting holes.
f.Use the front two mounting screws to attach the PCB assembly and bottom plate to the flush mount location.
g.Reinstall the nut and washer, and replace the volume knob on the shaft.
14.To play an auxiliary source connect your auxiliary source to the female plug on the auxiliary Input box using a male to male 3.5mm audio cable. Switch volume/power knob on by turning the knob clockwise until a click is heard. The red light on the Auxiliary Input box will illuminate to indicate the system is now playing the auxiliary source. To switch back to the head unit signal, turn the knob
Settings & Adjustments
10.Adjust the
a.Set all amplifier gains and bass controls to a minimum.
b.Turn all settings on
c.Set factory head unit to maximum desired listening level.
d.Adjust gain on full range amp to desired listening level.
e.Adjust gain on sub amp to desired listening level.
f.Adjust amplifier crossovers.
g.If applicable, adjust amplifier bass boost.
h.Fine tune audio system using
i.Listen to audio system at low and high volumes. If the bass compensation is not enough, move the Bass Enhance switch to “BFR AMP” setting and repeat adjustment steps c - h.
11.In some applications it may be necessary to reduce the low frequency output of the full range outputs on the
©2008
their respective owners. All specifications subject to change without notice. |
| |
Made in China | REQ002864 RevB 1/08 | NDM575 |
Fig. 5 | Fig. 6 |
Template
If you have any problems using or installing your