POWER ON
Plug in the system and the standby indicator light comes on.
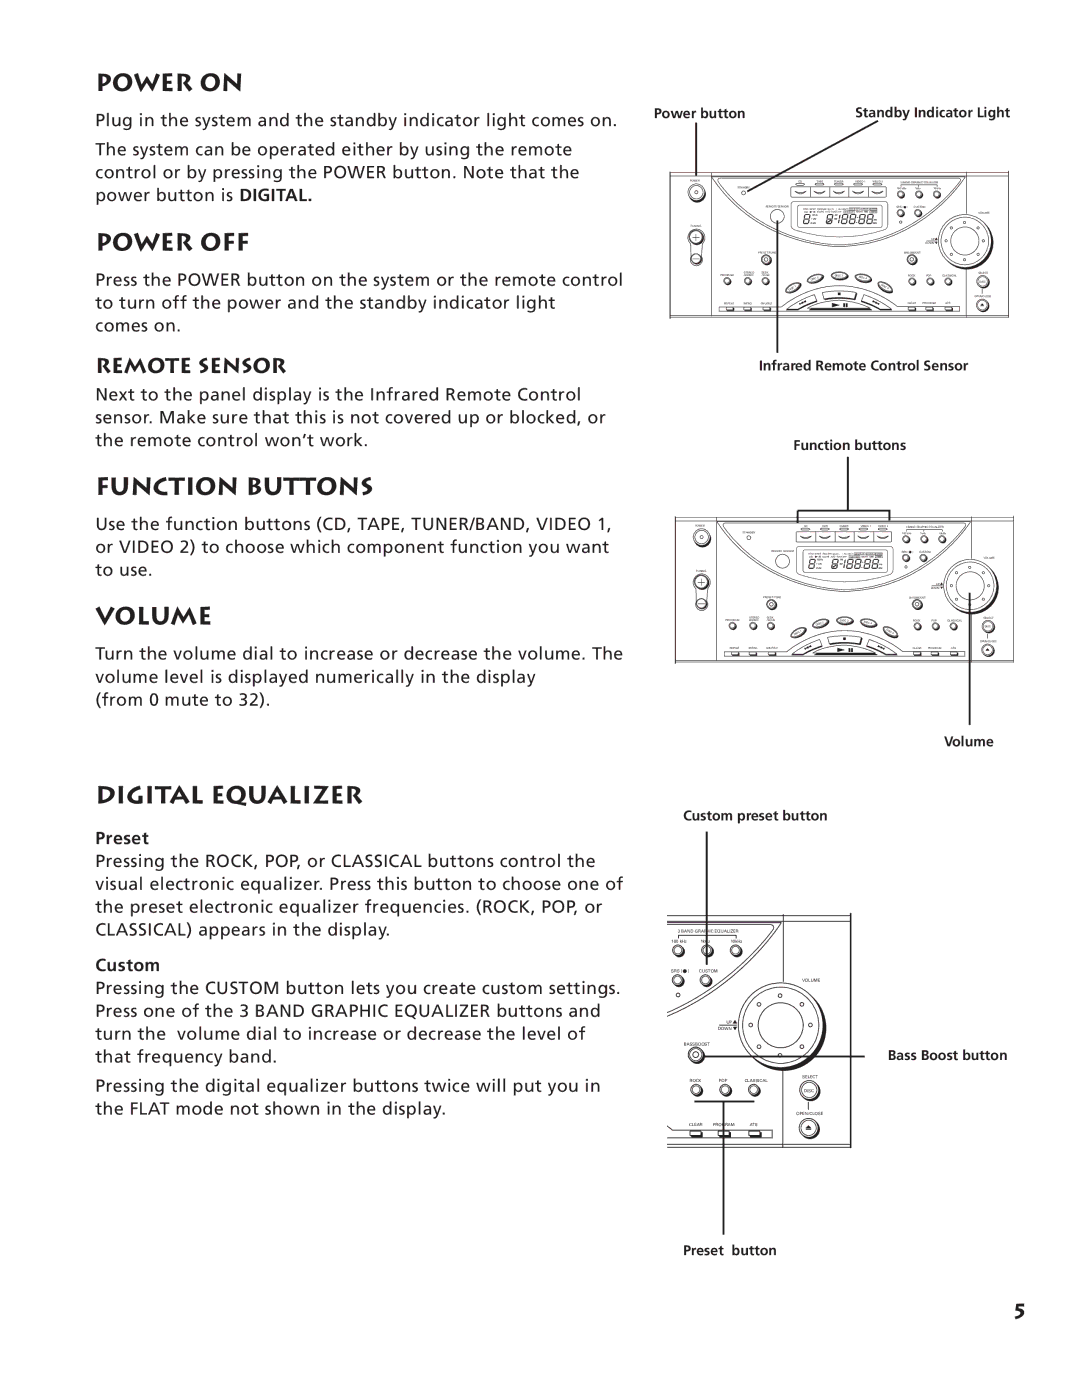
The system can be operated either by using the remote control or by pressing the POWER button. Note that the power button is DIGITAL.
POWER OFF
Press the POWER button on the system or the remote control to turn off the power and the standby indicator light comes on.
REMOTE SENSOR
Next to the panel display is the Infrared Remote Control sensor. Make sure that this is not covered up or blocked, or the remote control won’t work.
Power button |
|
|
| Standby Indicator Light | |||||||
POWER |
| CD | TAPE | TUNER | VIDEO 1 | VIDEO 2 | 3 BAND GRAPHIC EQUALIZER |
| |||
| STANDBY |
|
|
|
|
| 100 kHz |
| 1kHz | 10kHz |
|
|
| REMOTE SENSOR | PROGRAM SHUFFL | 1 ALL DISC S ROCK |
|
| SRS ( | ) | CUSTOM |
| |
|
| INTRO REPEAT | POP CLASSICAL | CUSTOM |
|
|
|
|
| ||
|
| DISC | VOLUME AUTO TRACK SKIP BASS BOOST | REMAIN TIME | STEREO |
|
|
|
| VOLUME | |
|
| 100 Hz | FM |
|
|
|
|
|
|
| |
|
| 1 kHz |
| AM |
| kHz |
|
|
|
|
|
|
| 10 kHz |
|
|
| MHz |
|
|
|
|
|
TUNING |
|
|
|
|
|
|
|
|
|
|
|
|
|
|
|
|
|
|
|
|
| UP |
|
|
|
|
|
|
|
|
|
|
| DOWN |
|
|
| PRESET/TUNE |
|
|
|
| BASSBOOST |
|
| ||
PROGRAM | STEREO | SEEK |
|
|
|
|
|
|
|
| SELECT |
/MONO | /SCAN | 2 | DISC 3 | DISC 4 |
|
|
| ROCK | POP | CLASSICAL | |
|
|
|
|
|
|
|
|
|
| ||
|
| DISC |
|
|
|
|
|
|
| DISC | |
|
| 1 |
|
|
| DISC | 5 |
|
|
|
|
|
| DISC |
|
|
|
|
|
|
|
| |
|
|
|
|
|
|
|
|
|
|
| OPEN/CLOSE |
REPEAT | INTRO | SHUFFLE |
|
|
|
|
| CLEAR | PROGRAM | ATS | |
Infrared Remote Control Sensor
Function buttons
FUNCTION BUTTONS
Use the function buttons (CD, TAPE, TUNER/BAND, VIDEO 1, or VIDEO 2) to choose which component function you want to use.
VOLUME
Turn the volume dial to increase or decrease the volume. The volume level is displayed numerically in the display
(from 0 mute to 32).
POWER |
| CD | TAPE | TUNER | VIDEO 1 | VIDEO 2 | 3 BAND GRAPHIC EQUALIZER |
| |||
| STANDBY |
|
|
|
|
| 100 kHz |
| 1kHz | 10kHz |
|
|
| REMOTE SENSOR | PROGRAM SHUFFL | 1 ALL DISC S ROCK |
|
| SRS ( | ) | CUSTOM |
| |
|
| INTRO REPEAT | POP CLASSICAL | CUSTOM |
|
|
|
|
| ||
|
| DISC | VOLUME AUTO TRACK SKIP BASS BOOST | REMAIN TIME | STEREO |
|
|
|
|
| |
|
| 100 Hz | FM |
|
|
|
|
|
|
| |
|
| 1 kHz |
| AM |
| kHz |
|
|
|
|
|
|
| 10 kHz |
|
|
| MHz |
|
|
|
|
|
TUNING |
|
|
|
|
|
|
|
|
|
|
|
|
|
|
|
|
|
|
|
|
| UP |
|
|
|
|
|
|
|
|
|
|
| DOWN |
|
|
| PRESET/TUNE |
|
|
|
| BASSBOOST |
|
| ||
PROGRAM | STEREO | SEEK |
|
|
|
|
|
|
|
|
|
/MONO | /SCAN | 2 | DISC 3 | DISC 4 |
|
|
| ROCK | POP | CLASSICAL | |
|
|
|
|
|
|
|
|
|
| ||
|
| DISC |
|
|
|
|
|
|
|
| |
|
| 1 |
|
|
| DISC | 5 |
|
|
|
|
|
| DISC |
|
|
|
|
|
|
|
| |
REPEAT | INTRO | SHUFFLE |
|
|
|
|
| CLEAR | PROGRAM | ATS | |
VOLUME
SELECT
DISC
OPEN/CLOSE
Volume
DIGITAL EQUALIZER
Preset
Pressing the ROCK, POP, or CLASSICAL buttons control the visual electronic equalizer. Press this button to choose one of the preset electronic equalizer frequencies. (ROCK, POP, or CLASSICAL) appears in the display.
Custom
Pressing the CUSTOM button lets you create custom settings. Press one of the 3 BAND GRAPHIC EQUALIZER buttons and turn the volume dial to increase or decrease the level of that frequency band.
Pressing the digital equalizer buttons twice will put you in the FLAT mode not shown in the display.
Custom preset button
3 BAND GRAPHIC EQUALIZER | ||
100 kHz | 1kHz | 10kHz |
SRS ( ) | CUSTOM |
|
VOLUME
UP![]()
DOWN ![]()
BASSBOOST
SELECT
ROCK POP CLASSICAL
DISC
OPEN/CLOSE
CLEAR | PROGRAM | ATS | |||
|
|
|
|
|
|
|
|
|
|
|
|
Preset button
Bass Boost button
5
