AC/DC Power Converter (Not Included)
To save batteries you can use an AC/DC converter (not included) to operate your recorder.
1.Connect the converter into the DC 3V jack on the recorder.
2.Connect the other side of the converter into a household
outlet. When the AC/DC converter is used, batteries are automatically disconnected.
Specification of AC/DC Power Converter
Output: 3V DC @ 200 mA
Polarity: ![]()
![]()
![]()
![]()
![]()
Record/ Battery Indicator
•Recording
•Battery Condition
Using the Recorder
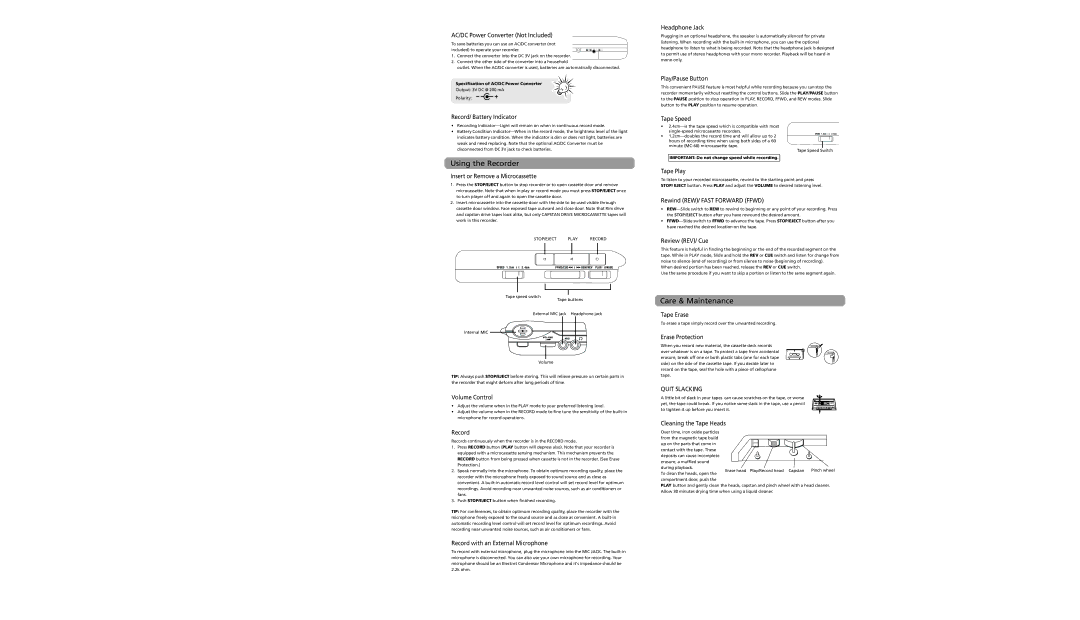
Insert or Remove a Microcassette
1.Press the STOP/EJECT button to stop recorder or to open cassette door and remove microcassette. Note that when in play or record mode you must press STOP/EJECT once to turn player off and again to open the cassette door.
2.Insert microcassette into the cassette door with the side to be used visible through cassette door window. Face exposed tape outward and close door. Note that Rim drive and capstan drive tapes look alike, but only CAPSTAN DRIVE MICROCASSETTE tapes will work in this recorder.
STOP/EJECT PLAY RECORD
Tape speed switch |
|
Tape buttons | |
External MIC jack | Headphone jack |
Internal MIC |
|
Volume
TIP: Always push STOP/EJECT before storing. This will relieve pressure on certain parts in the recorder that might deform after long periods of time.
Volume Control
•Adjust the volume when in the PLAY mode to your preferred listening level.
•Adjust the volume when in the RECORD mode to fine tune the sensitivity of the
Record
Records continuously when the recorder is in the RECORD mode.
1.Press RECORD button (PLAY button will depress also). Note that your recorder is equipped with a microcassette sensing mechanism. This mechanism prevents the RECORD button from being pressed when cassette is not in the recorder. (See Erase Protection.)
2.Speak normally into the microphone. To obtain optimum recording quality, place the recorder with the microphone freely exposed to sound source and as close as convenient. A
3.Push STOP/EJECT button when finished recording.
TIP: For conferences, to obtain optimum recording quality, place the recorder with the microphone freely exposed to the sound source and as close as convenient. A
Record with an External Microphone
To record with external microphone, plug the microphone into the MIC JACK. The
Headphone Jack
Plugging in an optional headphone, the speaker is automatically silenced for private listening. When recording with the
Play/Pause Button
This convenient PAUSE feature is most helpful while recording because you can stop the recorder momentarily without resetting the control buttons. Slide the PLAY/PAUSE button to the PAUSE position to stop operation in PLAY, RECORD, FFWD, and REW modes. Slide button to the PLAY position to resume operation.
Tape Speed
•
•
minute
Tape Speed Switch
IMPORTANT: Do not change speed while recording.
Tape Play
To listen to your recorded microcassette, rewind to the starting point and press STOP/ EJECT button. Press PLAY and adjust the VOLUME to desired listening level.
Rewind (REW)/ FAST FORWARD (FFWD)
•
•
Review (REV)/ Cue
This feature is helpful in finding the beginning or the end of the recorded segment on the tape. While in PLAY mode, Slide and hold the REV or CUE switch and listen for change from noise to silence (end of recording) or from silence to noise (beginning of recording).
When desired portion has been reached, release the REV or CUE switch.
Use the same procedure if you want to skip a portion or listen to the same segment again.
Care & Maintenance
Tape Erase
To erase a tape simply record over the unwanted recording.
Erase Protection
When you record new material, the cassette deck records
over whatever is on a tape. To protect a tape from accidental A erasure, break off one or both plastic tabs (one for each tape side) on the side of the cassette tape. If you decide later to record on the tape, seal the hole with a piece of cellophane tape.
QUIT SLACKING
A little bit of slack in your tapes can cause scratches on the tape, or worse yet, the tape could break. If you notice some slack in the tape, use a pencil to tighten it up before you insert it.
Cleaning the Tape Heads |
|
|
|
Over time, iron oxide particles |
|
|
|
from the magnetic tape build |
|
|
|
up on the parts that come in |
|
|
|
contact with the tape. These |
|
|
|
deposits can cause incomplete |
|
|
|
erasure, a muffled sound |
|
|
|
during playback. | Play/Record head | Capstan | Pinch wheel |
Erase head | |||
To clean the heads, open the |
|
|
|
compartment door, push the
PLAY button and gently clean the heads, capstan and pinch wheel with a head cleaner. Allow 30 minutes drying time when using a liquid cleaner.