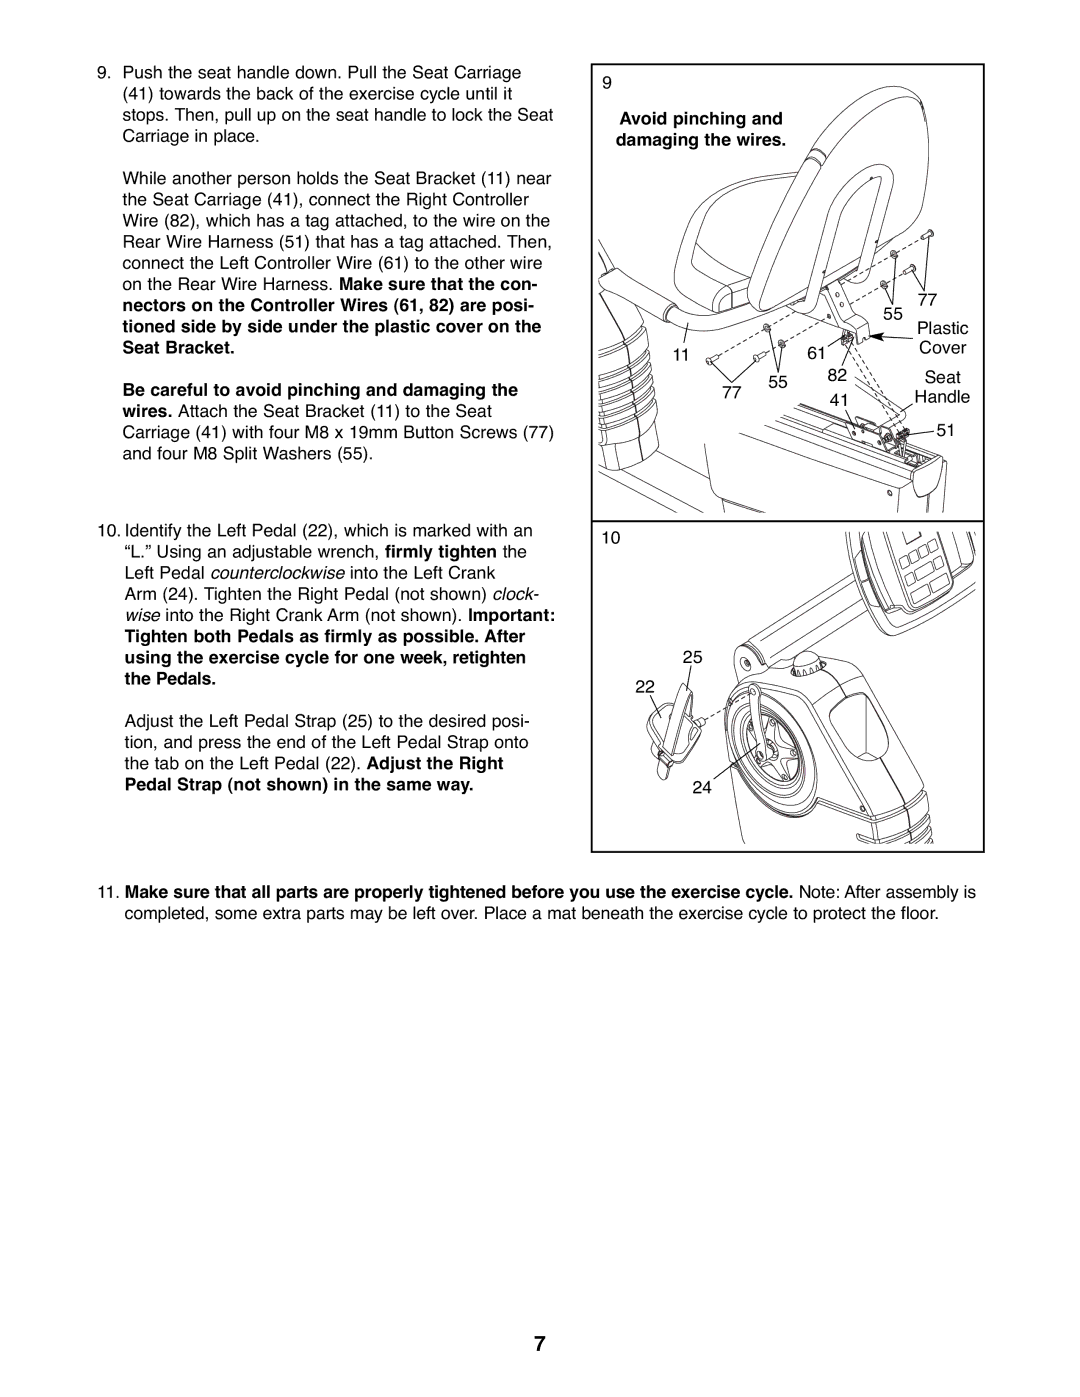
9. Push the seat handle down. Pull the Seat Carriage | 9 |
|
|
|
(41) towards the back of the exercise cycle until it |
|
|
| |
|
|
|
| |
stops. Then, pull up on the seat handle to lock the Seat | Avoid pinching and |
|
| |
Carriage in place. | damaging the wires. |
|
| |
While another person holds the Seat Bracket (11) near |
|
|
|
|
the Seat Carriage (41), connect the Right Controller |
|
|
|
|
Wire (82), which has a tag attached, to the wire on the |
|
|
|
|
Rear Wire Harness (51) that has a tag attached. Then, |
|
|
|
|
connect the Left Controller Wire (61) to the other wire |
|
|
|
|
on the Rear Wire Harness. Make sure that the con- |
|
|
| 77 |
nectors on the Controller Wires (61, 82) are posi- |
|
|
| |
tioned side by side under the plastic cover on the |
|
|
| 55 |
|
|
| Plastic | |
Seat Bracket. | 11 |
| 61 | Cover |
|
|
| ||
Be careful to avoid pinching and damaging the | 77 | 55 | 82 | Seat |
| 41 | Handle | ||
wires. Attach the Seat Bracket (11) to the Seat |
|
|
| 51 |
Carriage (41) with four M8 x 19mm Button Screws (77) |
|
|
| |
and four M8 Split Washers (55). |
|
|
|
|
10. Identify the Left Pedal (22), which is marked with an | 10 |
|
|
|
“L.” Using an adjustable wrench, firmly tighten the |
|
|
| |
|
|
|
| |
Left Pedal counterclockwise into the Left Crank |
|
|
|
|
Arm (24). Tighten the Right Pedal (not shown) clock- |
|
|
|
|
wise into the Right Crank Arm (not shown). Important: |
|
|
|
|
Tighten both Pedals as firmly as possible. After |
|
|
|
|
using the exercise cycle for one week, retighten | 25 |
|
|
|
the Pedals. | 22 |
|
|
|
|
|
|
| |
Adjust the Left Pedal Strap (25) to the desired posi- |
|
|
|
|
tion, and press the end of the Left Pedal Strap onto |
|
|
|
|
the tab on the Left Pedal (22). Adjust the Right |
|
|
|
|
Pedal Strap (not shown) in the same way. | 24 |
|
|
|
11.Make sure that all parts are properly tightened before you use the exercise cycle. Note: After assembly is completed, some extra parts may be left over. Place a mat beneath the exercise cycle to protect the floor.
7
