INSTALLATION

4)If the fl oor of your fi replace is below the level of the fi replace opening, adjust the insert's levelling bolts to accommodate the difference. When additional shimming is required, use non-combustible masonry or steel shims.

5)Measure approximately the alignment of the fl ue liner with the position of the smoke outlet hole on the insert to check for pos- sible offset. If an offset is required, use a proper stainless steel unit available with the chimney liner.

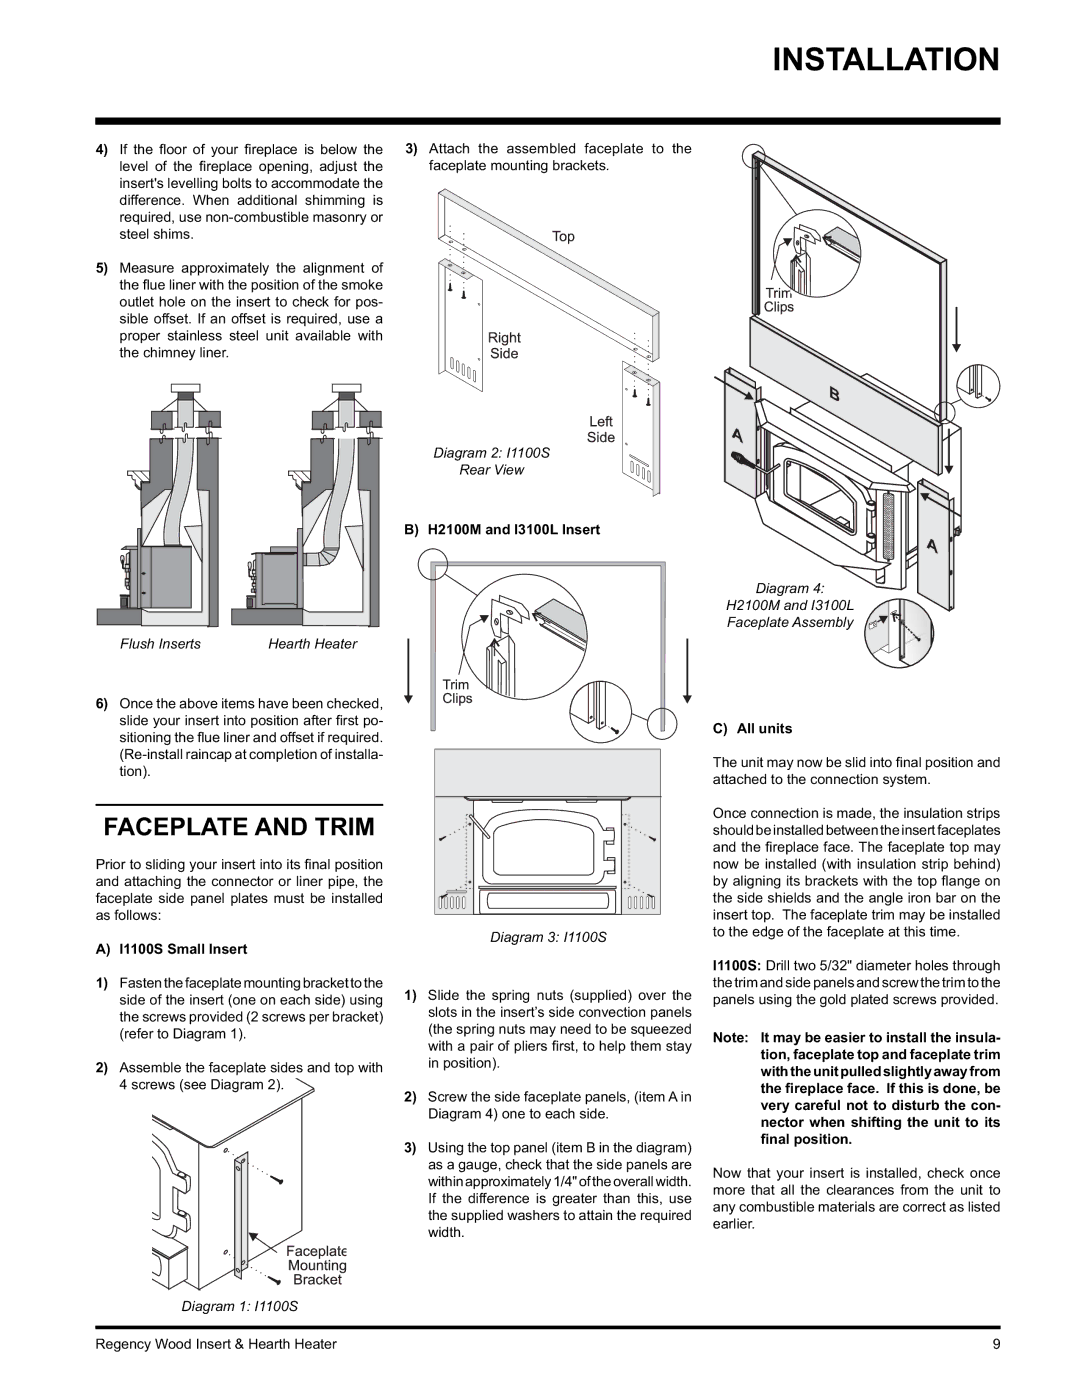
3)Attach the assembled faceplate to the faceplate mounting brackets.

Diagram 2: I1100S

Rear View

B) H2100M and I3100L Insert

Flush Inserts

Hearth Heater

Diagram 4:

H2100M and I3100L

Faceplate Assembly

6)Once the above items have been checked, slide your insert into position after fi rst po- sitioning the fl ue liner and offset if required. (Re-install raincap at completion of installa- tion).

FACEPLATE AND TRIM

Prior to sliding your insert into its fi nal position and attaching the connector or liner pipe, the faceplate side panel plates must be installed as follows:

A) I1100S Small Insert

Diagram 3: I1100S

C) All units

The unit may now be slid into fi nal position and attached to the connection system.

Once connection is made, the insulation strips should be installed between the insert faceplates and the fi replace face. The faceplate top may now be installed (with insulation strip behind) by aligning its brackets with the top fl ange on the side shields and the angle iron bar on the insert top. The faceplate trim may be installed to the edge of the faceplate at this time.

1)Fasten the faceplate mounting bracket to the side of the insert (one on each side) using the screws provided (2 screws per bracket) (refer to Diagram 1).

2)Assemble the faceplate sides and top with 4 screws (see Diagram 2).

1)Slide the spring nuts (supplied) over the slots in the insert’s side convection panels (the spring nuts may need to be squeezed with a pair of pliers fi rst, to help them stay in position).

2)Screw the side faceplate panels, (item A in Diagram 4) one to each side.

3)Using the top panel (item B in the diagram) as a gauge, check that the side panels are withinapproximately1/4"oftheoverallwidth. If the difference is greater than this, use the supplied washers to attain the required width.

I1100S: Drill two 5/32" diameter holes through the trim and side panels and screw the trim to the panels using the gold plated screws provided.

Note: It may be easier to install the insula- tion, faceplate top and faceplate trim withtheunitpulledslightlyawayfrom the fireplace face. If this is done, be very careful not to disturb the con- nector when shifting the unit to its final position.

Now that your insert is installed, check once more that all the clearances from the unit to any combustible materials are correct as listed earlier.

Diagram 1: I1100S

Regency Wood Insert & Hearth Heater

9

Page 9
Image 9
Regency I1100S installation manual Faceplate and Trim, H2100M and I3100L Insert

H2100, I1100S, I3100L specifications

The Regency H2100 and I3100L are two innovative and efficient heating solutions that cater to the evolving needs of modern homes. Known for their quality craftsmanship and advanced technology, these products have become favorable choices among homeowners seeking both aesthetics and functionality.

The Regency H2100 is a gas fireplace insert designed specifically to be installed within an existing fireplace. It features a sleek and contemporary design that enhances the ambiance of any room while providing effective heating. One of the main highlights of the H2100 model is its high efficiency rating, often exceeding 70%. This efficiency translates to reduced energy costs and a minimal environmental footprint. Equipped with a powerful heating capacity, the H2100 can effectively warm spaces up to 1,500 square feet, ensuring comfort during the coldest months.

Key technologies integrated into the H2100 include a direct vent system that allows for safe and efficient exhaust of combustion gases, promoting clean indoor air quality. Additionally, the unit features adjustable flame settings and an easy-to-use remote control, allowing for customized heating options to meet individual preferences. The H2100 also includes a variety of aesthetic options, such as different media choices, decorative surrounds, and glass doors, making it suitable for diverse interior designs.

On the other hand, the Regency I3100L is a wood-burning insert designed for homeowners who appreciate traditional heating methods. This model boasts a large firebox that can accommodate larger logs, providing extended burn times and minimal need for refueling. With an impressive efficiency rating, the I3100L minimizes wood consumption while maximizing heat output.

One of the standout characteristics of the I3100L is its large viewing glass, offering an unobstructed view of the fire, creating an inviting atmosphere. The insert features secondary combustion technology, which ensures that smoke and emissions are significantly reduced, promoting environmental friendliness. With its classic cast iron construction, durability is another crucial feature, ensuring that the insert will withstand the test of time while providing consistent warmth.

In conclusion, both the Regency H2100 and I3100L present unique heating solutions tailored to different preferences and lifestyles. With their advanced features, energy efficiency, and customizable designs, these models stand out in the market, offering homeowners the perfect blend of comfort, style, and sustainability in their heating solutions. Whether one prefers the convenience of gas or the charm of wood-burning, Regency has positioned itself as a leader in innovative heating technology.