OWNER’S MANUAL

OPERATING CHAIN SAW

Continued

Normal Guide Bar Maintenance

1.Remove guide bar from chain saw.

2.Remove sawdust from guide bar groove periodically. Use putty knife or wire.

3.Clean oil slots after each day of use.

4.Remove burrs from sides of guide bar. Use flat file to make side edges square.

Replace guide bar when

bar is bent or cracked

inside groove of bar is badly worn

Note: When replacing guide bar, see Re- placement Parts, page 14 for proper bar.

Cleaning Groove Flat File Burr With Putty Knife

Oil Slot

Guide

Bar

Figure 18 - Guide Bar Maintenance

Keep chain sharp. Your saw will cut faster and more safely. A dull chain will cause undue sprocket, guide bar, chain, and motor wear. If you must force chain into wood and cutting creates only sawdust with few large chips, chain is dull.

Items Needed to Sharpen Chain

Purchase these items from your local dealer, hardware store, or chain saw supplies outlet.

4 mm (5/32") round file

File guide

Medium sized flat file

Depth gauge too

Vise

Sharpening Cutters

Use file guide for 30° filing.

1.

Adjust chain for proper tension (see Saw


Chain Tension Adjustment, page 8).

2.

Clamp guide bar in vise to hold saw


steady. Note: Do not clamp chain.

3.

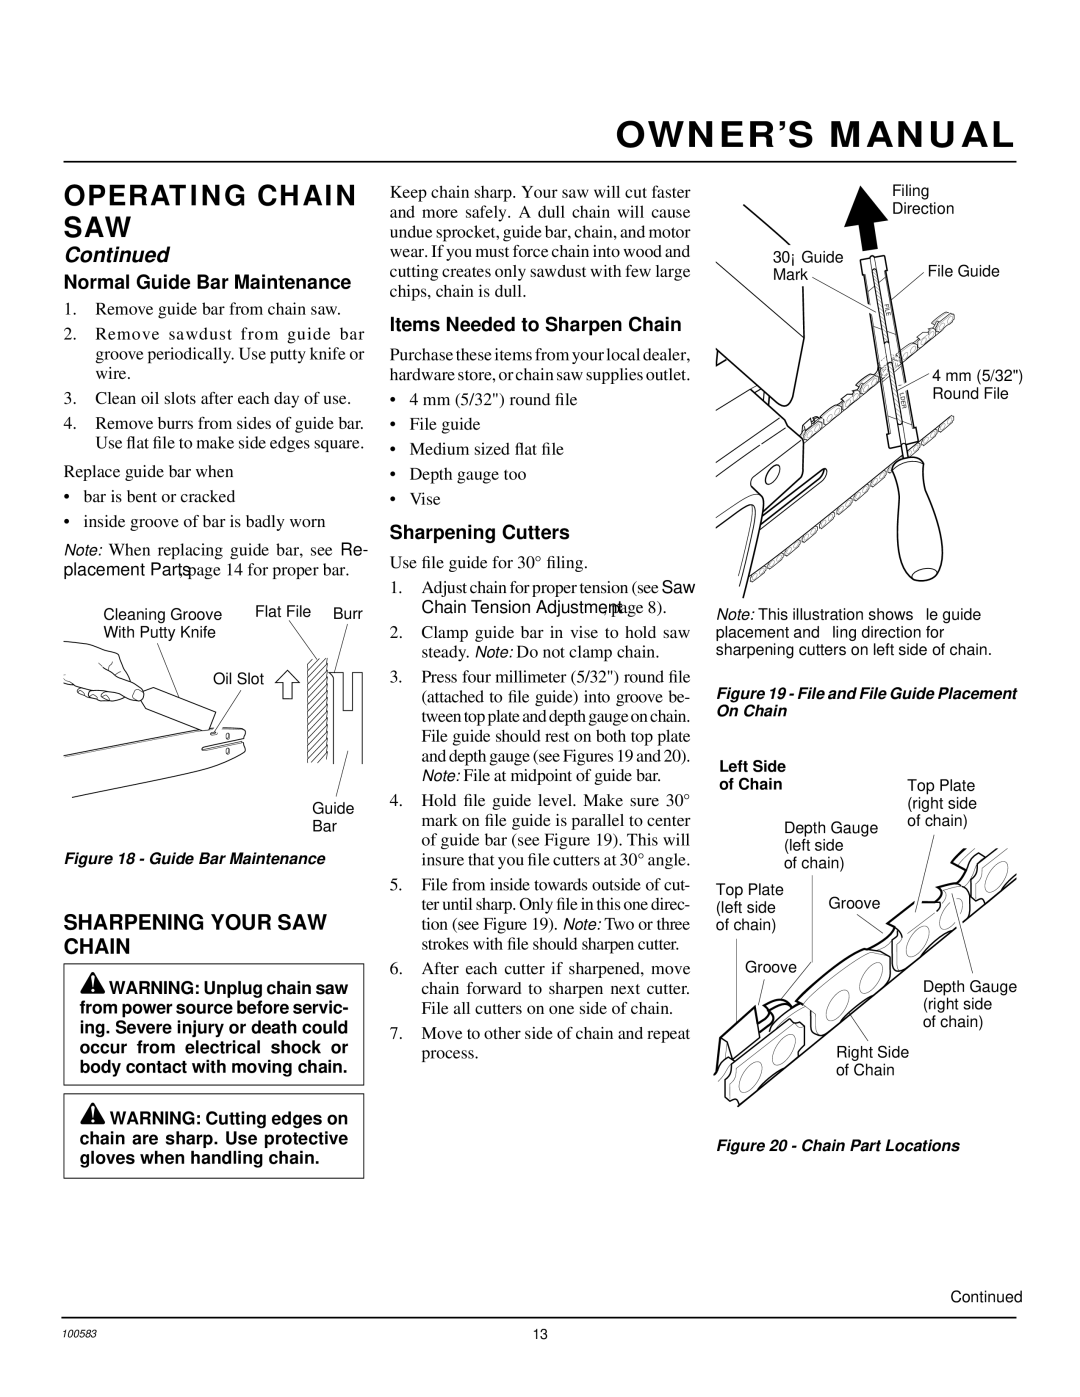
Press four millimeter (5/32") round file


(attached to file guide) into groove be-


tween top plate and depth gauge on chain.


File guide should rest on both top plate


and depth gauge (see Figures 19 and 20).


Note: File at midpoint of guide bar.

4.

Hold file guide level. Make sure 30°


mark on file guide is parallel to center


of guide bar (see Figure 19). This will


insure that you file cutters at 30° angle.

Filing

Direction

30° Guide

File Guide

Mark

F


IL


E


H

4 mm (5/32")

Round File

E

O


L


D


R


Note: This illustration shows file guide placement and filing direction for sharpening cutters on left side of chain.

Figure 19 - File and File Guide Placement On Chain

Left Side


of Chain

Top Plate


(right side

Depth Gauge

of chain)


(left side


of chain)


SHARPENING YOUR SAW CHAIN

WARNING: Unplug chain saw from power source before servic- ing. Severe injury or death could occur from electrical shock or body contact with moving chain.

5.

File from inside towards outside of cut-


ter until sharp. Only file in this one direc-


tion (see Figure 19). Note: Two or three


strokes with file should sharpen cutter.

6.

After each cutter if sharpened, move


chain forward to sharpen next cutter.


File all cutters on one side of chain.

7.

Move to other side of chain and repeat


process.

Top Plate (left side of chain)

Groove

Groove

Depth Gauge (right side of chain)

Right Side

of Chain

WARNING: Cutting edges on chain are sharp. Use protective gloves when handling chain.

Figure 20 - Chain Part Locations

Continued

100583

13

Page 13
Image 13
Remington LNT-3 12-inch, LNT-2 8-inch Normal Guide Bar Maintenance, Items Needed to Sharpen Chain, Sharpening Cutters

EL-7 16-inch, LNT-3 12-inch, EL-7 14-inch, LNT-2 10-inch, LNT-2 8-inch specifications

The Remington EL-7 series and LNT series of products are engineered for precision, efficiency, and versatility in various applications, standing out for their robust features and advanced technologies.

The Remington EL-7 14-inch and 16-inch models are designed for users who prioritize power and cutting performance. The EL-7 series boasts a high-performance motor that delivers consistent power throughout use, ensuring efficiency in cutting applications. The dual-action system enhances the cutting action, providing cleaner cuts with minimal effort. Additionally, the ergonomic design of the handles ensures user comfort, reducing fatigue during prolonged use. Suitable for both light and heavy-duty tasks, the EL-7 models incorporate advanced materials that ensure durability and longevity, making them a reliable choice for professionals and hobbyists alike.

In contrast, the LNT-3 12-inch and the LNT-2 series, which includes 8-inch and 10-inch models, cater to a range of cutting needs with varying blade lengths. The LNT-3 12-inch model features a powerful motor that ensures smooth and precise cutting, vital for intricate projects where accuracy is paramount. The unique blade design provides a finer finish while minimizing the chance of snagging or jamming, making it ideal for detailed work.

The LNT-2 8-inch and 10-inch models further enhance usability and versatility. Their compact design makes them easy to handle and maneuver, perfect for those working in confined spaces. The 10-inch model, while still compact, offers additional cutting power without sacrificing precision. Both models include adjustable cutting settings, allowing users to tailor their approach according to their specific project requirements.

All models feature a quick-release blade mechanism, enabling easy blade changes and maintenance, which further enhances their user-friendliness. Additionally, safety features such as blade guards and trigger locks contribute to a safer cutting experience.

With their combination of power, precision, and user-centric features, the Remington EL-7 and LNT series provide reliable tools suitable for a wide range of applications, from professional woodworking to DIY projects, emphasizing the importance of quality and innovation in the tools you choose. Whether for heavy-duty cutting tasks or intricate detailed work, these models deliver performance and precision, making them essential tools for any toolkit.