OPERATION

TO COMPOUND MITER CUT

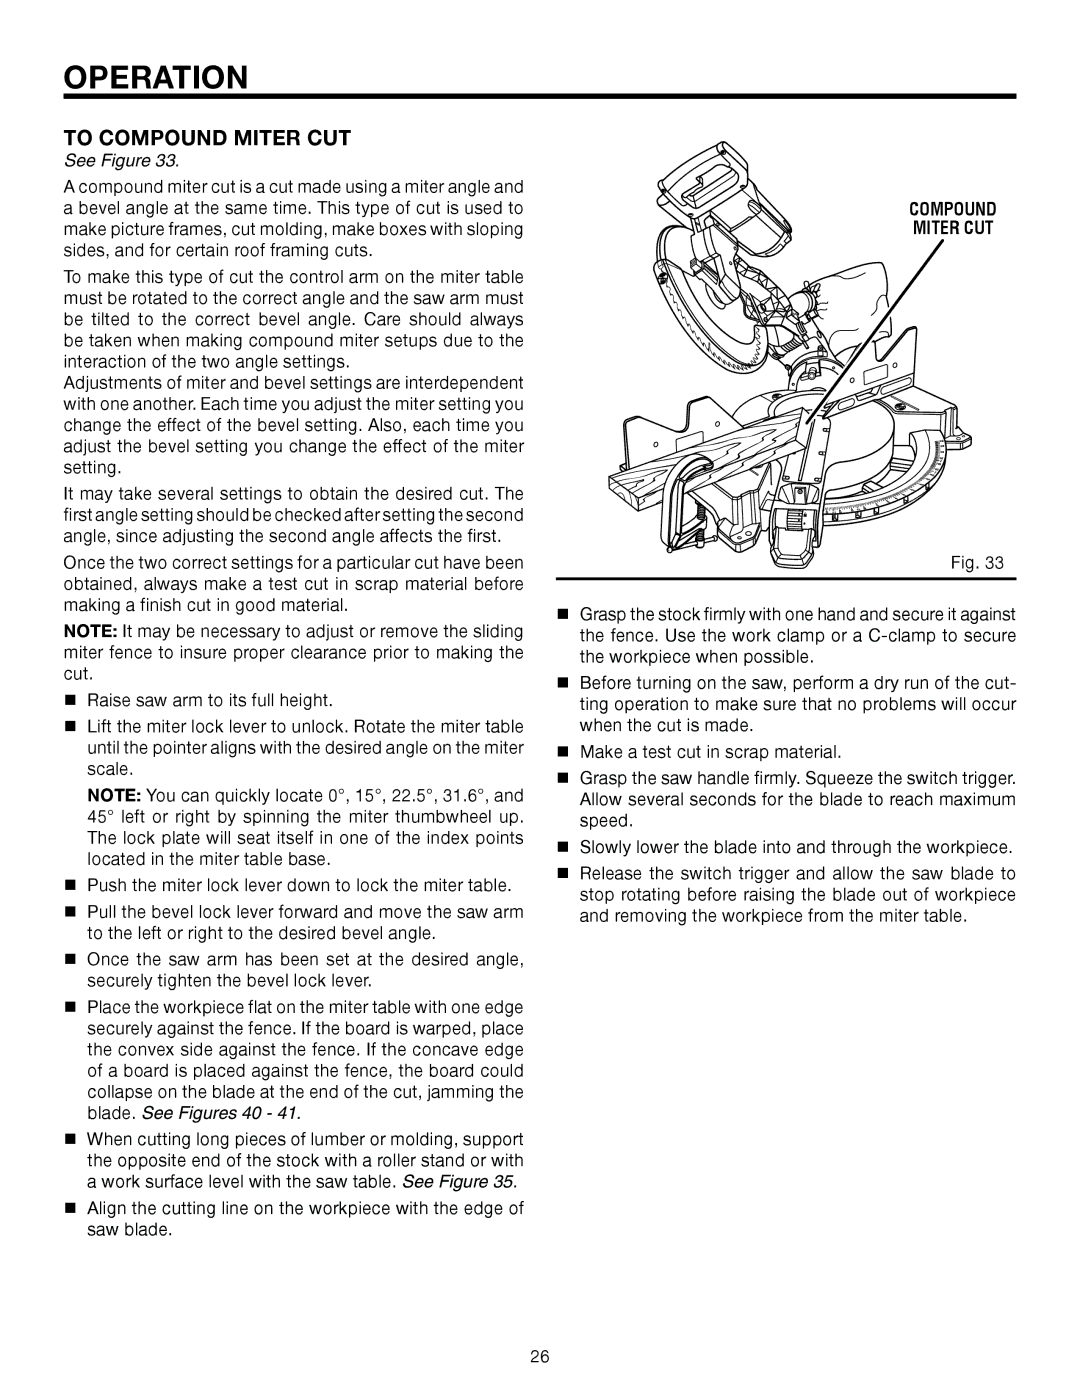
See Figure 33.

A compound miter cut is a cut made using a miter angle and a bevel angle at the same time. This type of cut is used to make picture frames, cut molding, make boxes with sloping sides, and for certain roof framing cuts.

To make this type of cut the control arm on the miter table must be rotated to the correct angle and the saw arm must be tilted to the correct bevel angle. Care should always be taken when making compound miter setups due to the interaction of the two angle settings.

Adjustments of miter and bevel settings are interdependent with one another. Each time you adjust the miter setting you change the effect of the bevel setting. Also, each time you adjust the bevel setting you change the effect of the miter setting.

It may take several settings to obtain the desired cut. The first angle setting should be checked after setting the second angle, since adjusting the second angle affects the first.

Once the two correct settings for a particular cut have been obtained, always make a test cut in scrap material before making a finish cut in good material.

NOTE: It may be necessary to adjust or remove the sliding miter fence to insure proper clearance prior to making the cut.

Raise saw arm to its full height.

Lift the miter lock lever to unlock. Rotate the miter table until the pointer aligns with the desired angle on the miter scale.

NOTE: You can quickly locate 0°, 15°, 22.5°, 31.6°, and 45° left or right by spinning the miter thumbwheel up. The lock plate will seat itself in one of the index points located in the miter table base.

Push the miter lock lever down to lock the miter table.

Pull the bevel lock lever forward and move the saw arm to the left or right to the desired bevel angle.

Once the saw arm has been set at the desired angle, securely tighten the bevel lock lever.

Place the workpiece flat on the miter table with one edge securely against the fence. If the board is warped, place the convex side against the fence. If the concave edge of a board is placed against the fence, the board could collapse on the blade at the end of the cut, jamming the blade. See Figures 40 - 41.

When cutting long pieces of lumber or molding, support the opposite end of the stock with a roller stand or with a work surface level with the saw table. See Figure 35.

Align the cutting line on the workpiece with the edge of saw blade.

COMPOUND

MITER CUT

Fig. 33

Grasp the stock firmly with one hand and secure it against the fence. Use the work clamp or a C-clamp to secure the workpiece when possible.

Before turning on the saw, perform a dry run of the cut- ting operation to make sure that no problems will occur when the cut is made.

Make a test cut in scrap material.

Grasp the saw handle firmly. Squeeze the switch trigger. Allow several seconds for the blade to reach maximum speed.

Slowly lower the blade into and through the workpiece.

Release the switch trigger and allow the saw blade to stop rotating before raising the blade out of workpiece and removing the workpiece from the miter table.

26

Page 26
Image 26
RIDGID R4121 manual To Compound Miter CUT

R4121 specifications

The RIDGID R4121 is a powerful and versatile table saw that has made a significant impact in the woodworking and construction industries. This innovative tool is designed to meet the needs of both professional contractors and DIY enthusiasts, offering a blend of performance, precision, and portability.

One of the standout features of the R4121 is its robust 15-amp motor, which provides ample power to handle a wide range of cutting tasks. This motor delivers a no-load speed of 5,000 RPM, allowing users to rip through hardwoods, softwoods, and composite materials with ease. The saw's 10-inch blade gives users the ability to make clean, straight cuts, while the adjustable blade height and angle settings enable bevel cuts and varied depths for more complex woodworking projects.

Portability is a key characteristic of the RIDGID R4121. With its compact design and lightweight construction, it can be easily transported to job sites or moved around the workshop. The saw features a sturdy folding stand that can be set up quickly, providing stability while saving valuable space when not in use. This makes it an ideal choice for those who need a dependable table saw that doesn’t sacrifice performance for portability.

In terms of safety, the R4121 is equipped with an array of features designed to protect users during operation. It includes a blade guard for added protection, an anti-kickback pawl for preventing kickbacks, and an emergency stop switch for quick shutdown in case of an unexpected emergency. These safety features enhance user confidence, making it a smart choice for both novice and experienced woodworkers.

The Ridgid R4121 also incorporates advanced technologies to enhance usability and precision. The rack and pinion fence system ensures accurate and consistent cuts, allowing users to make easy adjustments for various workpieces. Additionally, the miter gauge included with the saw provides added versatility for cross-cutting and angled cuts, making it suitable for a diverse array of projects.

Overall, the RIDGID R4121 is a well-rounded table saw that excels in performance, safety, and convenience. Whether you’re tackling home improvement tasks or working on larger construction projects, this tool is designed to deliver reliability and professional-grade results, making it a valuable addition to any workshop. With its combination of power, portability, and precision, the R4121 is poised to become a favorite among users who demand quality and performance in their woodworking tools.