PATA 2.5 Hard Drive Enclosure
Boîtier pour disque dur PATA de 2,5 po (6,35 cm)
Caja para disco duro PATA de 2.5"
Package contents
• | • | Carrying case | |
• | • | Screws (4) | |
• CD that contains Roxio BackOnTrack | • | Screwdriver | |
| backup software and User Guide | • | Quick Setup Guide |
System requirements
One USB port
Windows® 7, Windows Vista®, Windows® XP, or Mac OS 10.2.0 or higher.
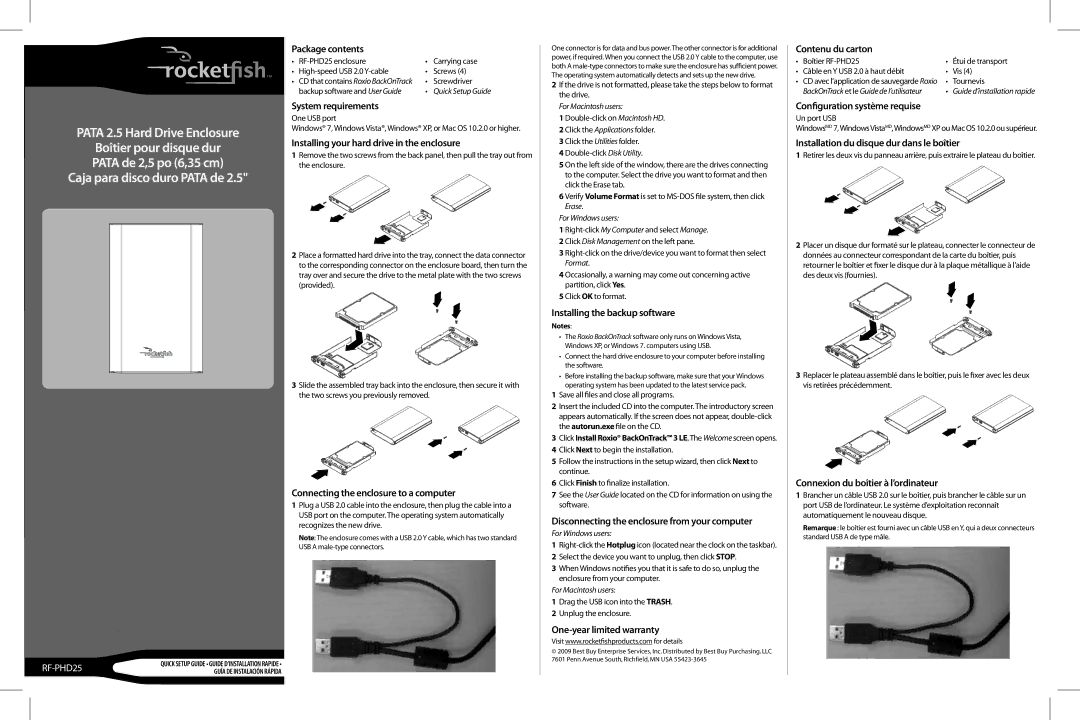
Installing your hard drive in the enclosure
1Remove the two screws from the back panel, then pull the tray out from the enclosure.
2Place a formatted hard drive into the tray, connect the data connector to the corresponding connector on the enclosure board, then turn the tray over and secure the drive to the metal plate with the two screws (provided).
3Slide the assembled tray back into the enclosure, then secure it with the two screws you previously removed.
One connector is for data and bus power. The other connector is for additional power, if required. When you connect the USB 2.0 Y cable to the computer, use both A
2If the drive is not formatted, please take the steps below to format the drive.
For Macintosh users:
1
2 Click the Applications folder.
3 Click the Utilities folder.
4
5 On the left side of the window, there are the drives connecting to the computer. Select the drive you want to format and then click the Erase tab.
6 Verify Volume Format is set to
For Windows users:
1
2 Click Disk Management on the left pane.
3
4 Occasionally, a warning may come out concerning active partition, click Yes.
5 Click OK to format.
Installing the backup software
Notes:
•The Roxio BackOnTrack software only runs on Windows Vista, Windows XP, or Windows 7. computers using USB.
•Connect the hard drive enclosure to your computer before installing the software.
•Before installing the backup software, make sure that your Windows operating system has been updated to the latest service pack.
1 | Save all files and close all programs. |
2 | Insert the included CD into the computer. The introductory screen |
| appears automatically. If the screen does not appear, |
| the autorun.exe file on the CD. |
3 | Click Install Roxio® BackOnTrack™ 3 LE. The Welcome screen opens. |
4 | Click Next to begin the installation. |
5 | Follow the instructions in the setup wizard, then click Next to |
| continue. |
6 | Click Finish to finalize installation. |
Contenu du carton
• | Boîtier | • | Étui de transport |
• Câble en Y USB 2.0 à haut débit | • | Vis (4) | |
• | CD avec l’application de sauvegarde Roxio | • | Tournevis |
| BackOnTrack et le Guide de l’utilisateur | • | Guide d’installation rapide |
Configuration système requise
Un port USB
WindowsMD 7,WindowsVistaMD,WindowsMD XP ou Mac OS 10.2.0 ou supérieur.
Installation du disque dur dans le boîtier
1Retirer les deux vis du panneau arrière, puis extraire le plateau du boîtier.
2Placer un disque dur formaté sur le plateau, connecter le connecteur de données au connecteur correspondant de la carte du boîtier, puis retourner le boîtier et fixer le disque dur à la plaque métallique à l’aide des deux vis (fournies).
3Replacer le plateau assemblé dans le boîtier, puis le fixer avec les deux vis retirées précédemment.
Connexion du boîtier à l’ordinateur
Connecting the enclosure to a computer
1 Plug a USB 2.0 cable into the enclosure, then plug the cable into a USB port on the computer. The operating system automatically recognizes the new drive.
Note: The enclosure comes with a USB 2.0 Y cable, which has two standard
USB A
| QUICK SETUP GUIDE • GUIDE D’INSTALLATION RAPIDE • |
GUÍA DE INSTALACIÓN RÁPIDA |
7 See the User Guide located on the CD for information on using the |
software. |
Disconnecting the enclosure from your computer
For Windows users:
1
2Select the device you want to unplug, then click STOP.
3When Windows notifies you that it is safe to do so, unplug the enclosure from your computer.
For Macintosh users:
1Drag the USB icon into the TRASH.
2Unplug the enclosure.
One-year limited warranty
Visit www.rocketfishproducts.com for details
© 2009 Best Buy Enterprise Services, Inc. Distributed by Best Buy Purchasing, LLC 7601 Penn Avenue South, Richfield, MN USA
1Brancher un câble USB 2.0 sur le boîtier, puis brancher le câble sur un port USB de l’ordinateur. Le système d’exploitation reconnaît automatiquement le nouveau disque.
Remarque : le boîtier est fourni avec un câble USB en Y, qui a deux connecteurs standard USB A de type mâle.