INSTALLATION

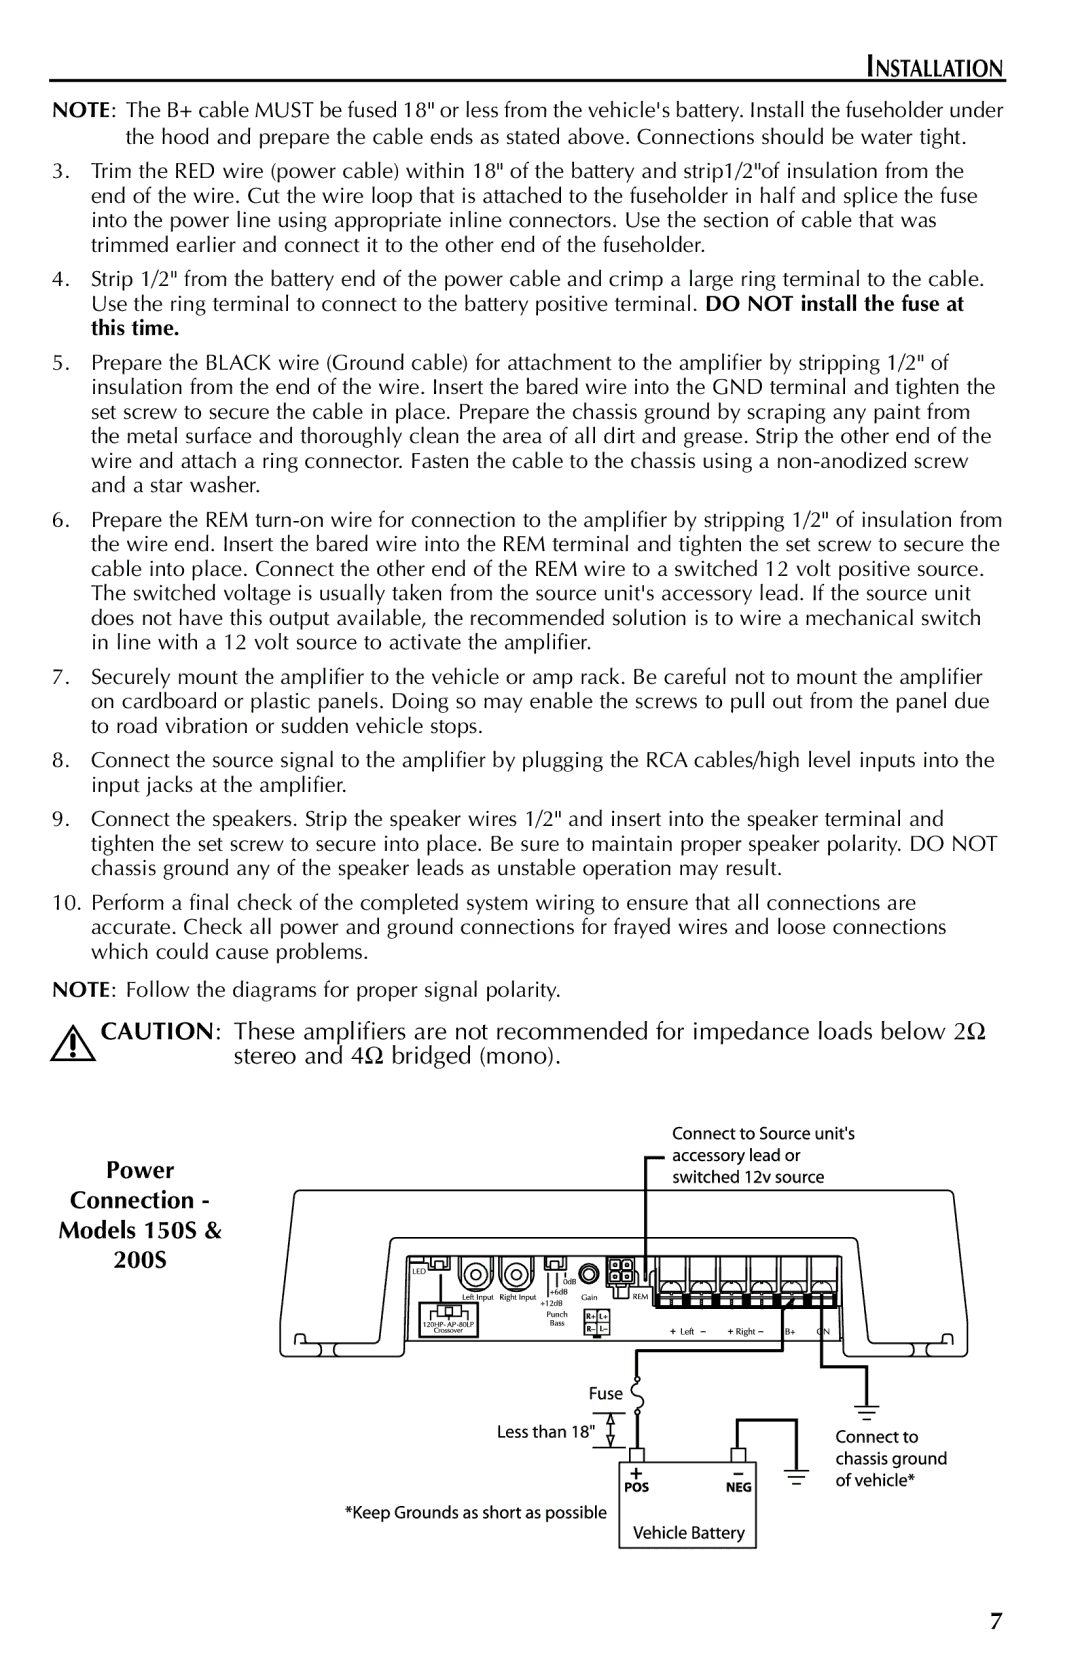
NOTE: The B+ cable MUST be fused 18" or less from the vehicle's battery. Install the fuseholder under the hood and prepare the cable ends as stated above. Connections should be water tight.

3.Trim the RED wire (power cable) within 18" of the battery and strip1/2"of insulation from the end of the wire. Cut the wire loop that is attached to the fuseholder in half and splice the fuse into the power line using appropriate inline connectors. Use the section of cable that was trimmed earlier and connect it to the other end of the fuseholder.

4.Strip 1/2" from the battery end of the power cable and crimp a large ring terminal to the cable. Use the ring terminal to connect to the battery positive terminal. DO NOT install the fuse at this time.

5.Prepare the BLACK wire (Ground cable) for attachment to the amplifier by stripping 1/2" of insulation from the end of the wire. Insert the bared wire into the GND terminal and tighten the set screw to secure the cable in place. Prepare the chassis ground by scraping any paint from the metal surface and thoroughly clean the area of all dirt and grease. Strip the other end of the wire and attach a ring connector. Fasten the cable to the chassis using a non-anodized screw and a star washer.

6.Prepare the REM turn-on wire for connection to the amplifier by stripping 1/2" of insulation from the wire end. Insert the bared wire into the REM terminal and tighten the set screw to secure the cable into place. Connect the other end of the REM wire to a switched 12 volt positive source.

The switched voltage is usually taken from the source unit's accessory lead. If the source unit does not have this output available, the recommended solution is to wire a mechanical switch in line with a 12 volt source to activate the amplifier.

7.Securely mount the amplifier to the vehicle or amp rack. Be careful not to mount the amplifier on cardboard or plastic panels. Doing so may enable the screws to pull out from the panel due to road vibration or sudden vehicle stops.

8.Connect the source signal to the amplifier by plugging the RCA cables/high level inputs into the input jacks at the amplifier.

9.Connect the speakers. Strip the speaker wires 1/2" and insert into the speaker terminal and tighten the set screw to secure into place. Be sure to maintain proper speaker polarity. DO NOT chassis ground any of the speaker leads as unstable operation may result.

10.Perform a final check of the completed system wiring to ensure that all connections are accurate. Check all power and ground connections for frayed wires and loose connections which could cause problems.

NOTE: Follow the diagrams for proper signal polarity.

!

CAUTION: These amplifiers are not recommended for impedance loads below 2


stereo and 4 bridged (mono).

Power

Connection -

Models 150S &

200S

7

Page 7
Image 7
Rockford Fosgate 500S, 700S, 400S, 300S manual Power Connection Models 150S 200S

400S, 700S, 200S, 300S, 150S specifications

Rockford Fosgate is a renowned brand in the audio industry, particularly known for producing high-performance amplifiers designed for car audio enthusiasts. Among their impressive lineup, the Rockford Fosgate 500S, 150S, 300S, 200S, and 700S stand out for their exceptional sound quality, technological advancements, and robust construction.

The Rockford Fosgate 500S is a powerful amplifier designed to deliver 500 watts RMS in a compact format, catering to those who demand high fidelity in a smaller package. It features a Class D topology, which significantly increases efficiency while maintaining excellent sound clarity. The 500S also incorporates an adjustable crossover and a bass boost feature, allowing users to tailor the audio output to their preferences.

Next, the Rockford Fosgate 150S is a versatile 2-channel amplifier that produces 150 watts RMS. Its compact design makes it an ideal choice for smaller vehicle audio systems or as an addition to an existing setup. Built with high-grade components, the 150S ensures durable performance under pressure and is equipped with a variable low-pass crossover, which enables precise control over the frequency range.

The 300S model delivers 300 watts RMS and is designed for those seeking balance between power and clarity. It features a rugged construction, ensuring longevity, while the smart circuitry protects against overheating, short circuits, and other potential issues. Its custom-tuned enclosure further enhances audio fidelity, providing a seamless listening experience.

The Rockford Fosgate 200S is yet another impressive amplifier, offering 200 watts RMS. It combines excellent power output with a user-friendly interface. The amplifier includes a variable high-pass and low-pass crossover, enabling combinations for various speaker configurations, while its compact size allows easy installation in tight spaces.

Lastly, the 700S amplifier reigns supreme with its 700 watts RMS output, making it a powerhouse for audiophiles seeking the ultimate sound experience. Its advanced thermal management system ensures optimal performance even during extended playback. The 700S supports multiple input formats and is compatible with a range of speakers, solidifying its versatility.

Each of these Rockford Fosgate amplifiers is designed with durability, efficiency, and sound quality in mind. Their advanced technologies and user-friendly features make them ideal for any audio enthusiast looking to elevate their vehicle's sound system. With Rockford Fosgate, users can expect not only powerful amplification but also clarity and precision, ensuring an immersive auditory experience.