READ CAREFULLY BEFORE USING AND THEN KEEP IN A SAFE PLACE
ENGLISH
You have just purchased a fan heater, ideal for quickly heating the different rooms in your house. This highly compact appliance can be easily stored or moved around from one room to another for your comfort.
WARNINGS : It is essential that you read these instructions carefully and comply with the following recommendations.
This appliance complies with European directives 73/23/EEC and 89/336/EEC.
Before using, always check the condition of the appliance, the power socket and the power lead.
Do not pull on the power cable or the appliance, even to unplug it from the wall socket.
Fully unwind the lead each time before use.
If the appliance is fixed to the wall, the socket must be acces sible. Do not place the appliance just below a power socket.
Never insert objects into the appliance (e.g. needles...).
When in use, this appliance must be kept out of the reach of young children and animals.
Do not use your appliance in a dusty room or a room where there is a risk of fire.
This appliance is intended for domestic use only. It must therefore not be used in industrial applications.
The warranty will be void in the event of damage arising from impro- per use.
If the power cable is damaged, it must be replaced by the manufactu- rer, its
VERY IMPORTANT :
NEVER COVER THE APPLIANCE, even temporarily, as there is a danger of overheating.
Keep the appliance 30 cm away from any objects (curtains, walls, aerosols, etc.)
NEVER USE IT TILTED OR LYING ON ITS SIDE. This appliance must not used in damp places.
Do not use the appliance near a bath, shower, sink or
NEVER ALLOW WATER TO PENETRATE THE APPLIANCE. Do not touch the appliance with wet hands.
In the event of a long absence: turn the button (A) to the initial setting ( ![]() mod.HA 325 - HA 340) and unplug the appliance.
mod.HA 325 - HA 340) and unplug the appliance.
1 - VOLTAGE
Before using the appliance for the first time, ensure that your mains voltage corresponds to the voltage indicated on the appliance.
Your appliance can be used with a power plug without an earth connection. It is a class II appliance (dual electrical insulation ![]() ).
).
3 - OPERATION
Starting up the appliance and choosing the operating mode: ![]()
This setting enables you to automatically maintain the temperature above 0°C in a nor- mally insulated room, whose volume corresponds to the power of your appliance.
To do this, plug in your appliance and turn button (A) so that the “ “ symbol is placed opposite indicator (B).
Heating light. (mod. HA 340 - HA 350 - HA 390 - HA 395)
This light (D) only comes on when your appliance is in heating mode.
Mod. HA 325 - HA 340
As soon as your appliance is connected to the mains, it delivers power of 2000 W. (mod. HA 325) or 2400 W (mod. HA 340). Adjust the temperature setting, according to your own comfort, by turning button (A) (fig. 1):
Setting 9: opposite mark (B) = warmer Setting 1: opposite mark (B) = cooler.
Mod. HA 335 - HA 350 - HA 390 - HA 395.
Your appliance has 3 operating modes. Simply position the symbol corresponding to the chosen mode opposite mark (B) on the housing (fig. 2).
Cold ventilation setting :
This setting enables you to use your fan heater as a fan in summer.
Power selection:
ECO• position : this position constantly delivers power of 1000 W (mod. HA 335) or 1200 W (mod. HA 350 - HA 390 - HA 395).
•• | position : this position constantly delivers power of 2000 W |
(mod. HA 335) or 2400 W (mod. HA 350 - HA 390 - HA 395).
It enables you to heat a room quickly and then maintain the required temperature by
positioning button (A) to a setting between symbols “ ” (max. heating) and “ “ (frost- | |
free setting). | •• |
| |
4 - INSTALLATION ON WALL
Your appliance can be bolted to the wall. It must be positioned vertically, respecting the minimum distances (fig. 3).
To bolt your appliance to the wall, use 3 appropriate screws and 3
Drill a hole in the wall at the required height, insert a
Hang your appliance on the wall and lock it in a vertical position using the holes (G) located on the appliance stand.
5 - CLEANING
Your appliance must be unplugged before proceeding with any cleaning work. You can clean it with a slightly damp cloth.
Important : never use abrasive products which might damage the appearance of your appliance.
We recommend that you clean the air inlet and outlet grills at least once a year ; (clean with a vacuum cleaner if necessary).
6 - STORAGE
When storing your appliance you can roll the cord up and put it away in the storage com- partment (I) (mod. HA 390 - HA 395).
It is important to allow the appliance to cool before winding the lead. When you are not using your appliance, store it in a dry place.
2 - SAFETY
Heat safety
In the event of abnormal overheating, a safety device automatically cuts out the appliance. Before ![]() (mod. HA 325 - HA 340) then unplug the power plug and wait for the temperature of the appliance to return to normal (approximately 15 min).
(mod. HA 325 - HA 340) then unplug the power plug and wait for the temperature of the appliance to return to normal (approximately 15 min).
Protect Signal: safety beep (mod. HA 395 only)
Your appliance is fitted with an exclusive audible safety system. If your appliance is not working properly, creating a potential risk (appliance covered, tipping over, grill clogged up, partially or comple- tely blocked), a safety device automatically cuts it out.
An exclusive electronic system starts up and issues a beep, to warn you that the appliance is overheating.
To stop the beep and restart your appliance, you must:
–turn the button (A) to the setting
–unplug the power plug,
–eliminate the cause of overheating,
–then wait for the temperature to return to normal (approximately 15 min).
If your appliance starts beeping again, please consult the paragraph entitled “IN THE EVENT OF PROBLEMS”, at the end of this instruc- tion booklet.
7 - IN THE EVENT OF PROBLEMS
Never dismantle your appliance yourself. A poorly repaired appliance may be dangerous for the user.
Before contacting one of our Approved Service Centres (see enclosed list), ensure that:
–the appliance is set to normal operating mode;
–the air inlet and outlet grills are totally clear.
WIRING INSTRUCTIONS - FOR U.K. ONLY.
SAFETY NOTES - FOR REWIREABLE OR HOULDED PLUG.
The mains lead of this appliance may be already fitted with a BS 1363 13 A plug.
Should the fuse need to be replaced, a 13 A ASTA approved BS 1362 fuse must be used.
If your socket outlet is not suitable for the plug, then the plug must be removed (cut off if it is a moul- ded on plug) and a appropriate one fitted. Warning : dispose of a plug that has been cut from the power supply cord, as such a plug is hazardous if inserted in a live 13 A socket outlet elsewhere in the house.
Always replace the fuse cover after fitting a fuse. The plug must NOT be used if the cover is omitted or lost until a replacement is obtained - make certain that only the correct fuse cover is used and fitted.
For plugs with a detachable fuse cover the replacement must be thesame as the colour insert in the base of the plug, or as directly by the embossed wording on the base of the plug.
If the detachable fuse cover is lost, a replacement may be purchased from Rowenta Service Centre (see enclosed Service Information leaflet). Information for supply may also be obtained from the plug manufacturer.
U.K. ONLY - FITTING A PLUG.
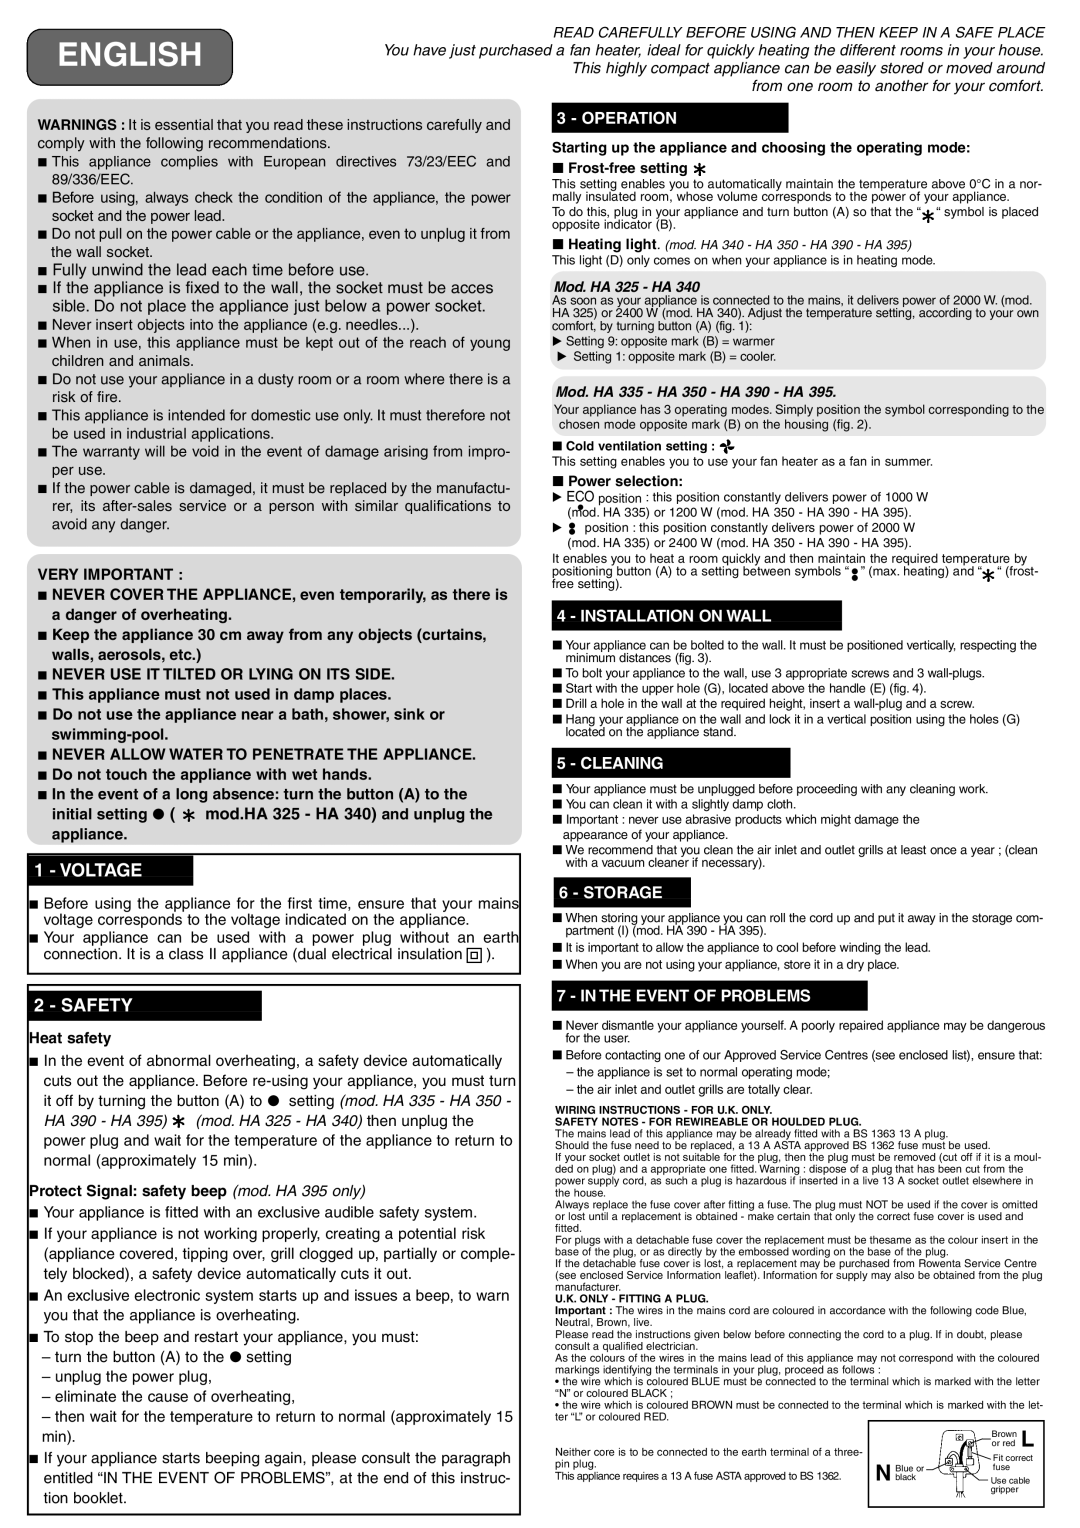
Important : The wires in the mains cord are coloured in accordance with the following code Blue, Neutral, Brown, live.
Please read the instructions given below before connecting the cord to a plug. If in doubt, please consult a qualified electrician.
As the colours of the wires in the mains lead of this appliance may not correspond with the coloured markings identifying the terminals in your plug, proceed as follows :
•the wire which is coloured BLUE must be connected to the terminal which is marked with the letter “N” or coloured BLACK ;
•the wire which is coloured BROWN must be connected to the terminal which is marked with the let- ter “L” or coloured RED.
|
|
|
|
|
| Brown | L |
Neither core is to be connected to the earth terminal of a three- |
|
|
|
|
| or red | |
|
|
|
|
| Fit correct | ||
pin plug. |
|
|
|
|
| ||
N |
| Blue or |
|
| fuse |
| |
This appliance requires a 13 A fuse ASTA approved to BS 1362. |
|
|
|
| |||
| black |
|
| Use cable | |||
|
|
|
|
|
| gripper |
|
|
|
|
|
|
|
| |
|
|
|
|
|
|
|
|