ASSEMBLY

ASSEMBLING THE ROUTER TABLE

Assembling the router table involves attaching the switch box, the under table guards, the legs, the router/insert plate as- sembly, the fence assembly, featherboard, throat plate, starting pin, and installing the miter gauge to the router table.

ATTACHING THE SWITCH BOX

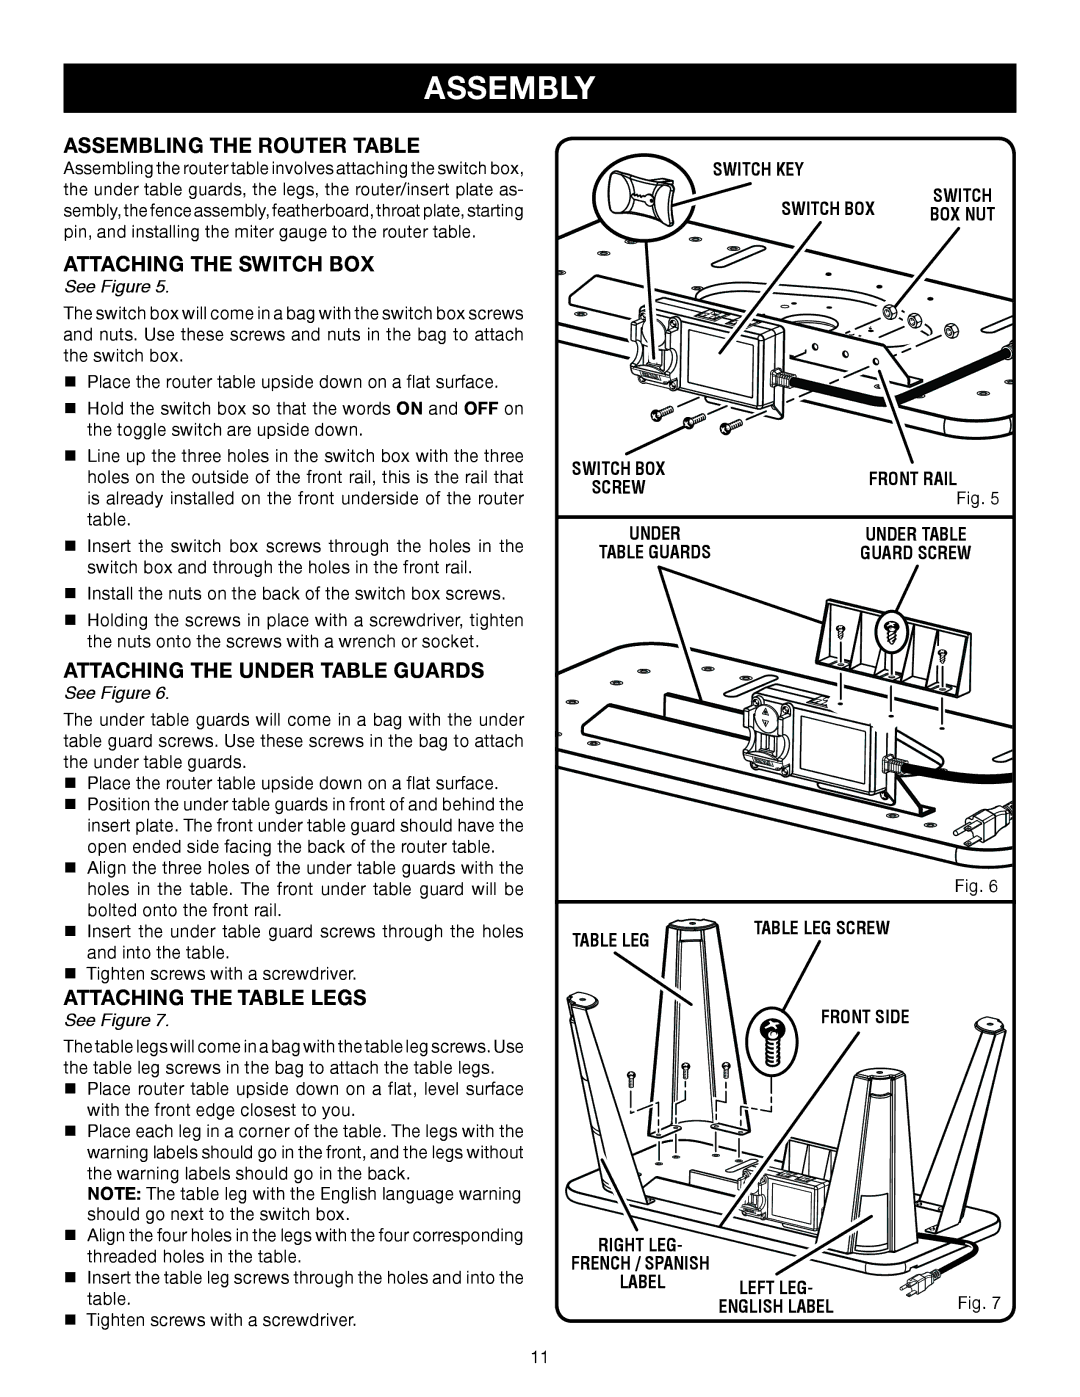
See Figure 5.

The switch box will come in a bag with the switch box screws and nuts. Use these screws and nuts in the bag to attach the switch box.

Place the router table upside down on a flat surface.

Hold the switch box so that the words ON and OFF on the toggle switch are upside down.

Line up the three holes in the switch box with the three holes on the outside of the front rail, this is the rail that is already installed on the front underside of the router table.

Insert the switch box screws through the holes in the switch box and through the holes in the front rail.

Install the nuts on the back of the switch box screws.

Holding the screws in place with a screwdriver, tighten the nuts onto the screws with a wrench or socket.

ATTACHING THE UNDER TABLE GUARDS

See Figure 6.

The under table guards will come in a bag with the under table guard screws. Use these screws in the bag to attach the under table guards.

Place the router table upside down on a flat surface.

Position the under table guards in front of and behind the insert plate. The front under table guard should have the open ended side facing the back of the router table.

Align the three holes of the under table guards with the holes in the table. The front under table guard will be bolted onto the front rail.

Insert the under table guard screws through the holes and into the table.

Tighten screws with a screwdriver.

ATTACHING THE TABLE LEGS

See Figure 7.

The table legs will come in a bag with the table leg screws. Use the table leg screws in the bag to attach the table legs.

Place router table upside down on a flat, level surface with the front edge closest to you.

Place each leg in a corner of the table. The legs with the warning labels should go in the front, and the legs without the warning labels should go in the back.

NOTE: The table leg with the English language warning should go next to the switch box.

Align the four holes in the legs with the four corresponding threaded holes in the table.

Insert the table leg screws through the holes and into the table.

Tighten screws with a screwdriver.

SWITCH KEY


SWITCH BOX

SWITCH

BOX NUT


SWITCH BOX

FRONT RAIL

SCREW

Fig. 5


UNDER

UNDER TABLE

TABLE GUARDS

GUARD SCREW

Fig. 6

TABLE LEG

TABLE LEG SCREW


FRONT SIDE

RIGHT LEG-


FRENCH / SPANISH


LABEL

LEFT LEG-

Fig. 7


ENGLISH LABEL

11

Page 11
Image 11
Ryobi A25RT02 manual Assembling the Router Table, Attaching the Switch BOX, Attaching the Under Table Guards

A25RT02 specifications

The Ryobi A25RT02 is a versatile and robust tool designed for both home improvement enthusiasts and professional contractors. This innovative product features a powerful motor that enhances its performance across a range of applications, making it an essential addition to any toolbox.

One of the standout features of the A25RT02 is its lightweight and ergonomic design. Weighing in at just a few pounds, this tool is easy to handle and reduces user fatigue during prolonged use. The rubber overmolded grip provides comfort and stability, allowing for precise control whether you're working on delicate projects or heavy-duty tasks.

The A25RT02 is equipped with advanced technology that enables quick adjustments and versatility. Its adjustable cutting depth and width make it suitable for various materials, ensuring that users can achieve the desired finish with ease. The tool also features a variable speed control that allows for customization based on the application, providing better results whether you're cutting, sanding, or shaping.

Another remarkable characteristic of the A25RT02 is its compatibility with Ryobi's extensive line of ONE+ batteries, which offers greater convenience and portability. This means users can easily switch between different Ryobi tools without the hassle of changing batteries or being tethered to a power outlet. The battery life is impressive, allowing users to complete tasks without frequent interruptions for recharging.

Safety is a key consideration in the design of the A25RT02. It comes with built-in safety features such as a blade guard and a safety switch to prevent accidental activation. These features contribute to a safer working environment, particularly when working on complex or intricate projects.

Durability is another hallmark of the Ryobi A25RT02. Constructed with high-grade materials, this tool is built to withstand the rigors of daily use, ensuring longevity and reliability. The easy-to-replace parts further extend its usability, making repairs straightforward without the need for specialized tools.

In summary, the Ryobi A25RT02 is a cutting-edge tool that combines power, versatility, and safety in a user-friendly package. Its lightweight design, compatibility with the Ryobi ONE+ battery system, advanced speed settings, and robust safety features make it an ideal choice for anyone looking to enhance their craftsmanship. Whether you're a hobbyist or a professional, the A25RT02 is sure to meet your creative and practical needs.